
Ping Integration Kit for BlueBoat Installation Guide
The Ping Integration Kit makes it easy to mount the Ping Echosounder to your BlueBoat for hydrographic surveys.

This guide will show you how to install it on the BlueBoat.
Parts and Tools
You Will Need
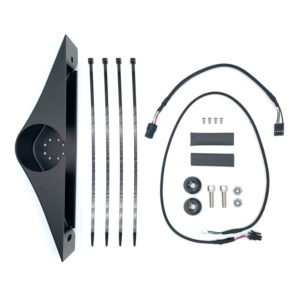
The integration kit includes all the hardware needed to mount the Ping. You will also need the following tools that are not included in the kit:
- M10 Bulkhead Wrench or 16 mm wrench
- M14 Bulkhead Wrench or 20 mm wrench
- 2 mm hex key
- 2.5 mm hex key (for hatch lid cable routing)
- 4 mm hex key (for under fairing cable routing)
- 5 mm hex key
- Silicone grease (Molykote 111)
- Heat gun or other heat source
Installation
The Ping cable can be routed under the fairing through the rear of the BlueBoat or through the top of the hatch lid. We prefer routing the cable under the fairing, as it preserves the ability to fully disconnect the hatch lid assembly from the BlueBoat. Feel free to select the cable routing method that works best for your setup.
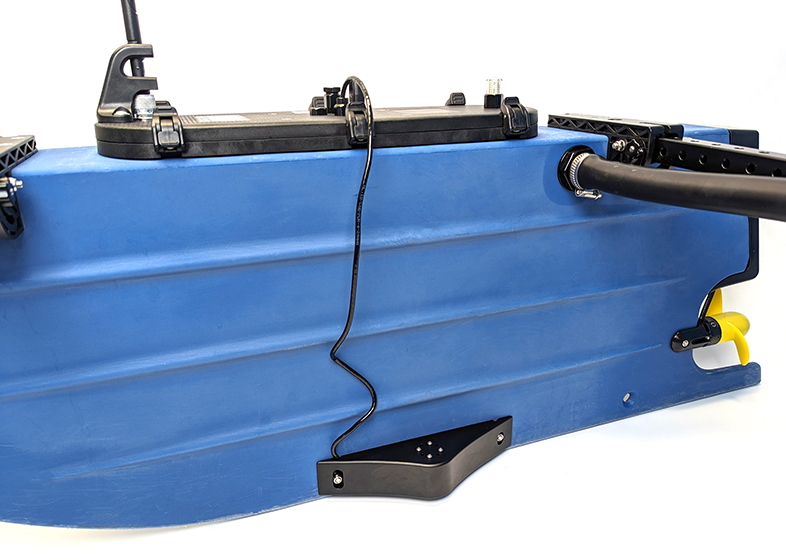
Ping cable routed under the fairing.
Ping cable routed through the hatch lid.
To route the cable under the fairing, follow the instructions in the following section. To route the cable through the hatch lid, skip to the Through Hatch Lid Cable Routing section.
Under Fairing Cable Routing
Installing the Ping Bulkhead Penetrator
You will need:
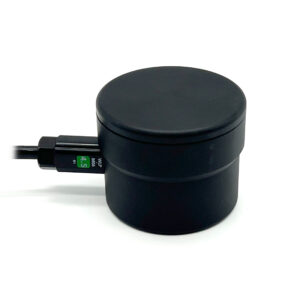
- Ping with included O-ring
- 1 x 4-position female header pin to Micro-Fit connector extension cable (from integration kit)
- 1 x Piece of heat shrink (from integration kit)
- M10 Bulkhead Wrench or 16 mm wrench
- M14 Bulkhead Wrench or 20 mm wrench
- 4 mm hex key
- Heat gun or other heat source
- Silicone grease (Molykote 111)
1. Remove the starboard hatch lid assembly from the BlueBoat by disconnecting all the cables and set it to the side.
2. Use the 4 mm hex key to remove the starboard side hull fairing screws and remove the fairing from the hull.
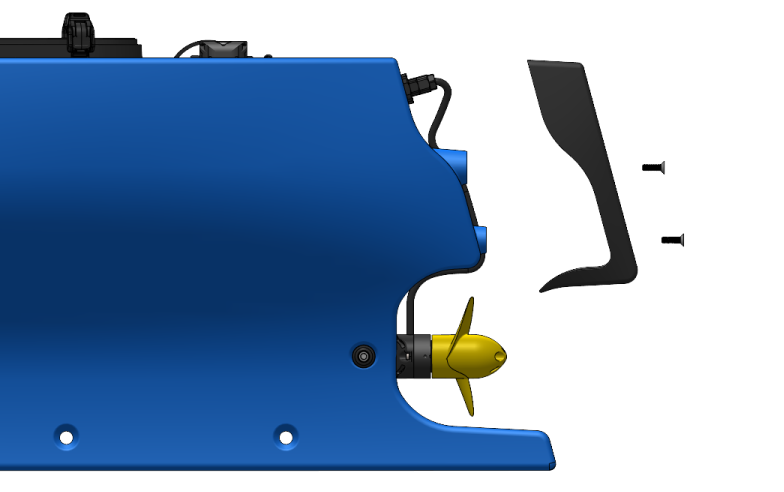
3. Use the M14 Bulkhead Wrench (or 20 mm wrench) to loosen the C-nut holding the M14 adapter penetrator inside the hull and remove it from the hull. Make sure not to lose the O-ring that sits under this penetrator.
4. Use the M10 Bulkhead Wrench (or 16 mm wrench) to remove the M10 penetrator blank from the M14 adapter penetrator.
5. Apply a thin, even layer of silicone grease (Molykote 111) to the Ping O-ring and install it in the groove on the underside of its penetrator.
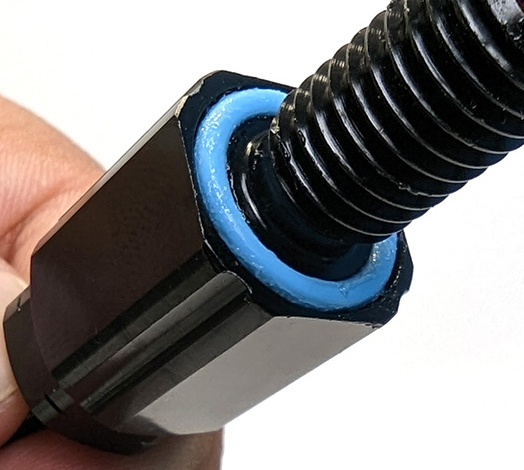
6. Install the Ping penetrator into the M14 adapter.
7. Place the piece of heat shrink over the extension cable then connect the extension cable to the Ping header pins. Match the wire colors: red to red, green to green, white to white, and black to black.
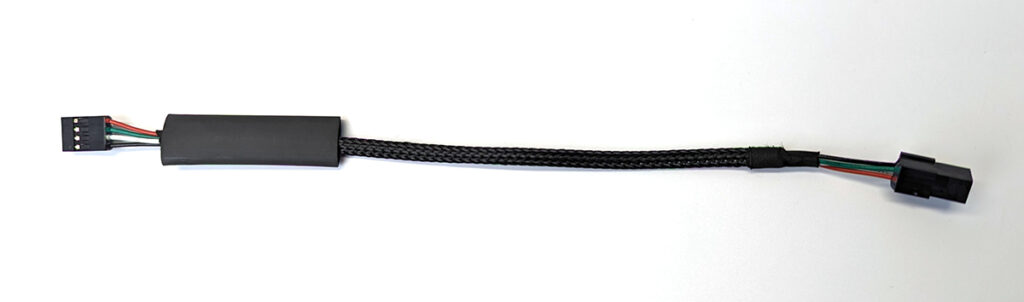
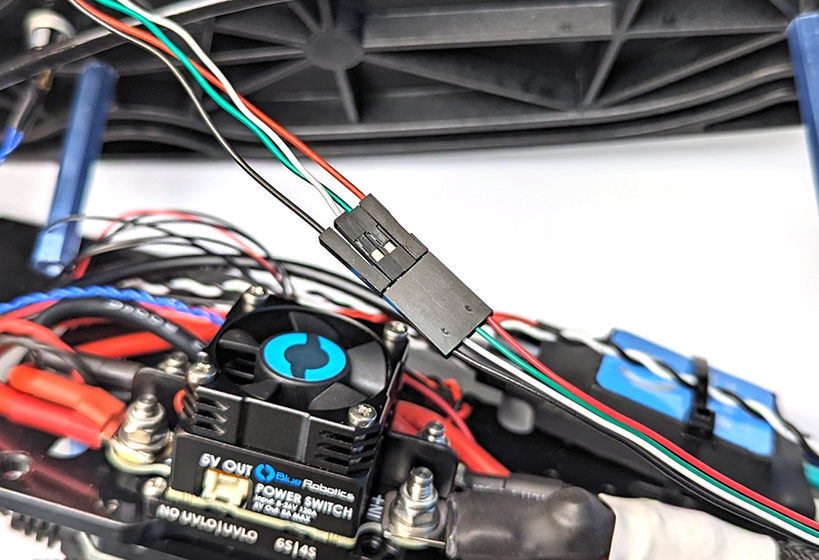
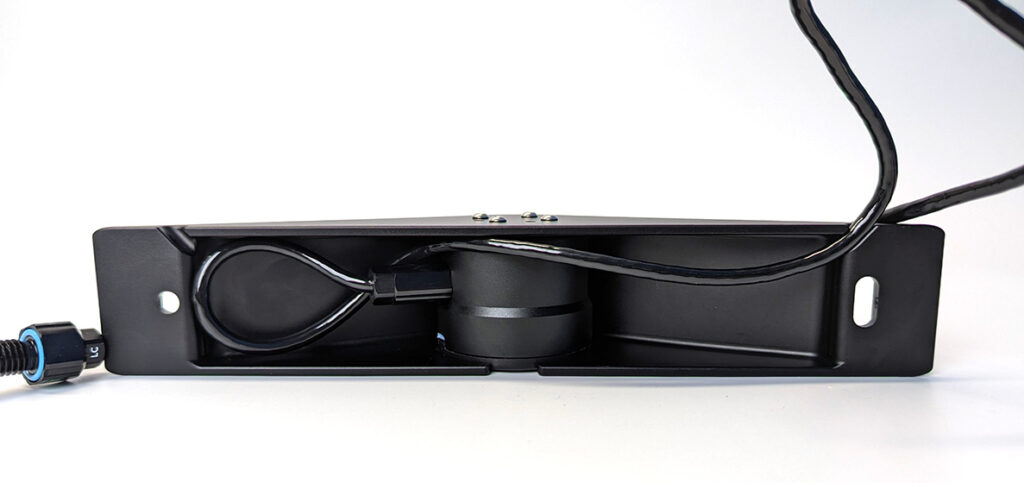
8. Center the heat shrink over the header pin connection then use a heat gun or other heat source to shrink the heat shrink and secure the connection. The additional piece of heat shrink in the kit is included as a spare. At the end of these steps you should end up with a Ping with extension cable that looks like this:
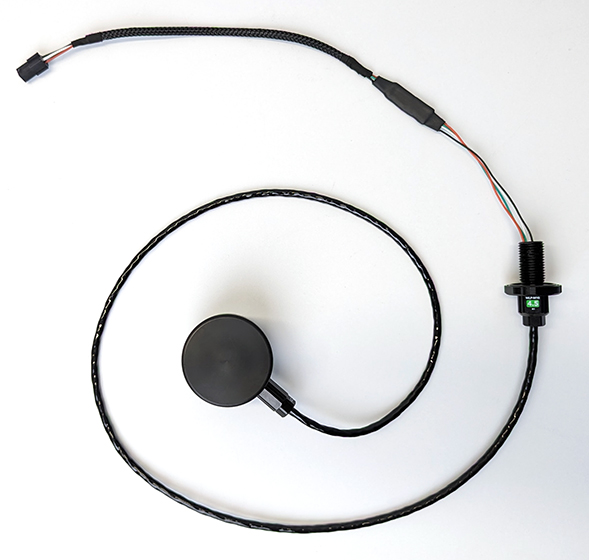
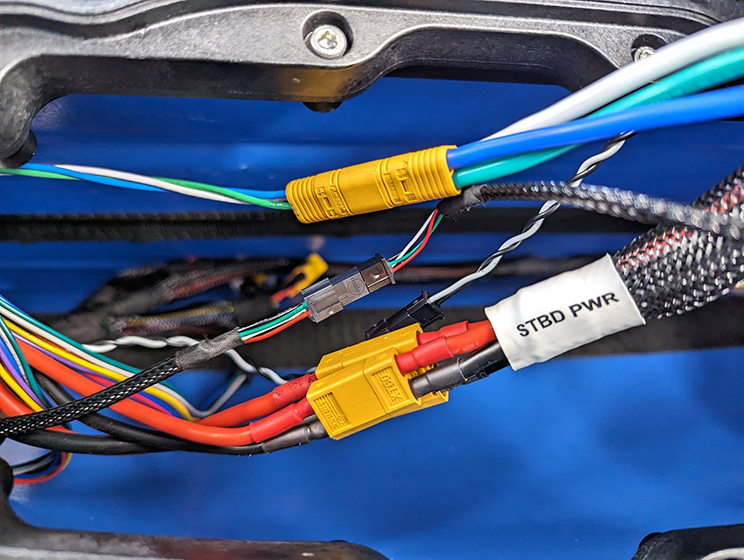
9. Ensure the O-ring is installed beneath the M14 adapter penetrator, then re-install it into the hole at the rear of the hull. Use the M14 Bulkhead Wrench and the C-nut you removed earlier to secure it in place. Verify that the penetrators are securely installed; they should not be able to be loosened by hand.
Mounting the Ping
To mount the Ping you’ll need:
- Ping mount
- 4 x M3x6 button head screw
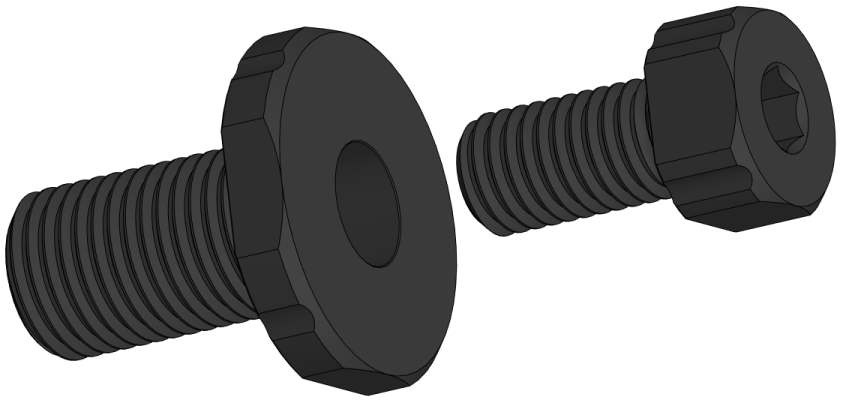
- 2 x M6x20 socket head screw
- 2 x Hull mount bushing
- 2 x M6 lock nut
- 2 mm hex key
- 5 mm hex key
- 2 x Cable ties
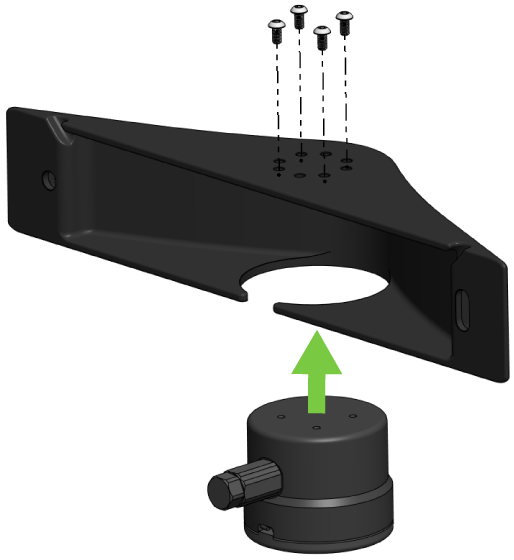
1. Put the Ping in the mounting bracket and rotate it to align the mounting holes, making sure the cable exits towards the rear of the boat. Secure the Ping in the mounting bracket using the included M3x6 button head screws and a 2 mm hex key.
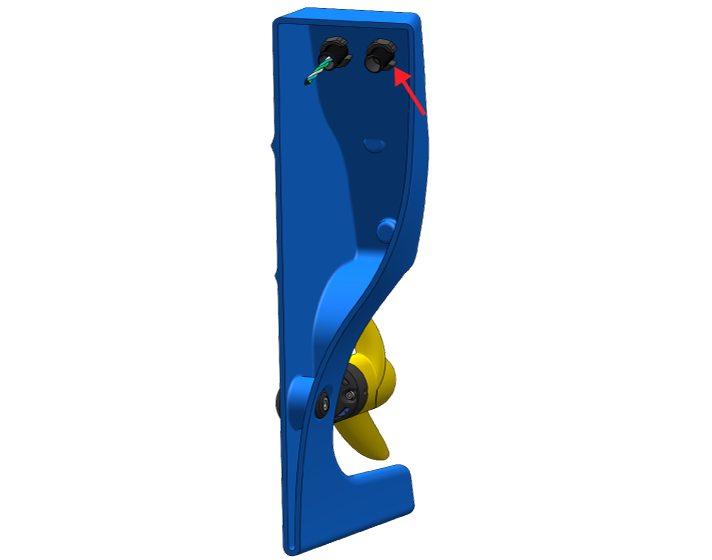
2. Use a 5 mm hex and included M6x20 socket head screws, hull mount bushings, and M6 nuts to mount the bracket on the inside face of the starboard hull. The Ping can be mounted toward the front or rear of the boat, whichever works best for your setup. Start with the circular mounting hole then make sure the mounting bracket is parallel to the bottom of the boat before tightening the second screw.

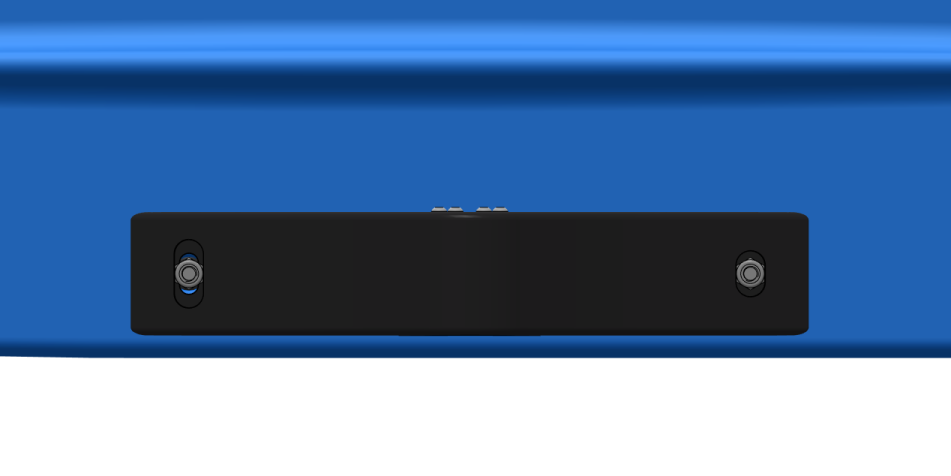
Ping mount parallel with the bottom of the boat.
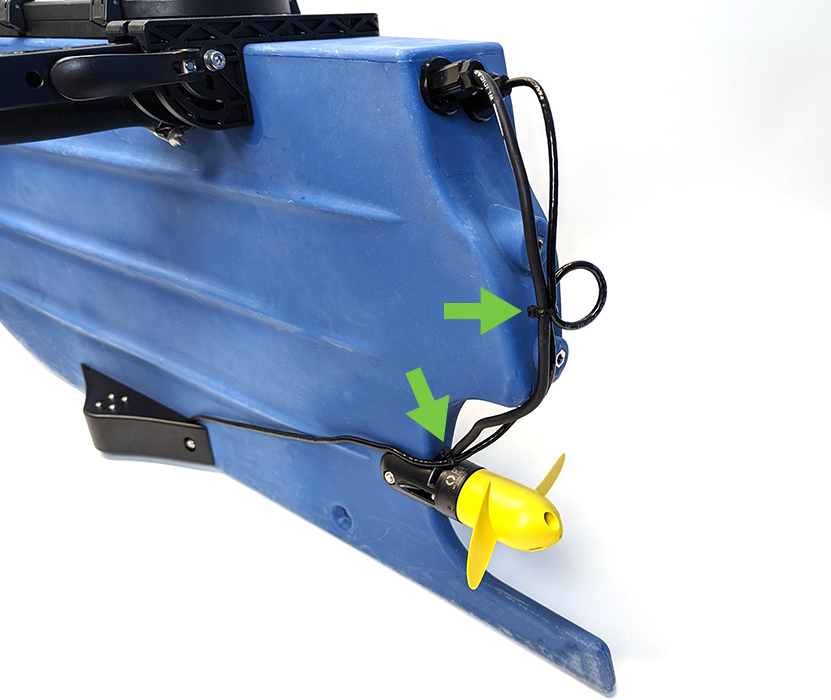
3. Pull any slack in the cable and use a cable tie to secure it to the base of the motor cable. Loop and secure any loose cable using another cable tie about midway up the cable.
4. Install the fairing back on the starboard hull.
Cable Connections
To finish up the installation, you will need:
- 1 x 4-position Micro-Fit to JST GH connector extension cable
- 2 x Cable tie
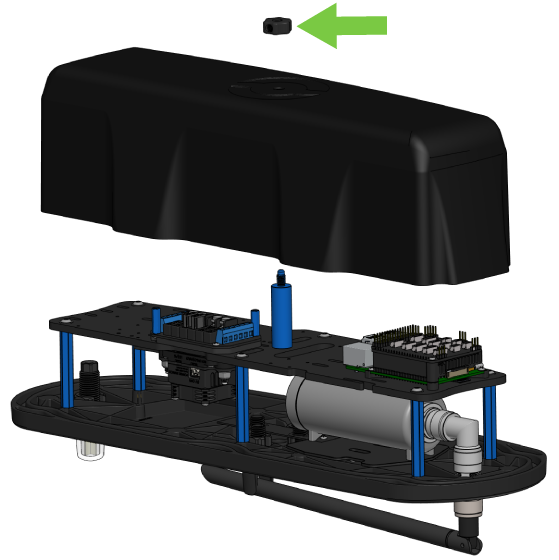
1. Remove the cover from the starboard hatch lid assembly by unscrewing the thumb nut.
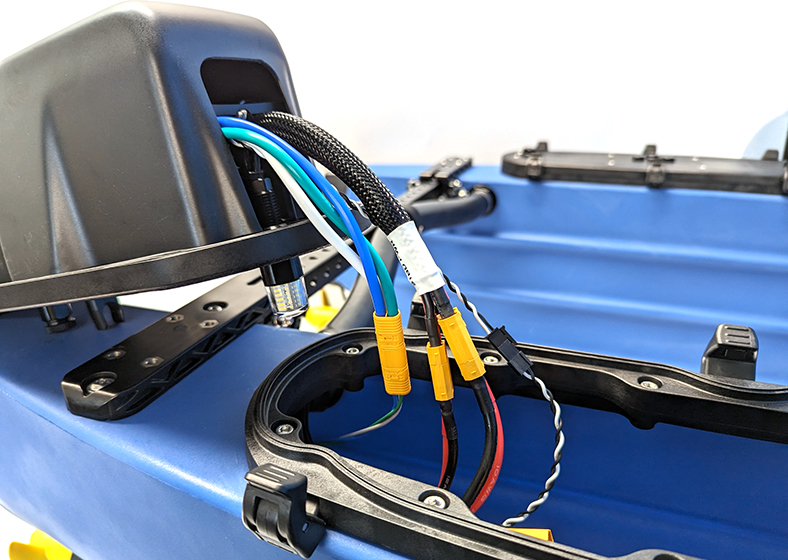
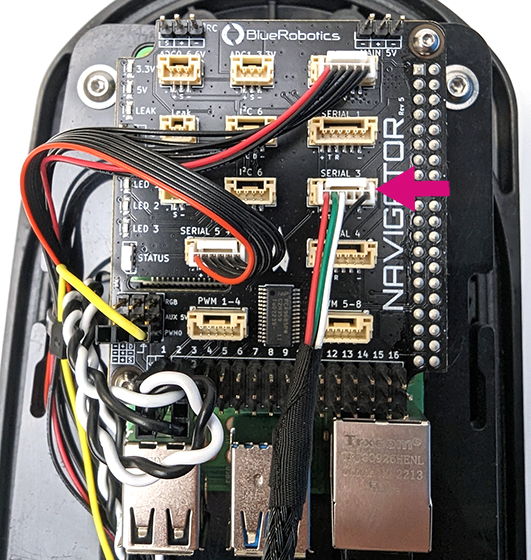
2. Connect the extension cable to the SERIAL 3 port on the Navigator.
3. Use two cable ties to secure the extension cable to the electronics tray.
4. Put the cover back on the hatch lid assembly and reconnect all the cables, including the Ping extension cable.
Through Hatch Lid Cable Routing
These are the instructions to route the Ping cable through the hatch lid. If you have already installed the Ping cable, you can skip this section and proceed to the Software Setup section.
You will need:
- Ping with included O-ring and C-nut
- JST GH to header pin adapter (from Ping kit)
- 2.5 mm hex key
- M10 Bulkhead Wrench
- 2 x Cable ties
- Silicone grease (Molykote 111)
1. Remove the starboard hatch lid assembly from the BlueBoat by disconnecting all the cables.
2. Remove the cover from the starboard hatch lid assembly by unscrewing the thumb nut.
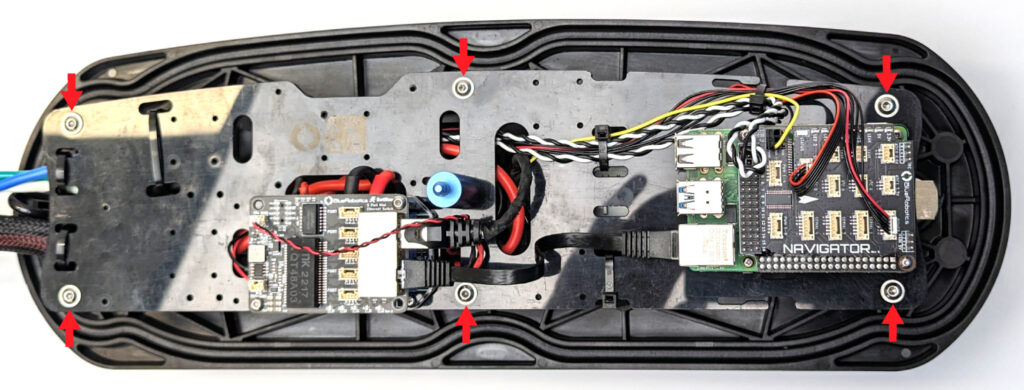
3. Use the 2.5 mm hex key to remove the six flanged button head screws from the electronics tray. Move the electronics tray to the side but be careful not to pull on the wires too much.
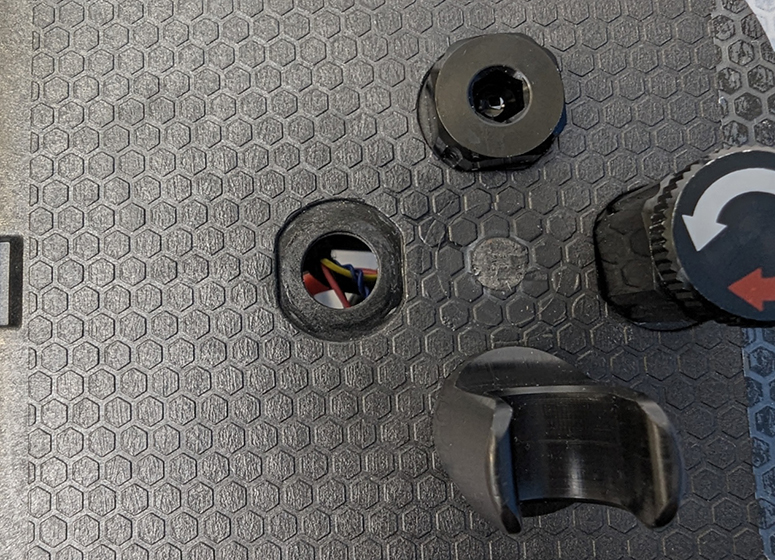
4. Use the M10 Bulkhead Wrench to loosen the C-nut and remove the blank penetrator.

5. Apply a thin, even layer of silicone grease (Molykote 111) to the Ping O-ring and install it in the groove on the underside of the penetrator.
6. Install the Ping bulkhead penetrator in the hole. Make sure it is fully seated in the lid recess and install the nut on the back. Tighten by hand then use the bulkhead wrench to fully tighten the nut. Only use the wrench to turn the C-nut, do not try to turn the bulkhead, the recess is shaped to prevent the bulkhead from rotating.
7. Connect the JST GH to header pin adapter to the Ping header pins. Match the wire colors: red to red, green to green, white to white, and black to black. Optional, use one of the included pieces of heat shrink to secure the cable connection.
8. Mount the electronics tray back on the standoffs using the screws you removed earlier.
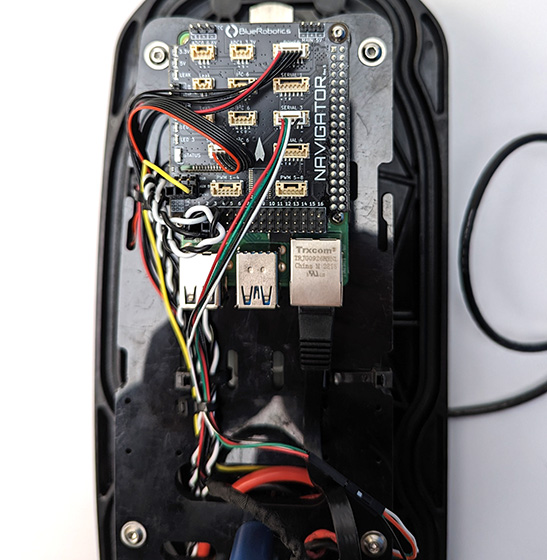
9. Connect the JST GH adapter to the SERIAL 3 port on the Navigator. Use cable ties to secure the cable to the electronics tray.
10. Put the cover back on the hatch lid assembly and reconnect all the cables.
Mounting
To mount the Ping you’ll need:
- Ping mount
- 4 x M3x6 button head screw
- 2 x M6x20 socket head screw
- 2 x Hull mount bushing
- 2 x M6 lock nut
- 2 mm hex key
- 5 mm hex key
1. Put the Ping in the mounting bracket and rotate it to align the mounting holes. Secure the Ping in the mounting bracket using the included M3x6 button head screws and a 2 mm hex key.
2. As there are not many good attachment points on the hull to secure loose cable, the extra Ping cable can be looped and stored inside the mounting bracket before mounting it to the hull. Make sure to leave enough slack in the cable to allow opening the hatch lid.
3. Use a 5 mm hex and included M6x20 socket head screws, hull mount bushings, and M6 nuts to mount the bracket on the inside face of the starboard hull. The Ping can be mounted toward the front or rear of the boat, whichever works best for your setup. Start with the circular mounting hole then make sure the mounting bracket is parallel to the bottom of the boat before tightening the second screw.
Ping mount parallel with the bottom of the boat.
Software Setup
1. Power up your BlueBoat and BaseStation and connect it to your computer. If you don’t know how to do that, please check out the BlueBoat Software Setup guide first.
2. Access BlueOS (the BlueBoat’s operating system) by typing 192.168.2.2 or blueos.local into a web browser address bar.
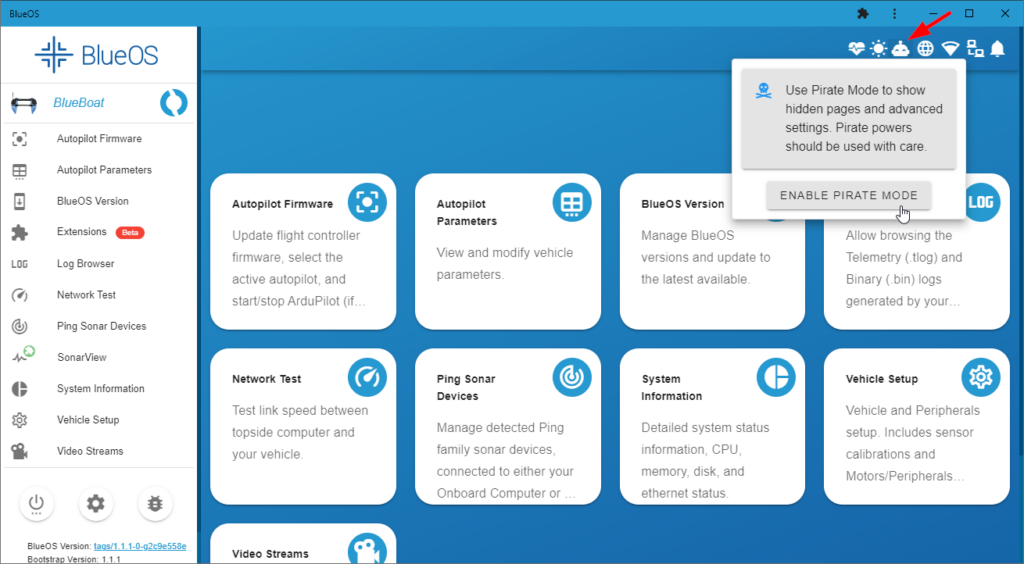
3. From BlueOS, enable Pirate Mode by clicking the happy robot icon in the top right corner.
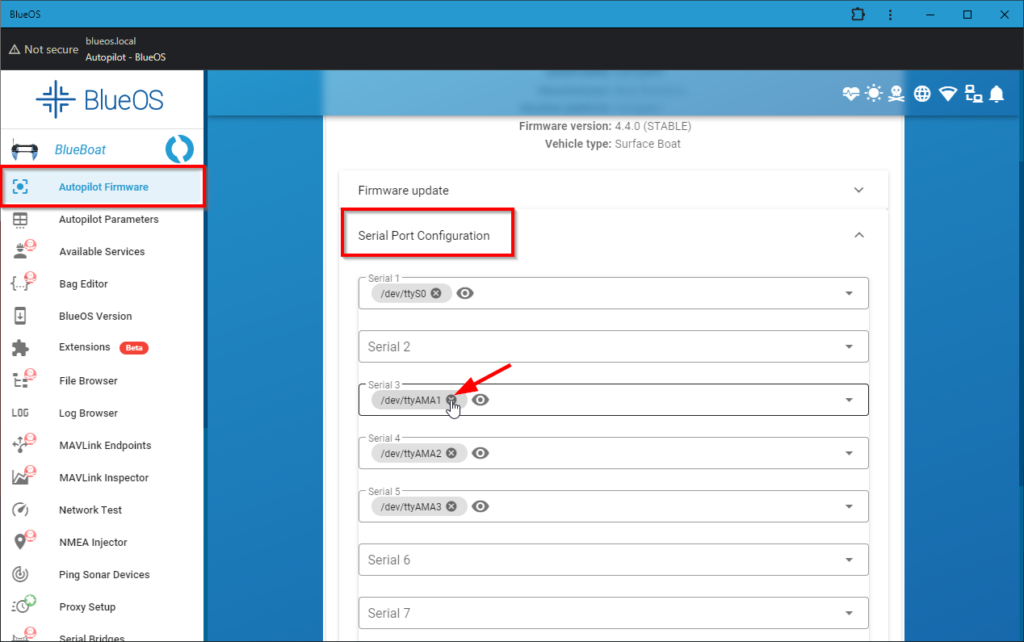
4. With Pirate Mode enabled, click on Autopilot Firmware. Expand the Serial Port Configuration section then clear the Serial 3 field. If you connected the Ping to a different serial port, clear the field for the appropriate serial port.
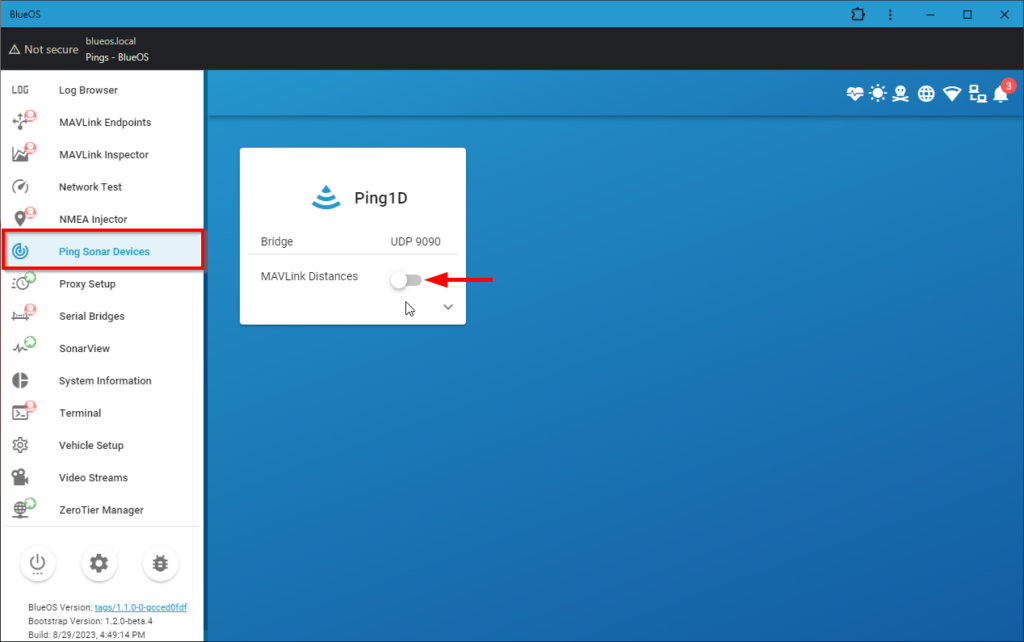
5. Access the Ping Sonar Devices page from the left sidebar, you should see the Ping device detected in this menu. Enable the MAVLink Distances setting, this makes it so the Ping distance measurements are available to the autopilot system and logged in the autopilot logs for every mission.
Viewing Ping Depth Data
After the Ping is installed, the depth data can be viewed in a few different ways.
Viewing Depth Data Using Ping Viewer
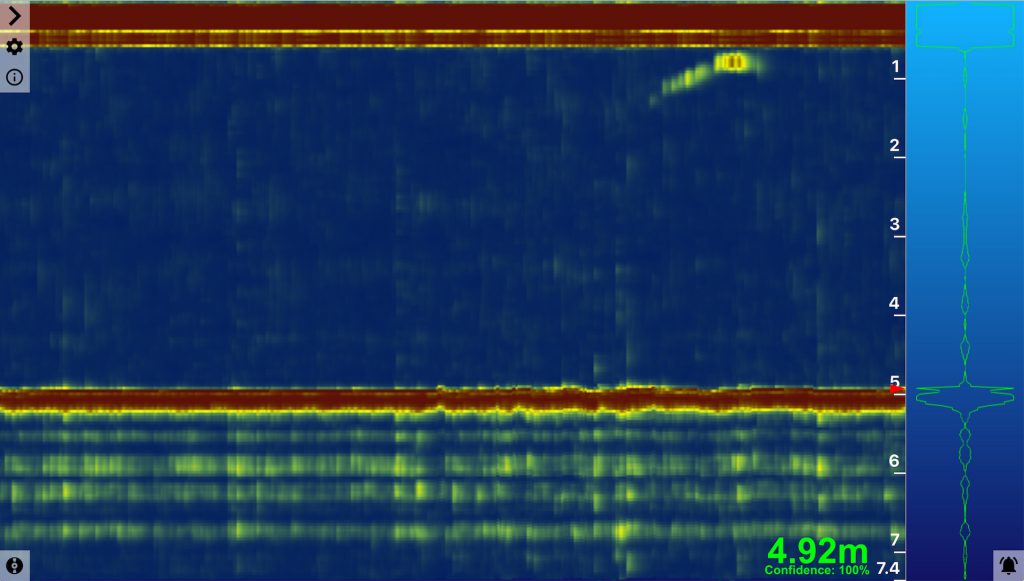
Depth data can be viewed in real time using Ping Viewer.
1. Download Ping Viewer for your operating system.
2. Start Ping Viewer on the same computer that is connected to the BlueBoat, it should automatically detect the connected Ping Sonar and display it in the device manager menu.
3. Select the Ping from the device manager menu, the live depth data and confidence value will be displayed.
4. Sensor logs are saved for every session.
Viewing Depth Data From Autopilot Logs
Sonar depth data is saved in the autopilot logs as long as the MAVLink Distances option is enabled for the device.
The data, along with GPS coordinates, can also be exported from the logs. Just keep in mind that MAVLink currently does not store the sonar confidence values, so some data may be noisy.
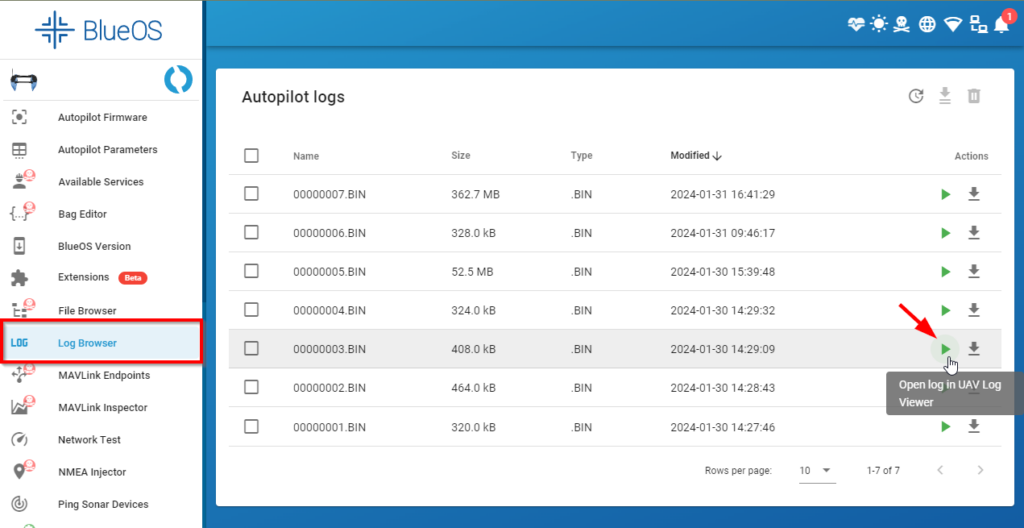
1. Select Log Browser from the BlueOS left sidebar. Click the green “play” icon next to the log you want to view, this opens the log in the log viewer web application.
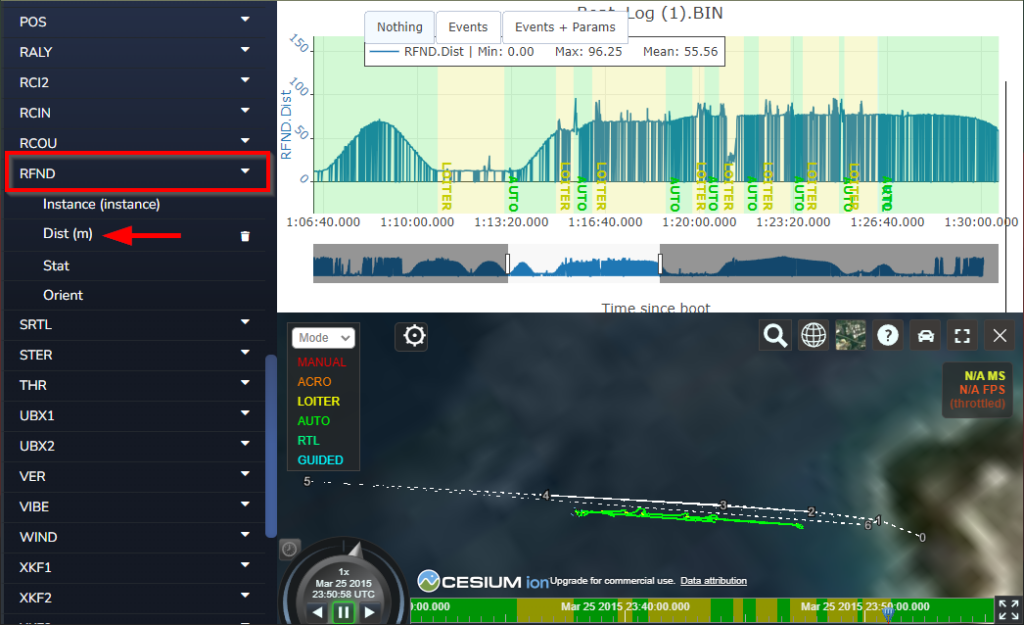
2. In the log viewer application, expand RFND from the left sidebar and select Dist (m). The distance measurements for that mission are shown, as well as the path taken by the boat plotted on a map.
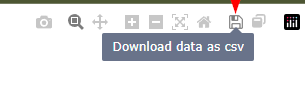
3. The data can be exported as a CSV file by clicking the download button at the top right of the window.
Using the Simple Ping Survey Extension
The Simple Ping Survey Extension makes it easy to log survey data and, along with some free, open-source sofware, create depth maps. Follow the guide linked below to learn how to use the extension.
Collecting and Creating Bathymetric Maps with the BlueBoat and Ping
Feedback
We’re always working to make our documentation, instructions, software, and user experience even better. If you have any ideas on how we can improve this guide, feel free to let us know here.