
BlueBoat General Integration Guide
Introduction
So you have a BlueBoat and a dream—time to combine the parts to make it happen! This guide documents all the ways things can be mounted, attached, routed, plugged in, and generally integrated into the BlueBoat vehicle platform.
CAD Downloads
BLUEBOAT_120_BR-101447_RevA_PUB (.zip)BLUEBOAT_HULL_SET_BR-101652 (.zip)
BLUEBOAT_STARBOARD_HATCH_LID_ASSEMBLY_BR-101667 (.zip)
BLUEBOAT_PORT_HATCH_LID_ASSEMBLY_BR-101745 (.zip)
BLUEBOAT_CROSSBARS_BRACKETS_BR-101645 (.zip)
BLUEBOAT_CROSSTUBE_BR-101639 (.zip)
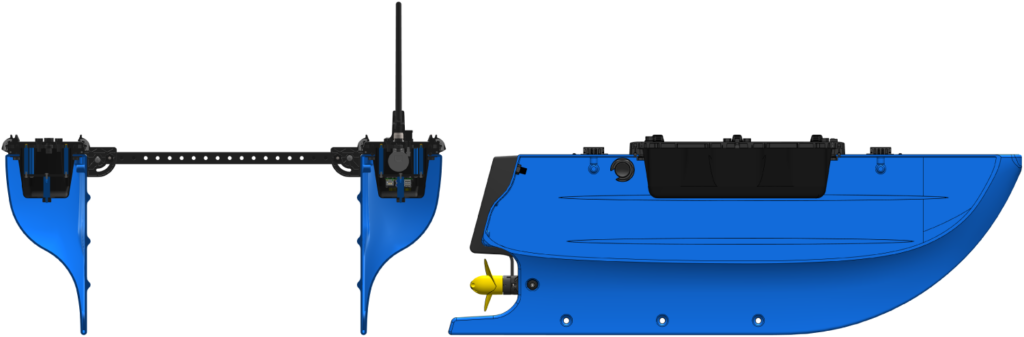
External Mounting Features
The exterior of the BlueBoat has several mounting features that can be used to secure payload. Keep in mind that anything mounted outside of the hulls should be waterproof!
Crossbars and Brackets
The crossbars have 8 mm diameter holes, spaced 25 mm apart along all four sides. Use the included plastic frame bushings to adapt these holes for M6 hardware or prevent metal to metal contact.
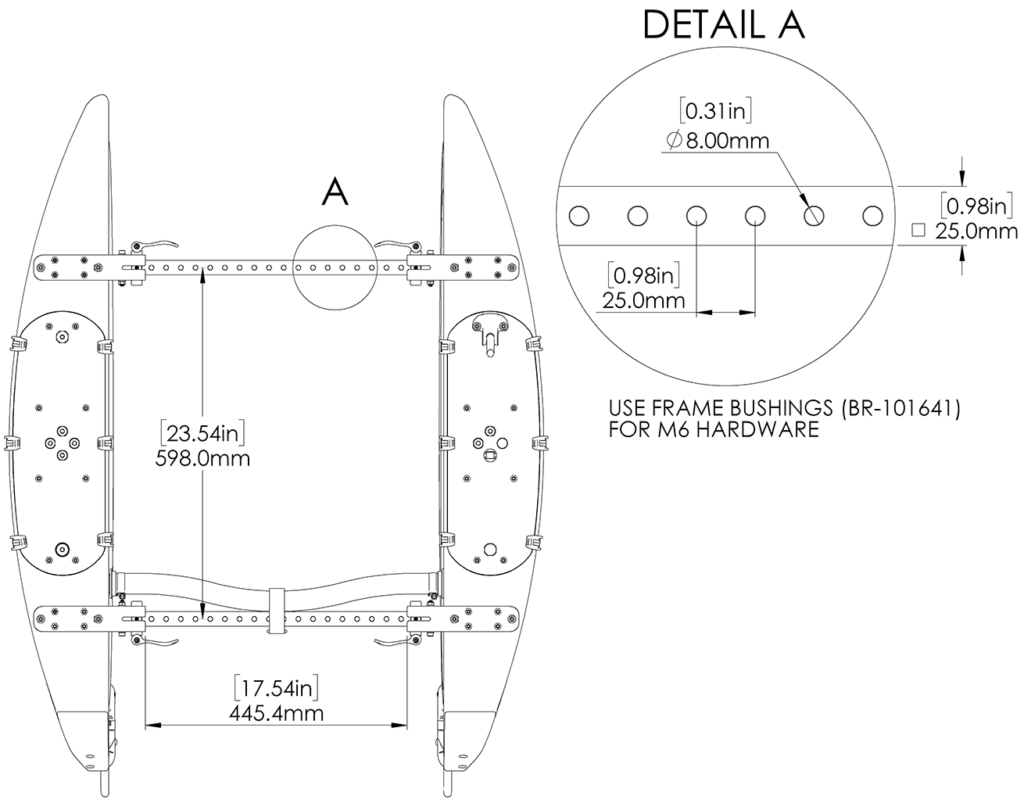
Each crossbar bracket features four M6x1.0 mounting holes. The flag is mounted using one of these mounting holes but 15 others remain available.
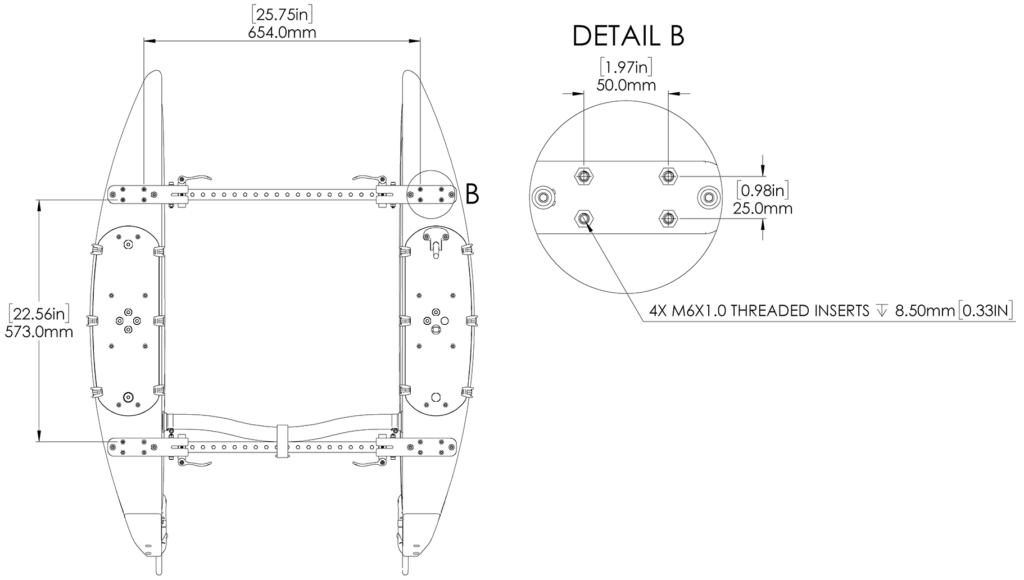
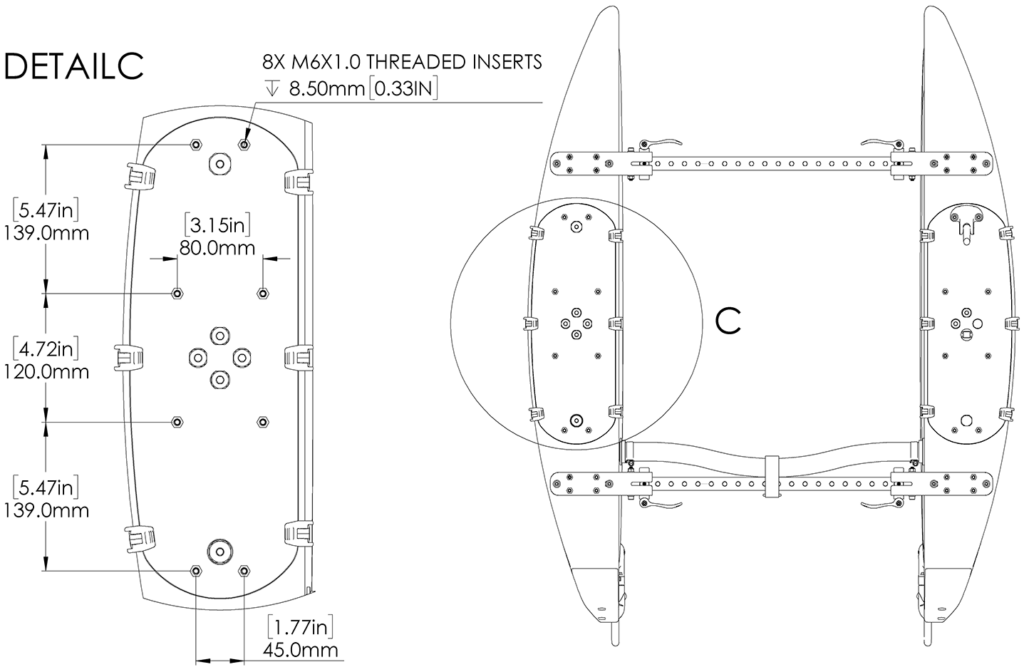
Hatch Lids
Each hatch lid has eight M6 threaded inserts that are molded into the top.
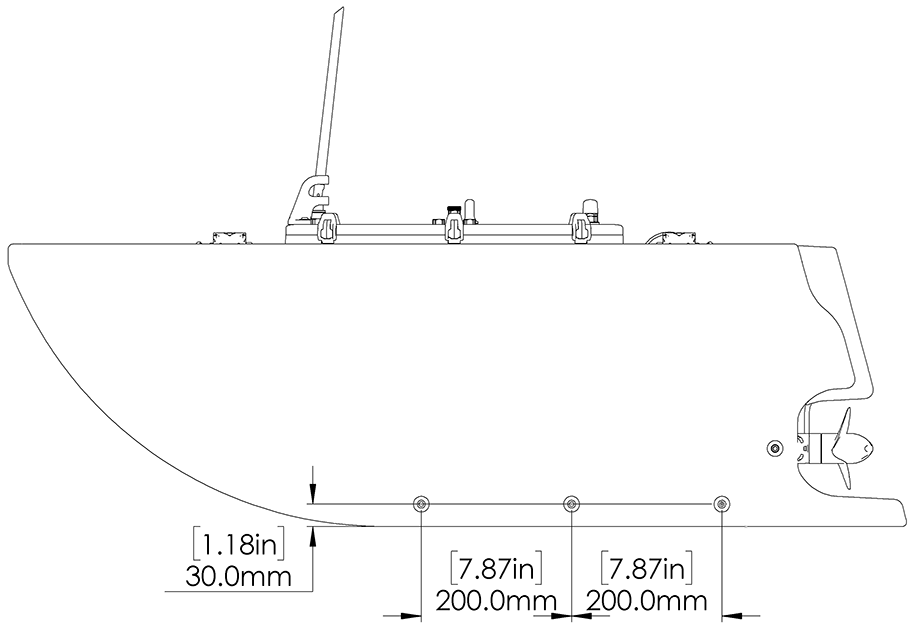
Hull Mounting Holes
Each hull features three holes along the keel for mounting things below the waterline. This location is ideal for payloads like acoustic transducers, cameras, and any business that needs to be carried out beneath the water surface. Use these mounting holes together with Hull Mount Bushings to securely mount payload. Hull Mount Bushings act as large, uniquely shaped washers to distribute clamping force and ensure a secure mount in the holes. M6 or #10 hardware recommended.
Payload Bracket
The Payload Bracket can be used in conjunction with the hull mounting holes to attach any object that needs a horizontal mounting surface beneath the water. This method is the best universal way to attach small things to the keel. The Payload Bracket is sold separately; you can find more details on the product page.
Internal Mounting
Inner Hulls
The inside of the hulls can be used for medium size payloads that are not waterproof. Hook and loop fasteners are a good way to secure things to the sides of the hulls. Keep in mind that the inner hull space is shared with the BlueBoat batteries.
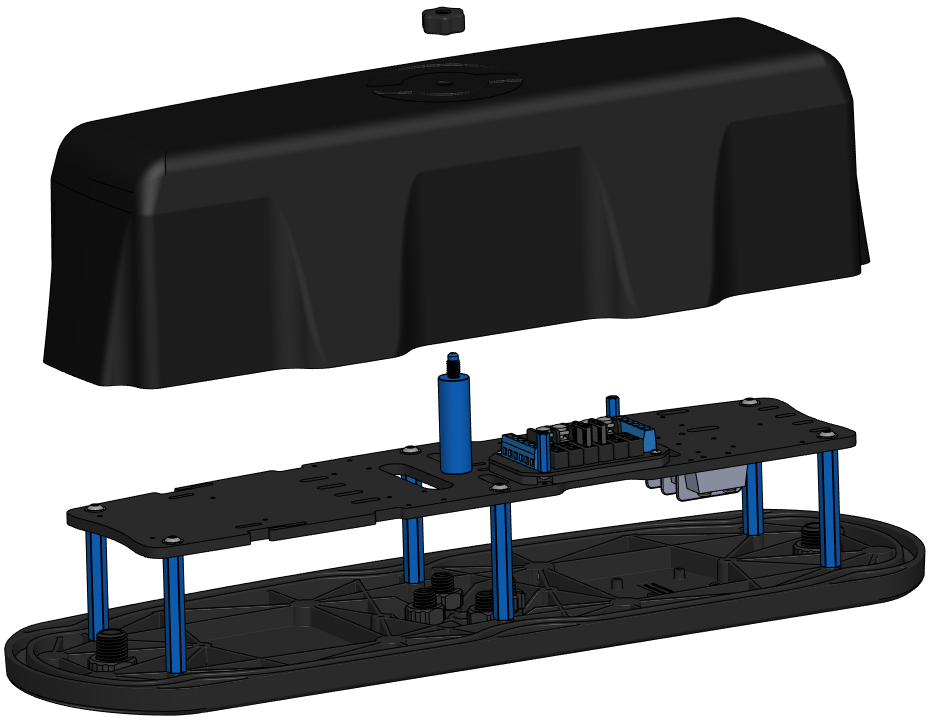
Hatch Assembly and Electronics Tray
The covered Hatch Lid Assemblies offer space for small electronics. The port side assembly is especially roomy as it hosts fewer electronic components than the starboard side. The electronics tray in each assembly has various mounting holes and cutouts to support mounting screws and cable ties. Refer to the 3D CAD files for mounting hole pattern and electronics components placement.
Penetrations
Penetrator holes provide a sealed passage—when used with WetLink Penetrators—for cables and wires into the hulls.
Hatch Lid Penetrators
By default, the starboard hatch lid has two available M10 penetrator holes and the port hatch lid has four M10 and two M14 available penetrator holes.

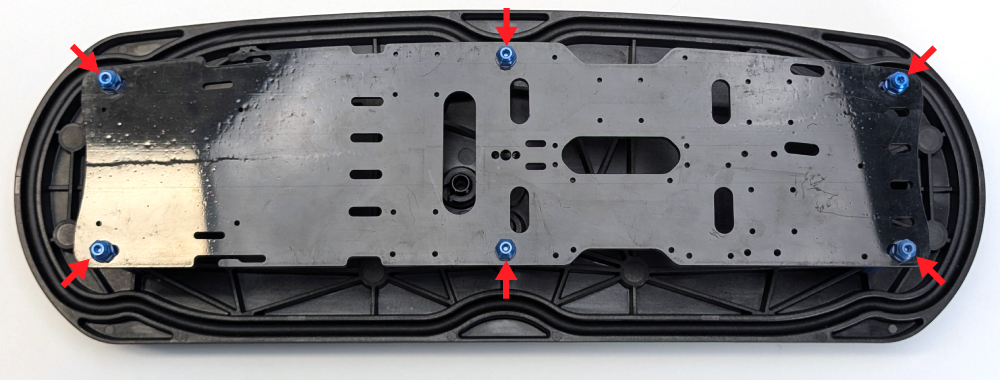
To use these penetrator holes, temporarily remove the electronics tray by removing the six hex nuts using a 2.5 mm hex driver or 8 mm socket. Move the electronics tray to the side but be careful not to pull on the wires too much.
Use a M10 or M14 Bulkhead Wrench to loosen the C-nut and remove the blank penetrator.

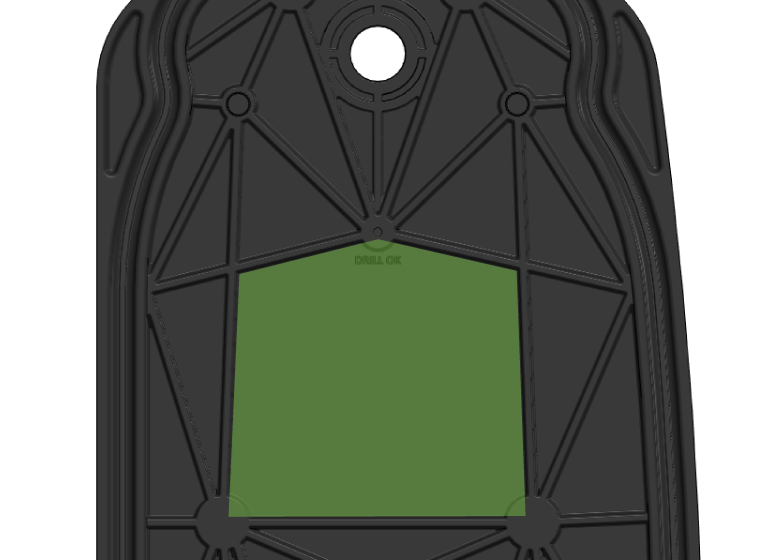
The hatch lids have an area where additional penetrator holes can be drilled.
- Use a 10 mm drill bit to make additional holes for M10 bulkheads.
- Use a 14 mm drill bit to make additional holes for M14 bulkheads.
Stern Penetrators
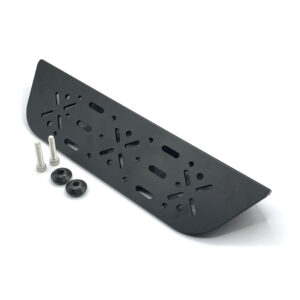
Each hull features an M14 and M10 compatible penetrator hole under the rear fairings. To access, remove the two screws securing the fairing using a 4 mm hex key.
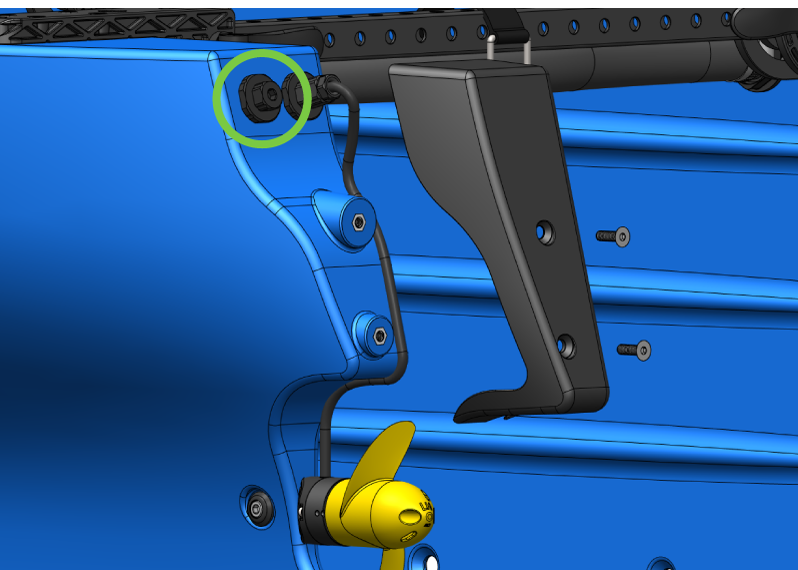
The penetrator hole is covered with an M14 to M10 adapter blank.
- To install an M10 bulkhead, remove the M10 blank only and install the penetrator into the adapter.
- To install an M14 bulkhead, remove the entire adapter from the hole.
Electrical and Data Interfacing
Connecting to Power
Each hatch lid assembly contains a six-circuit fuse board on the electronics tray. These fuse boards provide safe, convenient DC power connection points for onboard devices.
The six circuits are divided into two sections: V1 and V2.
- V1 is connected to battery voltage (BATT V), which comes directly from the BlueBoat’s batteries. For standard 4S batteries, a full charge is around 16.8 V, and the batteries are considered depleted at approximately 12 V.
- V2 provides 5 V auxiliary power for low-voltage payloads and devices.
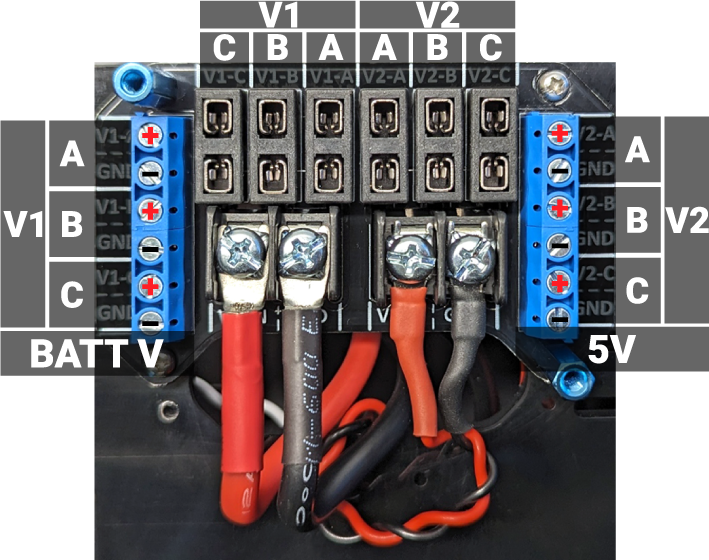
The fuse slots along the top of the fuse board accept MINI blade-style fuses. Each circuit remains open (disconnected) until a fuse is installed.
- To connect a device, attach its power wires to a circuit on the appropriate side—V1 (battery voltage) or V2 (5 V auxiliary power)—then insert a fuse into the corresponding fuse slot.
- Be sure to use a fuse that is properly rated for the current draw of the connected device.
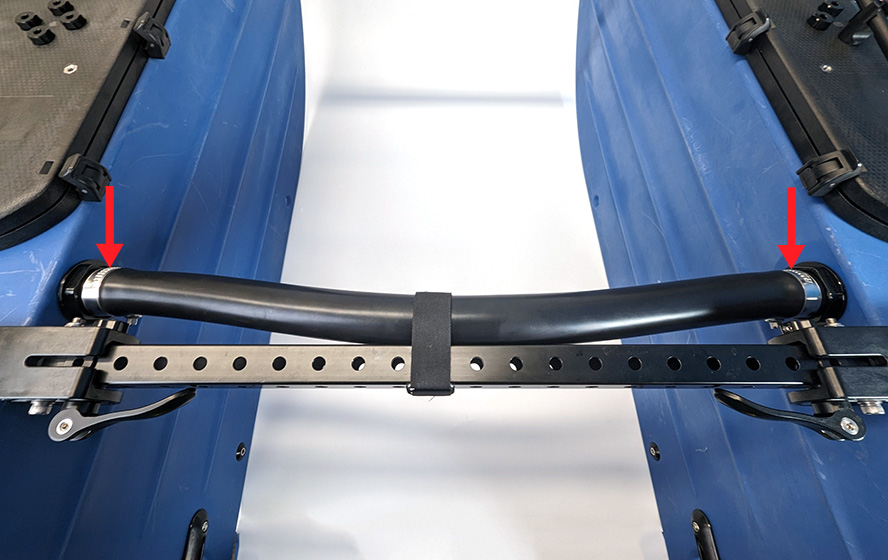
Running Cables Through the Crosstube
The crosstube is a great way to run cables or wires between hulls. The BlueBoat cross cable also runs through the crosstube but there is plenty of room for additional cables such as Ethernet connections, additional power wires, or coax cable. If passing cable through the tube is difficult, you can loosen the hose clamps and gently pull the tube off the barb to temporarily remove the tube. Using a wire clothes hanger or electrician’s fish tape is also helpful to get the cable through the tube.
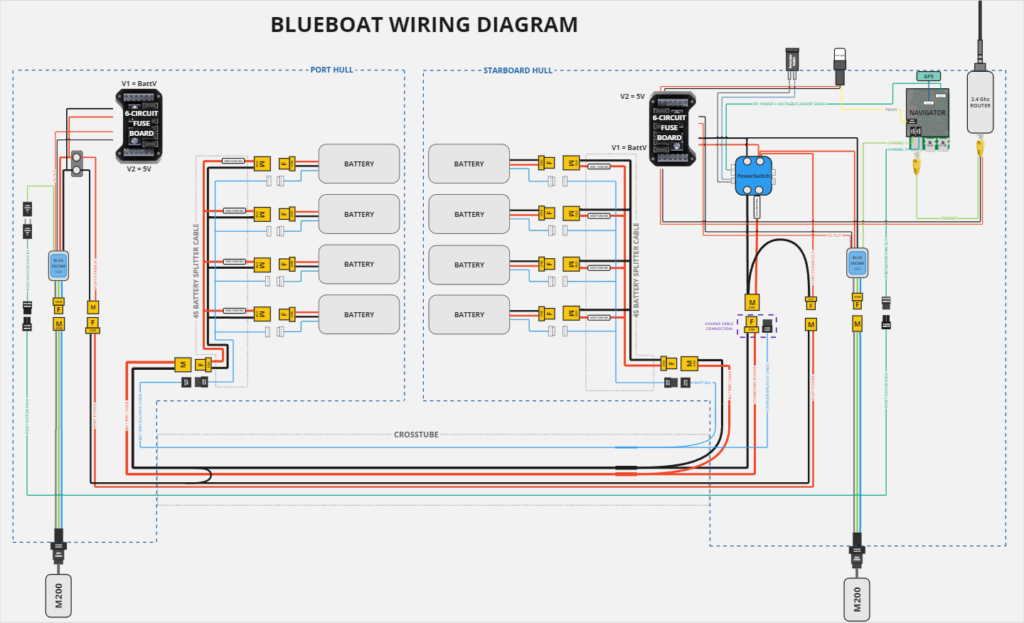
Wiring Diagram
A complete BlueBoat wiring diagram is available here for reference (click for full-size PDF).
Ethernet Connections
Payloads with an Ethernet communication interface, such as IP cameras or sonars, can be easily connected to the BlueBoat using the Blue Robotics Ethernet Switch.
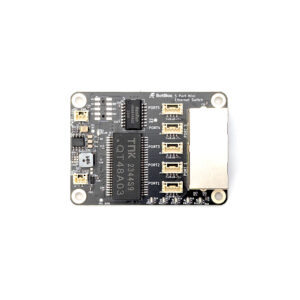
The Ethernet Switch is sold separately; an installation guide is available here.
Serial Data Connections
The onboard Navigator Flight Controller has a number of ports to connect devices using a serial data connection. Please check out the Connecting Your Device with Navigator and BlueOS guide for more information.

Connecting Your Device with Navigator and BlueOS
USB Connections
The onboard Raspberry Pi 4 has four available USB ports, two of which are USB 3.0. High power devices like mechanical hard-drives may require additional power input to function properly. Because BlueOS is based on Linux, driver support may be required in some applications such as Cameras or USB Sound cards. For applications that require a USB connection between the payload and ground control station computer, see the next section on using VirtualHere.
Software Interfacing
VirtualHere
The VirtualHere BlueOS extension is a utility that transmits a USB data connection over the network. Once installed on your BlueBoat, it allows you to access any device plugged into the Raspberry Pi USB ports as if it was directly connected to your computer. This feature enables you to use vendor software, which may be specific to an OS like Windows, with your BlueOS-based vehicle. For example, you could access a popular sonar with a USB interface as if it was connected directly to your laptop, even though it’s actually on your BlueBoat that could be hundreds of meters away!
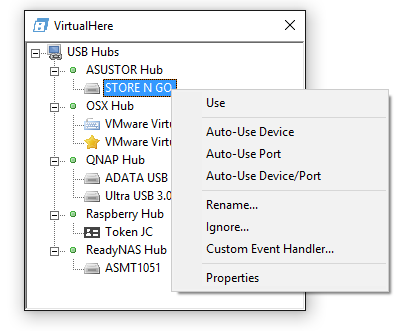
To use VirtualHere, install the extension from the Extension Manager in BlueOS, then install the correct client software for your ground control station computer. The VirtualHere client software is available for MacOS, Windows and Linux. Once the client is installed and your computer is connected to the BlueBoat, a list of connected devices can be found under USB Hubs, including the name of your BlueBoat. A device can be virtually plugged into your machine by right clicking it and selecting Use. Many USB devices from mass storage devices to cameras can be enabled, but be aware the performance for high data-rate applications may be impacted by the wireless link speed to your boat.
Creating an Extension
If your application does not already have an extension for BlueOS, you can create your own! All it takes is packaging whatever code you have that accomplishes your goals into a dockerized format. You can find complete details in our BlueOS documentation.
Feedback
We’re always working to make our documentation, instructions, software, and user experience even better. If you have any ideas on how we can improve this guide, feel free to let us know here.