
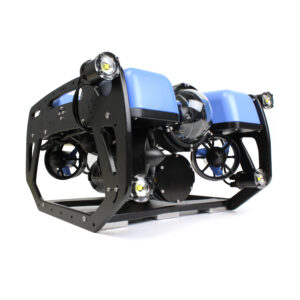
BlueROV2 Operation
Other BlueROV2 Guides in this Series
BlueROV2 Assembly
BlueROV2 Software Setup
Operation Manual Introduction
The information on this page is for operating the BlueROV2 remotely operated underwater vehicle. In order to operate the BlueROV2, it must be assembled and the software must be set up. If you have not assembled your BlueROV2, please see our Assembly Manual or if you have not completed the software setup, please see our Software Setup page.
Safety
Batteries
Here are our recommendations for batteries to use with the BlueROV2:
- Blue Robotics Lithium-ion Battery (14.8V, 15.6Ah)
- Blue Robotics Lithium-ion Battery (14.8V, 18Ah)
- Blue Robotics Li-po Battery (14.8V, 10Ah)
- Turnigy Li-po (14.8V, 10Ah) (Hobby King)
LiPo/Li-Ion Safety
LiPo batteries have a high energy density and must be treated with the proper precautions. More information about LiPo batteries including their correct use and care can be found on the following webpages.
Team Orion LiPo Battery Production Video
The highlights are as follows:
- Charge LiPo batteries in a fireproof bag
- Let LiPo batteries cool off for at least 15 minutes after use before charging
- Never leave a LiPo battery unattended when charging
- Install a smoke detector in the area where you charge your LiPo batteries
How to Charge Your Battery
To ensure that your LiPo batteries last as long as possible, it is important to not discharge the battery below 3.2 volts per cell or 12.8 volts if you are using a 4S battery.
A nominal 14.8 volt (a 4s pack) LiPo battery is fully charged when it reaches 16.8 volts (4.2 volts per cell). If you charge a 4S battery beyond 16.8 volts, the battery may become damaged or catch fire. To safely charge a LiPo battery, you should charge with a LiPo-compatible charger. A LiPo-compatible charger will prevent over-charging; it will also balance the cells. A good rule of thumb is to charge your LiPo battery at less than or equal to “1C” or 1 time its capacity. So, if you are using the 10,000mAh battery, you would want to charge at or less than 10 amps.
Swapping Batteries
To exchange batteries in the BlueROV2 use the following procedure:
1. Move the BlueROV2 to a dry area, avoiding sandy/dirty surfaces.
2. Remove the vent plug from the vent penetrator. Place the vent plug in a safe place.
3. Remove the 4-hole end cap assembly (endcap + flange, all in one piece) from the battery enclosure.
4. Disconnect the battery and remove it from the battery enclosure.
5. Connect the new battery and place it in the battery enclosure.
6. Check the O-rings on the 4-hole end cap, then install it on the battery enclosure.
7. Check the O-rings on the vent plug, then install it into the vent penetrator.
Getting Ready for Your First Dive
Before putting the BlueROV2 in the water, there are a few things that you need to do.
Your first dive should be in a body of water that is shallow, still, and clear. We recommend a pool or a test tank. Testing in a more controlled environment will provide a good opportunity to check that the ROV is ballasted correctly. It will also allow you to confirm that your controller is set up correctly and your ROV is behaving how you expect it to.
Connecting Your Batteries
To get ready for your first dive, you need to start by connecting a charged battery using the same process as shown in the Swapping Batteries section.
Setting up Your Topside Control
To set up your topside control follow the instructions on the Software Setup page.
Vacuum Test
To perform a vacuum test on the BlueROV2, you’ll need the vacuum pump included in your kit. It’s important to do a vacuum test before putting the ROV in the water for the first time, and after any of the following:
- Assembling a new ROV
- Replacing any O-rings
- Installing or replacing a penetrator
- Replacing enclosure parts, like the dome or end cap
You don’t need to vacuum test every time you open an enclosure—like for battery swaps—unless one of the above changes was made.
The step-by-step vacuum test procedure is provided here.
Pre-Dive Checklists
Comprehensive Checklist
This checklist is more thorough than the Pre-Dive Checklist and should be done in a couple of circumstances:
- After travel by airplane
- After extended travel by car or boat (>1 hour)
- After taking off the electronics enclosure
- After replacing or exchanging penetrators
- After replacing any sealing O-ring
- Check that the ROV has connected to QGroundControl.
- Tighten the M5x16 screws that hold the frame to the center and bottom panels using the short part of the M3 hex key as the handle or an M3 hex driver.
- Tighten the M3x12 screws that hold the back end caps to the flange seals using the M2.5 hex driver.
- Tighten the M3x16 screws that hold the clips to the electronics enclosure.
- Tighten the M3x12 screws that hold the dome and the front battery end cap to the flange seals using the M2.5 hex driver.
- Gently attempt to twist the ballast weights clockwise.
- Pull on the side panels and attempt to twist the frame.
- Pull on the cable bundles going into the 14 hole end cap.
- Pull on and twist the tether thimble.
- Attempt to loosen all of the penetrators by hand.
- Check that the vent plugs are installed.
- Push and twist the battery enclosure.
- Visually check that all screws holding the back end caps are installed and look tight.
- Pull on all of the thrusters.
- Grab and shake the fairings.
- Pull on the Lumens.
- Visually check that all screws holding the dome and front battery end cap are installed and look tight.
- Visually check the radial seals on the electronics and battery enclosure are lubricated with silicone grease and intact (not cracked or sliced).
- Put the ROV on the ground and make sure that people are clear of the thrusters.
- Check to make sure the camera tilt function and lights work. If they do not, please see the [Troubleshooting](#troubleshooting) section.
- Put the ROV in Manual Mode.
- Arm the ROV.
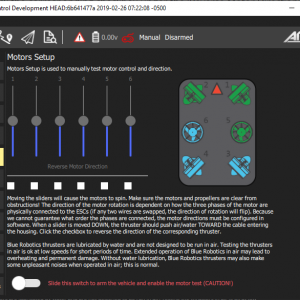
- Press the forward/reverse stick forward to check that the vectored thrusters are spinning freely.
- Press the ascend/descend stick forward to check that the vertical thrusters are spinning freely.
- Disarm the ROV.
- Launch.
Pre-Dive Checklist
This checklist should be done every time the ROV is put into the water, prior to putting the ROV in the water. This checklist starts after you have connected the battery, reinstalled the battery enclosure end cap, and reinstalled the battery enclosure vent plug.
- Check that the ROV has connected to QGroundControl.
- Gently attempt to twist the ballast weights clockwise.
- Pull on the side panels and attempt to twist the frame.
- Pull on the cable bundles going into the 14 hole end cap.
- Pull on and twist the tether thimble.
- Attempt to loosen all of the penetrators by hand.
- Check that the vent plugs are installed.
- Push and twist the battery enclosure.
- Visually check that all screws holding the back end caps are installed and look tight.
- Pull on all of the thrusters.
- Grab and shake the fairings.
- Pull on the Lumens.
- Visually check that all screws holding the dome and front battery end cap are installed and look tight.
- Visually check the radial seals on the electronics and battery enclosure are lubricated with silicone grease and intact (not cracked or sliced).
- Put the ROV on the ground and make sure that people are clear of the thrusters.
- Check to make sure the camera tilt function and lights work. If they do not, please see the Troubleshooting section.
- Put the ROV in Manual Mode.
- Arm the ROV.
- Press the forward/reverse stick forward to check that the vectored thrusters are spinning freely. Do not run the thrusters for more than 30 seconds in air.
- Press the ascend/descend stick forward to check that the vertical thrusters are spinning freely. Do not run the thrusters for more than 30 seconds in air.
- Disarm the ROV
- Now you are ready to launch
Launch
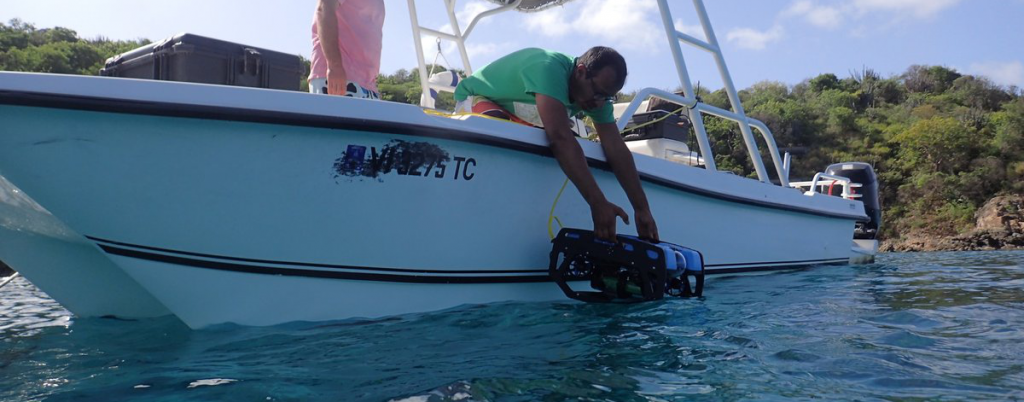
All Launches
- Do not launch the ROV near swimmers or divers.
- Do not release the ROV prior to it touching the water. If necessary, use the tether to lower it down. When lowereing the ROV, keep the dome away from any hard or sharp objects.
- Do not launch in water that is too shallow to freely drive the ROV.
- Keep the ROV away from boats that do not know that the ROV is in the water.
- Do not arm until the ROV is in the water and the launcher is clear of the ROV.
Boat Launch
- Keep the ROV and tether clear of the boat’s propellers or jets.
- Make sure that the captain of the boat knows that the ROV is about to be launched.
Shore Launch
- Do not launch the ROV in heavy surf.
- You may need to walk the ROV into the water to get to a point where the water is deep enough to drive the ROV.
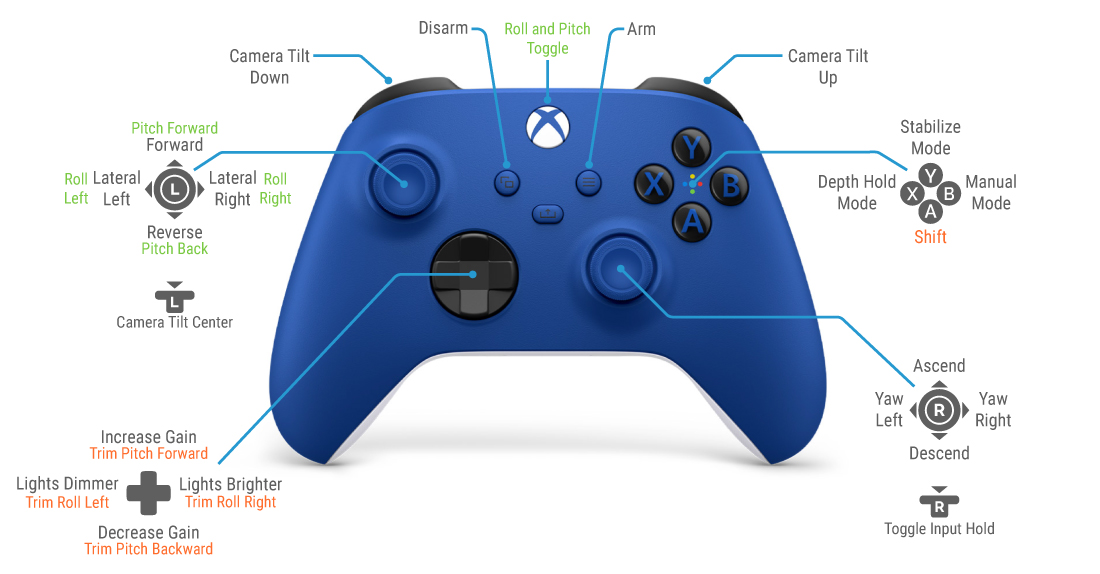
Controller Functions
The default button layout is shown below:
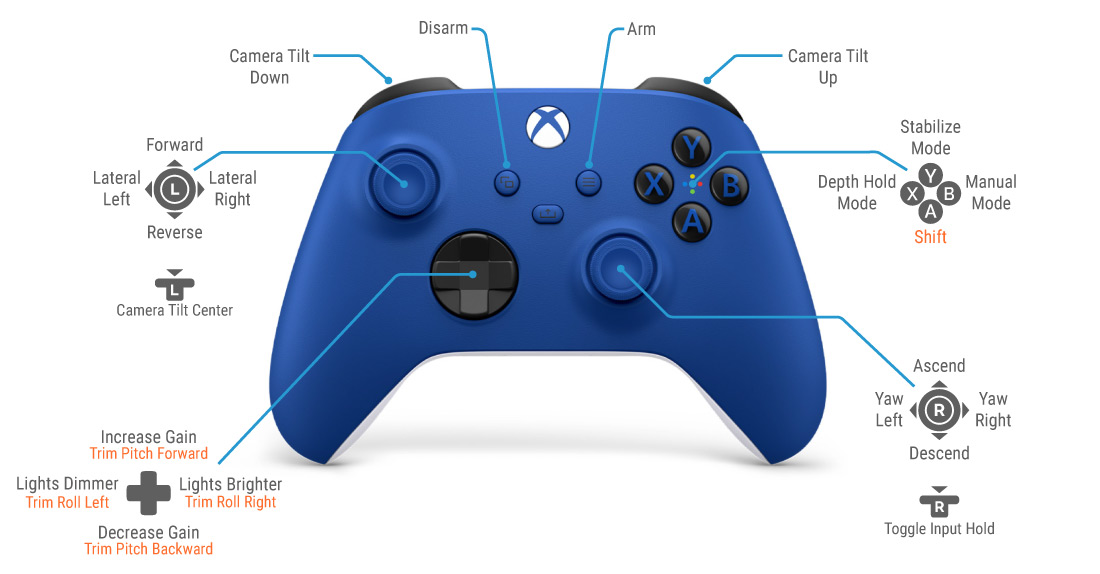
Adjusting Pitch and Roll
The BlueROV2 Heavy Retrofit Kit provides the user full control over the roll and pitch angle. There are currently two methods available for roll and pitch input:
Using the Trim Roll and Trim Pitch button functions
This is the default and recommended method for adjusting pitch and roll. Push the buttons once or hold them down to adjust the pitch and roll of the vehicle until the desired vehicle attitude is reached. The roll and pitch inputs are cleared when the dive mode is switched to MANUAL mode. They are NOT cleared when disarmed.
Using the Roll and Pitch Toggle button function and the left thumbstick
Push the Roll and Pitch Toggle button to toggle the function of the left thumbstick between controlling the forward and lateral motion of the vehicle and controlling the roll and pitch of the vehicle. To use the Roll and Pitch Toggle button, the roll_pitch_toggle function must be assigned to a button on the controller in the Joystick tab of the Vehicle Setup menu. We recommend using the middle button for this as shown below. The roll and pitch inputs are cleared when the dive mode is switched to MANUAL mode. They are NOT cleared when disarmed.
Changing the Button Setup
If you do not like the default button layout, you can change it in QGroundControl.
1. Go to the Vehicle Setup menu then select Joystick from the sidebar.
2. Under Button Assignment, QGroundControl shows a list of all the buttons and their assigned functions.
3. Press the button that you want to change on the controller. The corresponding button number in the list will light up next to the functions that are assigned to it. Each button has a primary function that is triggered when the button is pressed normally and a secondary “Shift Function” that is triggered when the button is pressed while the Shift button is held down.
4. Select the desired primary and secondary functions for the button from the dropdowns to the right of the button number. Be aware that not all button functions that are displayed are fully supported. A list of the most common button functions is provided below.
Below is a list of the common button functions and the associated button function parameter as it is displayed in the QGroundControl dropdown. A complete list of all available button functions for advanced control is available in the ArduSub.com documentation.
| Function | Button Function Parameter |
|---|---|
| Arm | arm |
| Disarm | disarm |
| Shift | shift |
| Camera Tilt Up | mount_tilt_up |
| Camera Tilt Down | mount_tilt_down |
| Increase Gain | gain_inc |
| Decrease Gain | gain_dec |
| Lights Brighter | lights1_brighter |
| Lights Dimmer | lights1_dimmer |
| Trim Pitch Forward | trim_pitch_inc |
| Trim Pitch Backward | trim_pitch_dec |
| Trim Roll Right | trim_roll_inc |
| Trim Roll Left | trim_roll_dec |
| Manual Mode | mode_manual |
| Depth Hold Mode | mode_depth_hold |
| Stabilize Mode | mode_stabilize |
| Camera Tilt Center | mount_center |
| Toggle Input Hold | input_hold_set |
| Roll and Pitch Toggle | roll_pitch_toggle |
| Open Gripper | servo_#_max_momentary* |
| Close Gripper | servo_#_min_momentary* |
| *Where # is the servo number corresponding to the output channel the Gripper is connected to. Refer to the servo function mapping table below. | |
The following table shows which output channels the servo_# button functions control for both the Navigator Flight Controller and Pixhawk 1 Autopilot.
| Servo Function Number | Navigator Output Channel | Pixhawk 1 Output Channel |
|---|---|---|
| servo_1 | 9 | Aux 1 |
| servo_2 | 10 | Aux 2 |
| servo_3 | 11 | Aux 3 |
Operation
Dive Modes
- In Manual Mode the BlueROV2 will only output motor controls based on the pilot input from the joysticks. There is no feedback stabilization, heading holding, or depth holding.
- In Stabilize Mode the BlueROV2 will stabilize roll to level and it will maintain heading when not commanded to turn. The vertical control is left entirely to the pilot.
- In Depth Hold Mode the BlueROV2 will hold depth unless you command it to dive/ascend. It will also stabilize roll to level and maintain heading when not commanded to turn.
Tether Management
When diving the BlueROV2 the tether will require some active management. Here are some guidelines for good tether management:
- Keep the tether away from propellers or jets if you are operating on a boat.
- Keep the tether and ROV away from other boats that are not aware that it is in the water.
- Keep the tether away from sharp objects such as coral, rocks, etc.
- Do not deploy too much tether. Excess tether in the water will add drag to the ROV and opportunity for the tether to get caught on something.
- Do not deploy the tether over sharp edges or rough ground.
- Do not step on the tether.
Driving Guidelines
- Do not drive into a sandy bottom. If you do drive into a sandy bottom, stop driving the vehicle and allow it to float up to prevent sand from getting into the vertical thrusters.
- Drive smoothly and on low gain when possible to maximize battery life.
- Do not touch coral with the ROV to prevent damage to the coral.
- Avoid driving into seaweed when possible. Seaweed can get sucked into and stop the thrusters from spinning.
- When diving, it is helpful to follow down a chain or a line to give a frame of reference.
Battery Monitoring
- Be sure to occasionally glance at the battery voltage in the instrument panel.
- It is recommended to recover the ROV once the battery reaches 12.5V to avoid discharging below 12.0V, which can permanently damage a 4S battery or shorten its lifespan.
Recovery
Powered Recovery
Typically, you will be recovering the BlueROV2 when it is under power.
- The ROV pilot should find the tether and follow it back to the launching area.
- While the pilot is driving back pull in the tether slack. Clean debris off of the tether and inspect for cuts or nicks while pulling in.
- When the ROV arrives back to the launching location, disarm the ROV.
- Pick up the ROV directly if practical, or pull the ROV up using the tether. Avoid sharp or hard objects while lifting the ROV by the tether; allow space for the ROV to swing.
- Remove the vent plug from the battery enclosure vent penetrator.
- Disconnect the battery.
Unpowered Recovery
If the ROV loses power or connection to QGroundControl while diving, you should do the following:
- Pull the tether in at a moderate pace. Don’t try to pull it in as fast as possible.
Storage Between Dives
If you have a break between dives where the BlueROV2 is out of the water for more than 15 minutes, make sure to keep it in a shaded area. If there is no shade nearby, a towel draped over the ROV will supply sufficient shade.
Post Mission Checklist
- Rinse down with fresh water. It is important to rinse out the thrusters with freshwater so saltwater does not pool inside the rotors leading to premature corrosion.
- If you were operating in a sandy environment or seaweed, clean sand and seaweed from the thrusters.
Servicing the BlueROV2
This section shows how to perform some routine operations for servicing the BlueROV2.
Turning the BlueROV2 On and Off
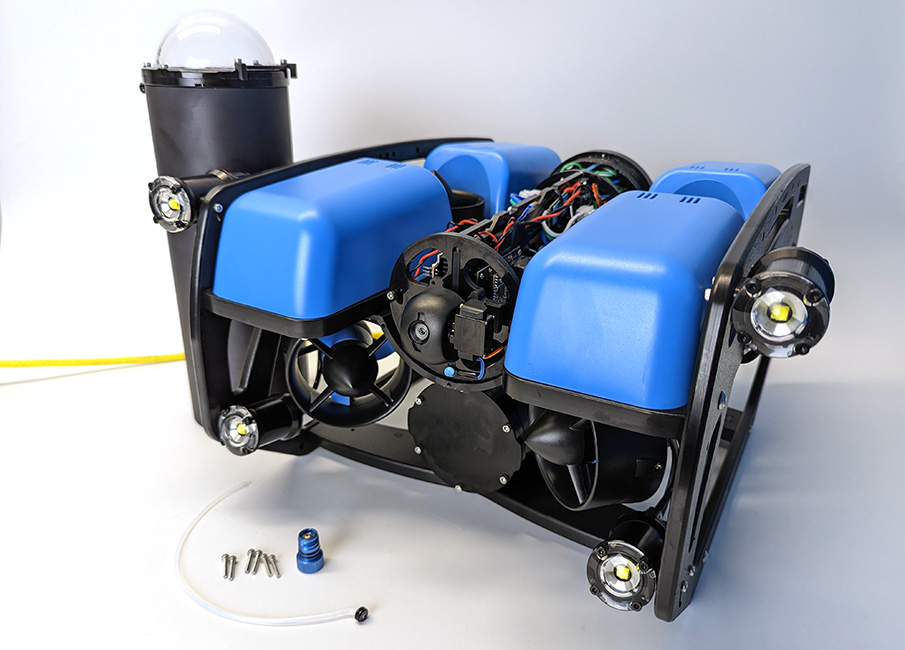
The BlueROV2 does not have a regular power switch to turn it on and off. Instead, turning it on and off is done by connecting and disconnecting the battery from the power cable. The battery is housed inside the battery enclosure, the smaller enclosure located under the Electronics Enclosure. You should disconnect the battery whenever you service the ROV. To access the BlueROV2 battery:
1. Remove the Pressure Relief Valve (PRV) plug from the bulkhead by turning the plug counterclockwise until you can take it out. Older ROVs have a regular vent plug instead of a PRV.
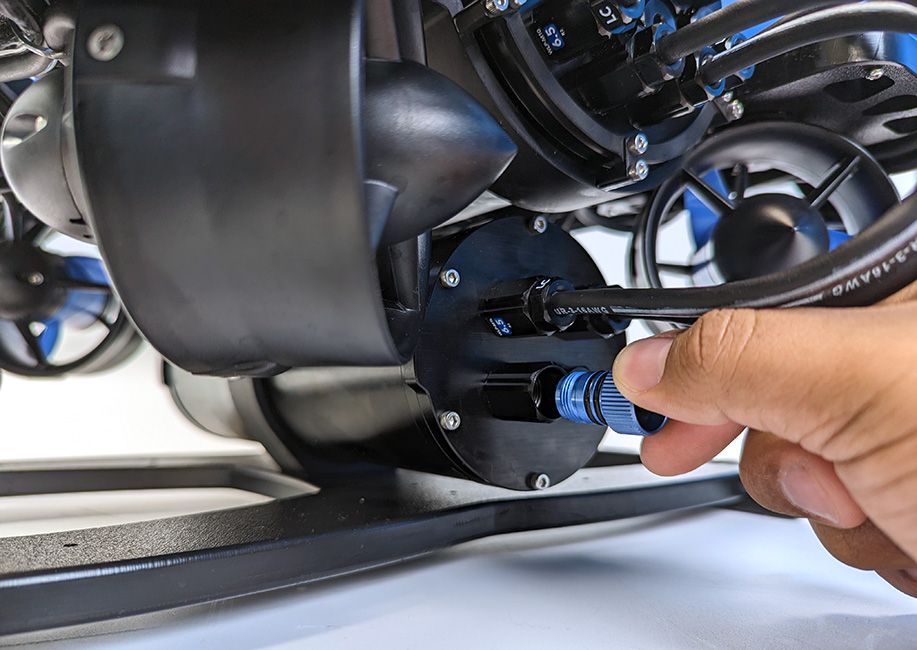
2. Remove the locking cord from the enclosure. Older ROVs may not have a locking cord.
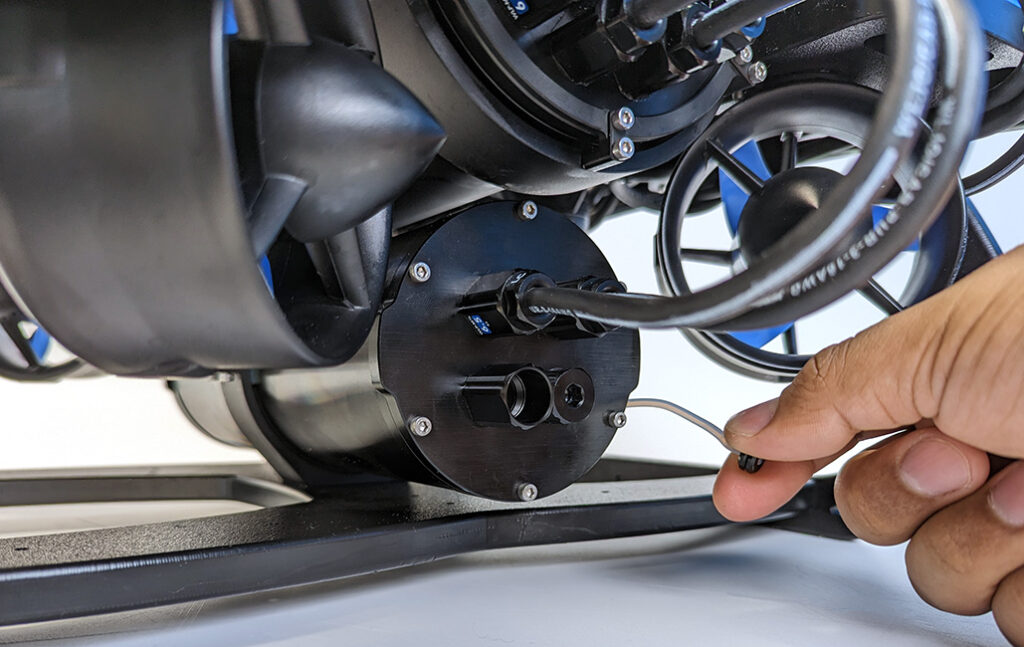
3. Grip the end cap from the tabs and pull it away from the tube to remove it and open the enclosure. Do not pull directly from the power cables.
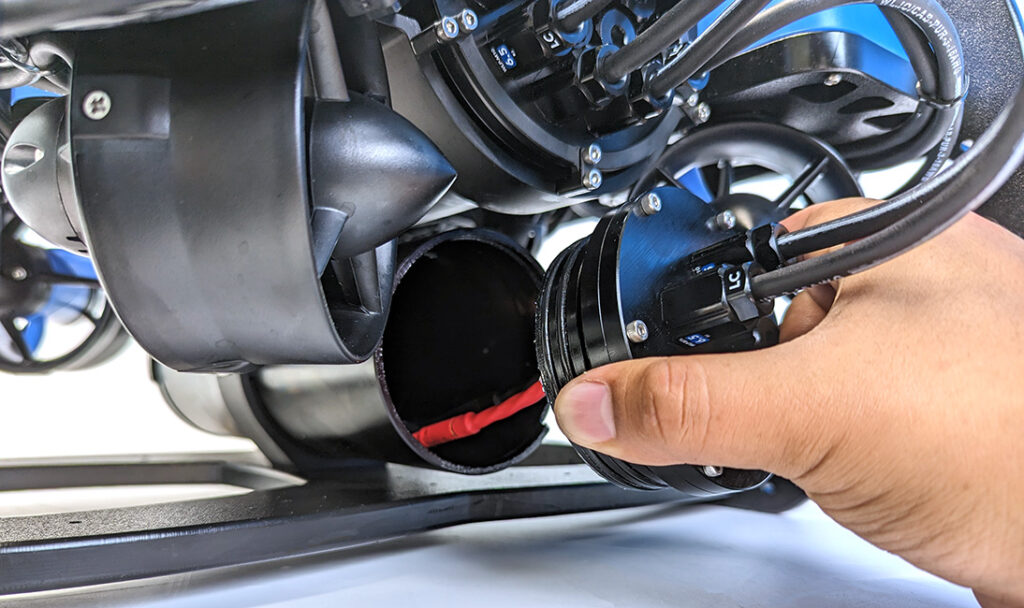
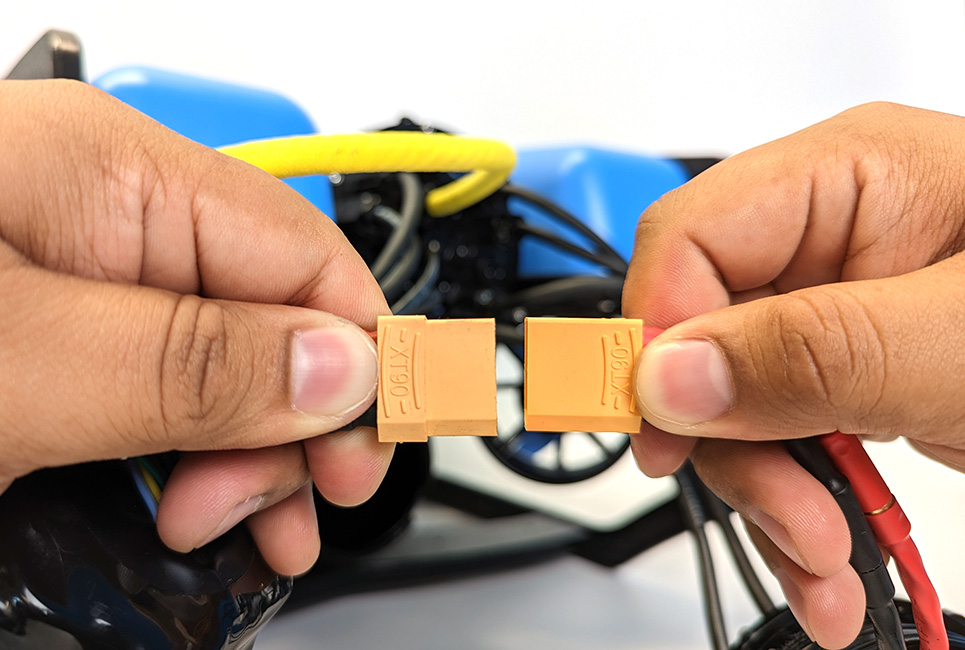
You now have access to the power cable. To power on the ROV, connect the XT90 connector from the battery to the XT90 connector on the power cable and place the battery in the tube. To power off the ROV, disconnect the battery from the power cable and remove it from the tube.
To close the battery enclosure:
1. Push the end cap and flange assembly back onto the tube until it is fully seated. If you have a locking-style enclosure, make sure the rotation locking tab sits inside the slot in the tube.
2. Insert the locking cord through the slot. Older ROVs may not have a locking cord.
3. Reinstall the PRV or vent plug back in the bulkhead. Turn the plug clockwise until it stops to seal it.
Opening the Electronics Enclosure
You will occasionally need to open the Electronics Enclosure to install accessories or service the BlueROV2. To open the Electronics Enclosure, you will need:
- 1 x 2.5 mm hex key or driver
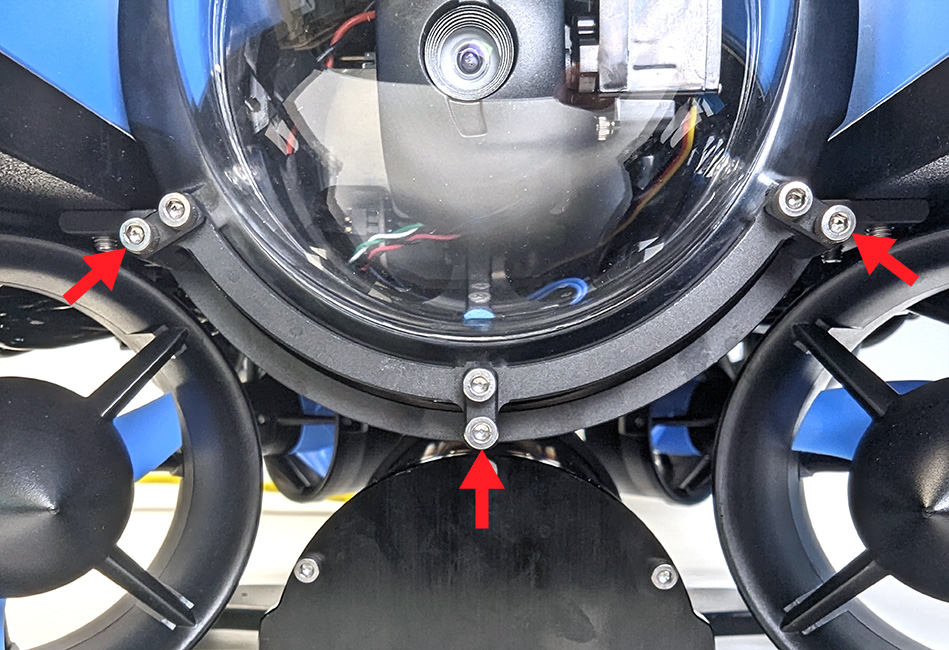
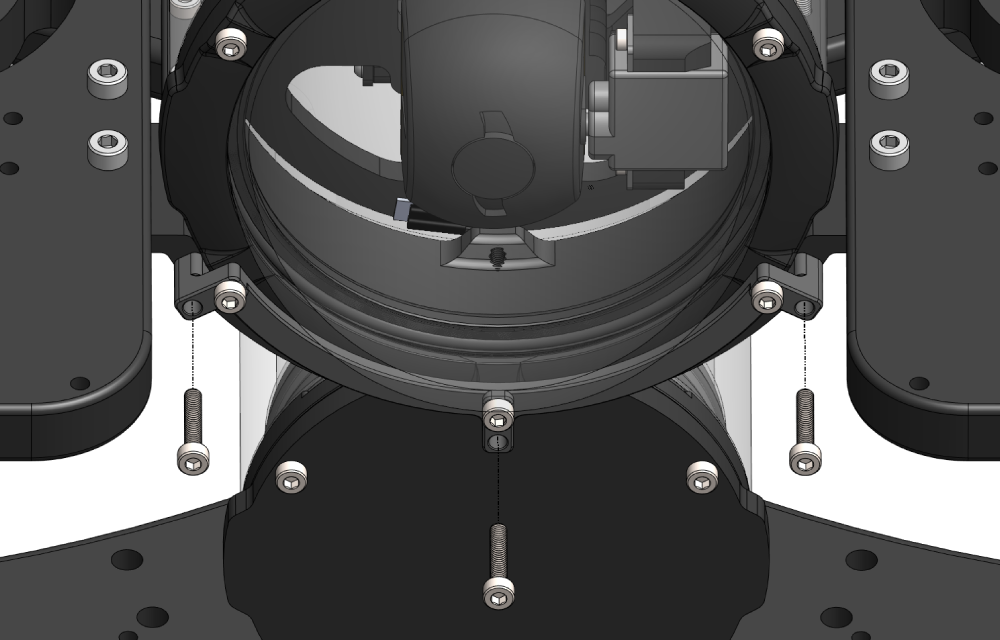
1. There is an enclosure mounting clip located on the front and rear of the Electronics Enclosure. Remove the three M3x16 screws that secure both mounting clips to the enclosure cradles. Older ROVs use only two screws and small mounting extensions.
2. Remove the Pressure Relief Valve (PRV) plug from the bulkhead by turning the plug counterclockwise until you can take it out. Older ROVs have a regular vent plug instead of a PRV.
3. Remove the locking cord from the enclosure. Older ROVs may not have a locking cord.
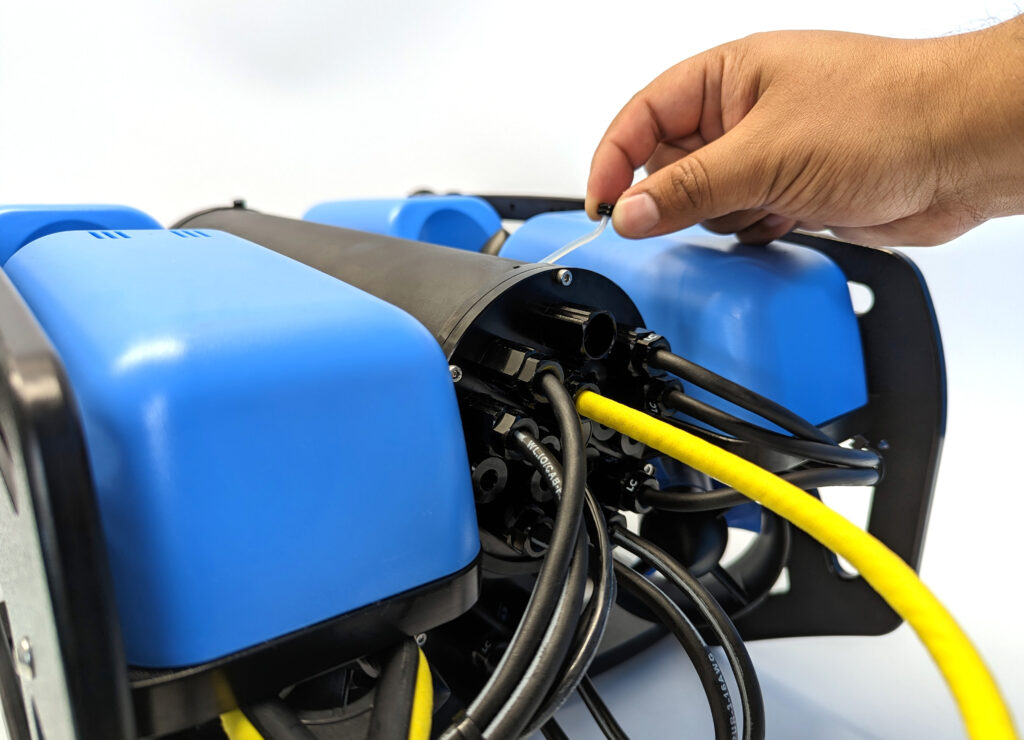
4. Remove the tube and dome assembly from the rest of the Electronics Enclosure assembly. If this step is difficult, try pushing the flange up from the end cap tabs while gripping the tube. Alternate pushing up from the tab on each side of the end cap until the flange is off. If this is still difficult, you can place a flathead screwdriver into the slots on the O-ring flange and then twist to make a gap between the tube and the O-ring flange. Once you have the gap, you can wedge the screwdriver between the end of the tube and the O-ring flange to finish removing the tube.
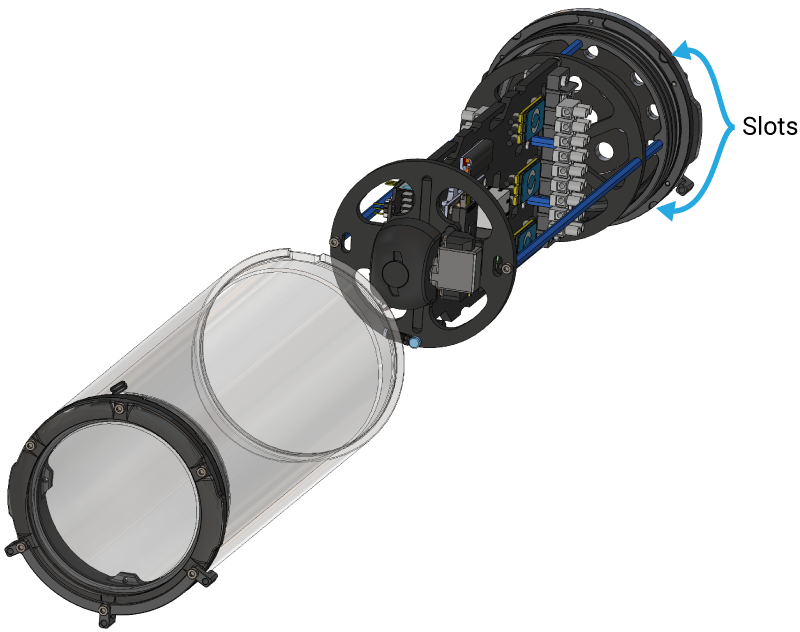
With the tube removed, you can now access the electronics inside the BlueROV2.
To close the Electronics Enclosure again:
1. Apply a thin coat of silicone grease (Molykote 111) to the two radial O-rings on the O-ring flange and the inner surface of the tube if necessary.
2. Reinstall the tube and dome assembly onto the flange. If the ROV has a locking-style enclosure, ensure the rotation locking tab sits inside the slot in the tube.
3. Insert the locking cord through the slot. Older ROVs may not have a locking cord.
4. Reinstall the PRV or vent plug back in the bulkhead. Turn the plug clockwise until it stops to seal it.
5. Place the Electronics Enclosure on the enclosure cradles and line up the mounting clips with the screw holes on the cradles. Use the 2.5 mm hex to install the screws through the mounting clips and into the front and rear enclosure cradles
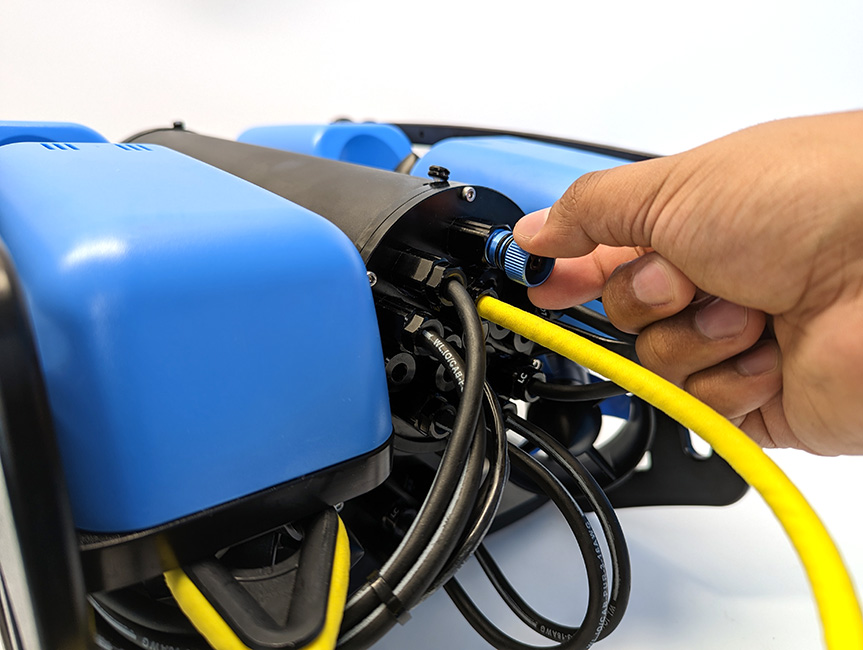
Removing and Installing a Penetrator Bulkhead
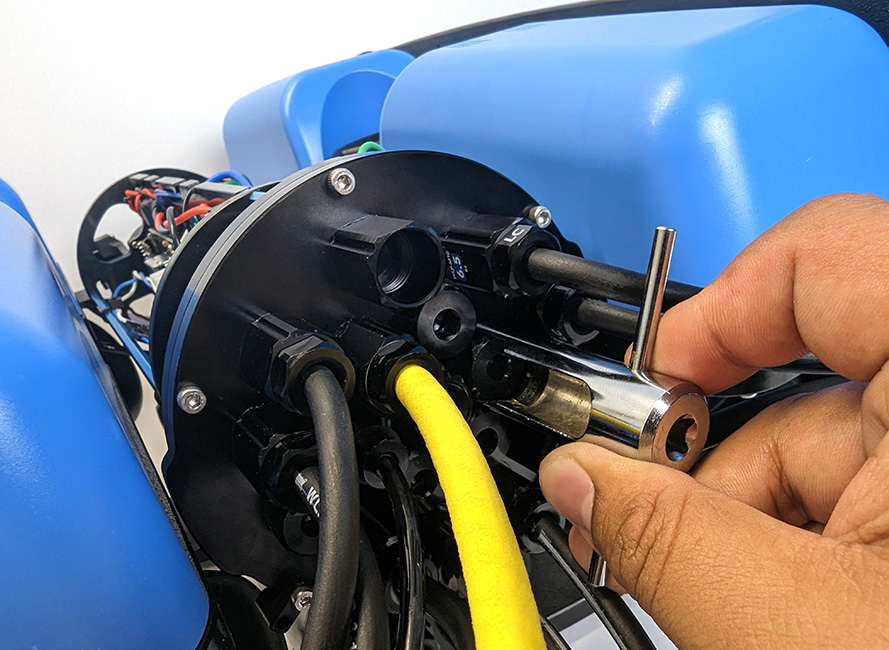
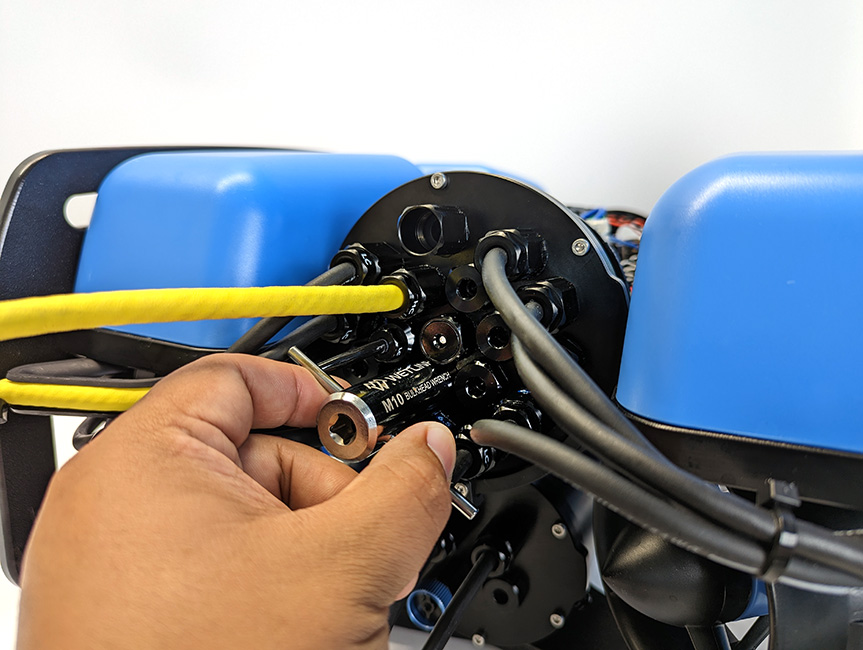
When installing an accessory on your BlueROV2, you will usually have to install its penetrator bulkhead in the Electronics Enclosure end cap. A penetrator must be removed from the end cap before you can install the new penetrator. To do this you will need:
- 1 x M10 Bulkhead Wrench
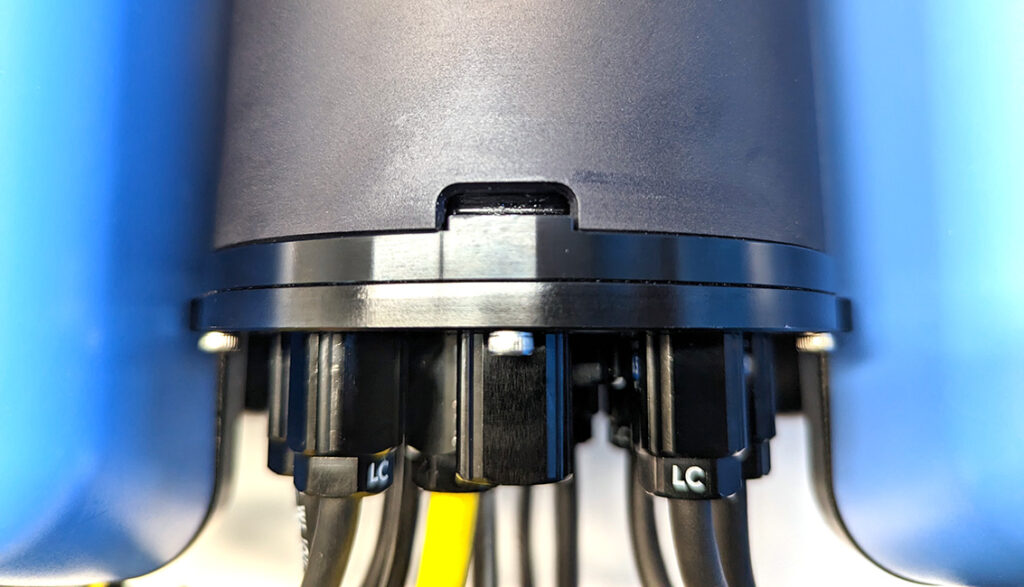
1. Choose a penetrator to remove from your end cap. If you are installing a new accessory, choose one of the blank penetrators. Blank penetrators are used to seal the unused holes in the end cap and do not have any wires connected to them. An example of an end cap with blank penetrators is shown below. Your end cap may look different depending on the accessories you already have installed on your ROV. Plan which side of the ROV you will mount the device and how you will route the cable, then pick a blank penetrator that is close to that side.
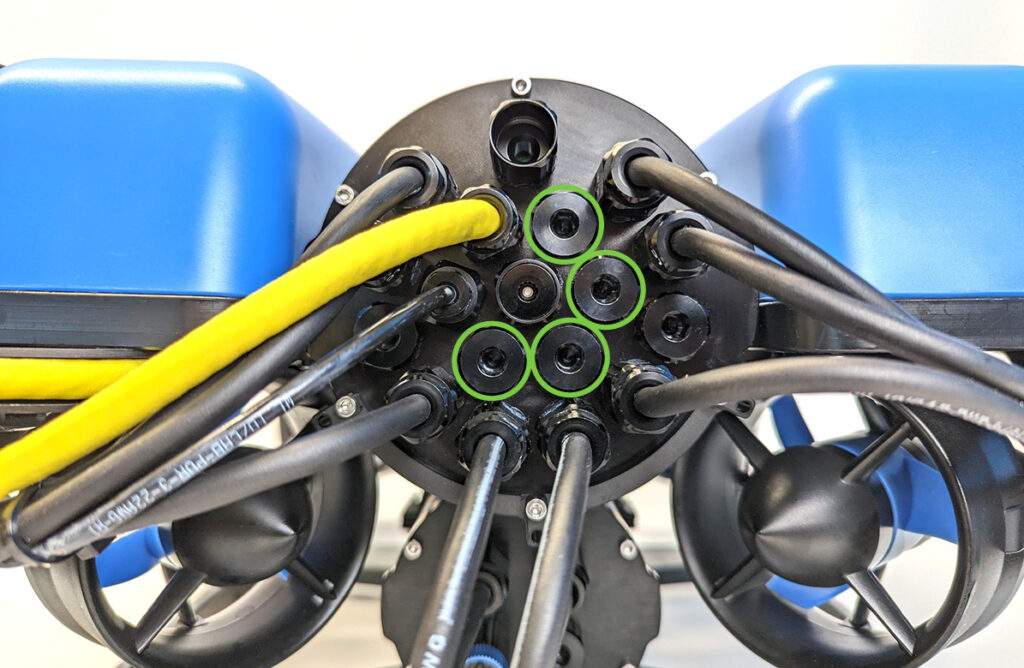
2. Use the Bulkhead Wrench to turn the penetrator counterclockwise to loosen it, then finish removing it by hand. Some penetrators have a penetrator nut in the back that needs to be removed before removing the penetrator.
To install a penetrator bulkhead, you will need:
- 1 x M10 Bulkhead Wrench
- Silicone grease (Molykote 111)
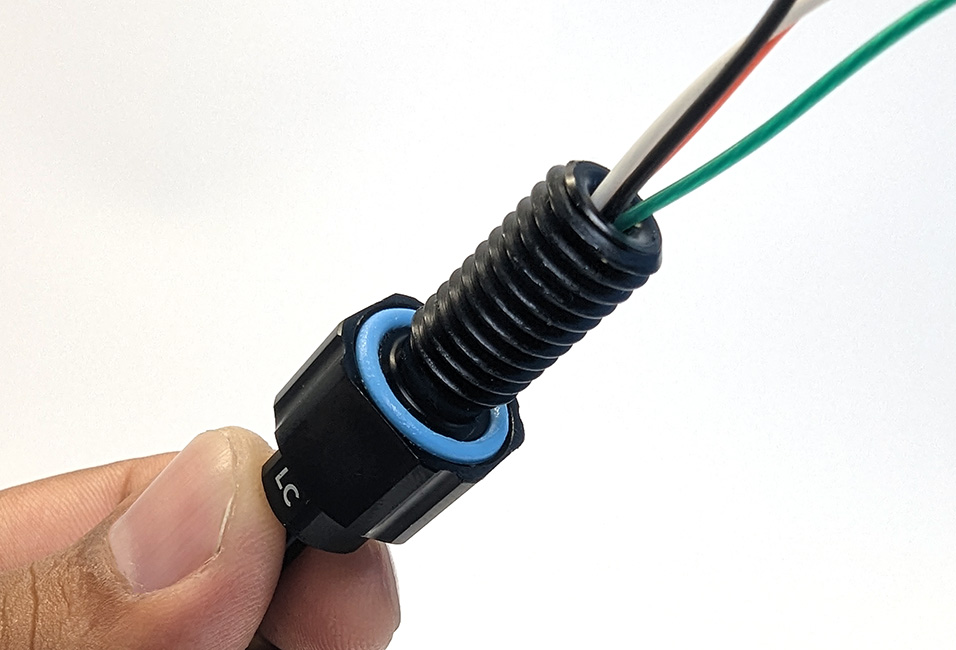
1. Inspect the O-ring included with the penetrator to make sure it is not dirty or damaged.
2. Lubricate the O-ring with a thin, even layer of silicone grease and install it in the groove on the underside of the penetrator.
3. The penetrator holes in the end cap may be threaded or unthreaded. To install a penetrator in a threaded hole, screw the penetrator clockwise into the hole by hand until finger-tight, do not install a penetrator nut on the back of the penetrator. Use the M10 Bulkhead Wrench to finish tightening the penetrator completely. If the penetrator cannot be loosened using your fingers, it is tight enough.
To install a penetrator in an unthreaded hole, insert the penetrator through the hole and fasten a penetrator nut on the other side. Tighten the nut and bulkhead by hand until finger-tight. Use the Bulkhead Wrench to fully tighten the penetrator until it no longer rotates in the hole. A second Bulkhead Wrench may be helpful to hold the nut in place while you do this. The penetrator is installed properly when you are not able to loosen it using your fingers.
Removing the Fairings
Removing the fairings can make cable management when installing new accessories easier. To remove the fairings, you will need:
- 1 x #2 Phillips screwdriver
Use the screwdriver to remove the self-tapping screws that hold the fairings to the frame panels. Each fairing uses four screws.
To put the fairings back, insert the self-tapping screws through the screw holes in the frame panels and screw them into the fairings. Each fairing uses four screws.
Adjusting Ballast
For the longest battery life and the best driving experience, it is important to have the ROV floating level and as close to neutrally buoyant as possible in the water. When we say “neutrally buoyant”, it means the ROV will neither float up or sink, but remain suspended at the same level. If the ROV is not level or is excessively buoyant in either direction, it will need to work harder to stabilize and maintain depth during operations, resulting in reduced battery life. Whenever accessories are installed or removed from the ROV, the ballast must be readjusted accordingly. The ballast weights positioned beneath the ROV can be added, removed, or repositioned to achieve the desired balance.
To adjust the ballast on the BlueROV2, you will need:
- The ballast weights and 8-18″ ballast mounting screws included in the BlueROV2 kit
- 1 x #2 Phillips screwdriver
1. Make sure the ROV enclosures are sealed and the PRV or vent plugs are properly installed. Place the ROV in calm water, a medium-size pool is best. The ROV should have enough room for you to be able to see how it naturally floats in the water. The ROV should be powered off or disarmed while you adjust the ballast.
2. Check how the ROV is floating in the water. The ROV should not be tilting or pitching to any side. If it is, add, remove, or relocate the ballast weights as needed to get the ROV to float level in the water.
3. The ROV should also not quickly sink or float up to the surface of the water. Push the ROV half an arm’s length under the water and let go, it should not sink or rise but maintain its current level. Add or remove ballast weights to achieve neutral buoyancy.
Adjusting the ballast involves some trial and error but is crucial for achieving stability, control, efficiency, and safety during underwater operations.
Preventative Maintenance
Every 24 Hours of Operation or Every 2 Months
- Visually check the radial seals on the electronics and battery enclosure are lubricated with silicone grease and intact (not cracked or sliced).
Every 100 Hours of Operation or Every 6 Months
- Replace radial battery cap O-rings on the side that you open and close when swapping batteries.
- Replace vent plug O-rings.
Connection diagrams
These diagrams outline all of the electrical connections between components in the ROV. There is a different diagram for each version of the ROV that Blue Robotics has produced.
- BlueROV2 with red-wire (BEC) ESCs (Pre-2018)
- BlueROV2 with no-red-wire ESCs (R1, R2, and R3)
- BlueROV2 Heavy (R1, R2, and R3)
- BlueROV2 (R4, current)
Autopilot Output Channel Configuration
The following tables show the default BlueROV2 and BlueROV2 Heavy autopilot servo output channel configuration and associated parameters. Default configurations are provided for both the Navigator Flight Controller and the discontinued Pixhawk 1.
Navigator
| Output Channel | Servo Number | Connected Device/Function | SERVO#_FUNCTION Parameter |
|---|---|---|---|
| BlueROV2 | |||
| 1 | SERVO1 | Thruster 1 | Motor1 |
| 2 | SERVO2 | Thruster 2 | Motor2 |
| 3 | SERVO3 | Thruster 3 | Motor3 |
| 4 | SERVO4 | Thruster 4 | Motor4 |
| 5 | SERVO5 | Thruster 5 | Motor5 |
| 6 | SERVO6 | Thruster 6 | Motor6 |
| 7 | SERVO7 | Not used | Disabled |
| 8 | SERVO8 | Not used | Disabled |
| 9 | SERVO9 | servo_1 button function (Newton Gripper) | Disabled |
| 10 | SERVO10 | servo_2 button function (Newton Gripper) | Disabled |
| 11 | SERVO11 | servo_3 button function (Newton Gripper) | Disabled |
| 12 | SERVO12 | Not used | Disabled |
| 13 | SERVO13 | Lumen lights | Lights1 |
| 14 | SERVO14 | Lights 2 (optional) | Lights2 |
| 15 | SERVO15 | Not used | Disabled |
| 16 | SERVO16 | Camera tilt servo | MountTilt |
| BlueROV2 Heavy | |||
| 1 | SERVO1 | Thruster 1 | Motor1 |
| 2 | SERVO2 | Thruster 2 | Motor2 |
| 3 | SERVO3 | Thruster 3 | Motor3 |
| 4 | SERVO4 | Thruster 4 | Motor4 |
| 5 | SERVO5 | Thruster 5 | Motor5 |
| 6 | SERVO6 | Thruster 6 | Motor6 |
| 7 | SERVO7 | Thruster 7 | Motor7 |
| 8 | SERVO8 | Thruster 8 | Motor8 |
| 9 | SERVO9 | servo_1 button function (Newton Gripper) | Disabled |
| 10 | SERVO10 | servo_2 button function (Newton Gripper) | Disabled |
| 11 | SERVO11 | servo_3 button function (Newton Gripper) | Disabled |
| 12 | SERVO12 | Not used | Disabled |
| 13 | SERVO13 | Lumen lights | Lights1 |
| 14 | SERVO14 | Lights 2 (optional) | Lights2 |
| 15 | SERVO15 | Not used | Disabled |
| 16 | SERVO16 | Camera tilt servo | MountTilt |
Pixhawk 1
| Output Channel | Servo Number | Connected Device/Function | SERVO#_FUNCTION Parameter |
|---|---|---|---|
| BlueROV2 | |||
| Main Out 1 | SERVO1 | Thruster 1 | Motor1 |
| Main Out 2 | SERVO2 | Thruster 2 | Motor2 |
| Main Out 3 | SERVO3 | Thruster 3 | Motor3 |
| Main Out 4 | SERVO4 | Thruster 4 | Motor4 |
| Main Out 5 | SERVO5 | Thruster 5 | Motor5 |
| Main Out 6 | SERVO6 | Thruster 6 | Motor6 |
| Main Out 7 | SERVO7 | Lumen lights | Lights1 |
| Main Out 8 | SERVO8 | Camera tilt servo | MountTilt |
| Aux Out 1 | SERVO9 | servo_1 button function (Newton Gripper) | Disabled |
| Aux Out 2 | SERVO10 | servo_2 button function (Newton Gripper) | Disabled |
| Aux Out 3 | SERVO11 | servo_3 button function (Newton Gripper) | Disabled |
| Aux Out 4 | SERVO12 | Not used | Disabled |
| Aux Out 5 | SERVO13 | Not used | Disabled |
| Aux Out 6 | SERVO14 | SOS Leak Detector | Disabled |
| SBUS (SB) | - | 5V in (5V 6A power supply) | - |
| RCIN (RC) | - | Not used | - |
| BlueROV2 Heavy | |||
| Main Out 1 | SERVO1 | Thruster 1 | Motor1 |
| Main Out 2 | SERVO2 | Thruster 2 | Motor2 |
| Main Out 3 | SERVO3 | Thruster 3 | Motor3 |
| Main Out 4 | SERVO4 | Thruster 4 | Motor4 |
| Main Out 5 | SERVO5 | Thruster 5 | Motor5 |
| Main Out 6 | SERVO6 | Thruster 6 | Motor6 |
| Main Out 7 | SERVO7 | Thruster 7 | Motor7 |
| Main Out 8 | SERVO8 | Thruster 8 | Motor8 |
| Aux Out 1 | SERVO9 | Lumen lights | Lights1 |
| Aux Out 2 | SERVO10 | Camera tilt servo | MountTilt |
| Aux Out 3 | SERVO11 | servo_3 button function (Newton Gripper) | Disabled |
| Aux Out 4 | SERVO12 | Not used | Disabled |
| Aux Out 5 | SERVO13 | Not used | Disabled |
| Aux Out 6 | SERVO14 | SOS Leak Detector | Disabled |
| SBUS (SB) | - | 5V in (5V 6A power supply) | - |
| RCIN (RC) | - | Not used | - |