
Ping Installation Guide for the BlueROV2
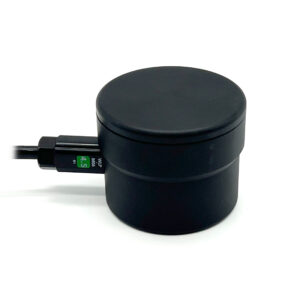
The Ping sonar is a multipurpose single-beam echosounder with a 100 meter sonar range and 300 meter depth rating. When mounted on a BlueROV2, the Ping can be used as an altimeter to measure how high the BlueROV2 is above the seafloor.
Parts and Tools
You Will Need
You will also need the following tools (not included):
- 1 x M10 Bulkhead Wrench
- 1 x 2 mm hex driver
- 1 x 2.5 mm hex driver
- 1 x 3 mm hex driver
- 1 x #2 Phillips screwdriver
- 1 x Power drill and a 5.50 mm (or 7/32”) drill bit
- Silicone grease (Molykote 111)
- Medium-strength threadlocker such as Loctite 242 or 243
- Zip ties for cable management
- 1 x Sharpie or other type of marking pen
If you are installing the Ping on an older ROV equipped with a Pixhawk autopilot, you will also need a BLUART USB to TTL Serial Adapter and a micro-USB cable, which are not included:
Preparing the BlueROV2
You will need to open up the BlueROV2 Electronics Enclosure and remove one of the penetrators to install the Ping. To do this you will need:
- 1 x 2.5 mm hex driver
- 1 x M10 Bulkhead Wrench
If you are not sure how to perform any of the steps in this section, more detailed instructions for each operation are available in the ‘Servicing the BlueROV2’ section of the BlueROV2 Operation guide.
1. Make sure your BlueROV2 is completely powered off by disconnecting the battery.
2. Use the 2.5 mm hex to remove the M3x16 mounting screws that secure the enclosure mounting clips to the cradles, remove the PRV or vent plug, and remove the Electronics Enclosure tube from the Electronics Enclosure assembly.
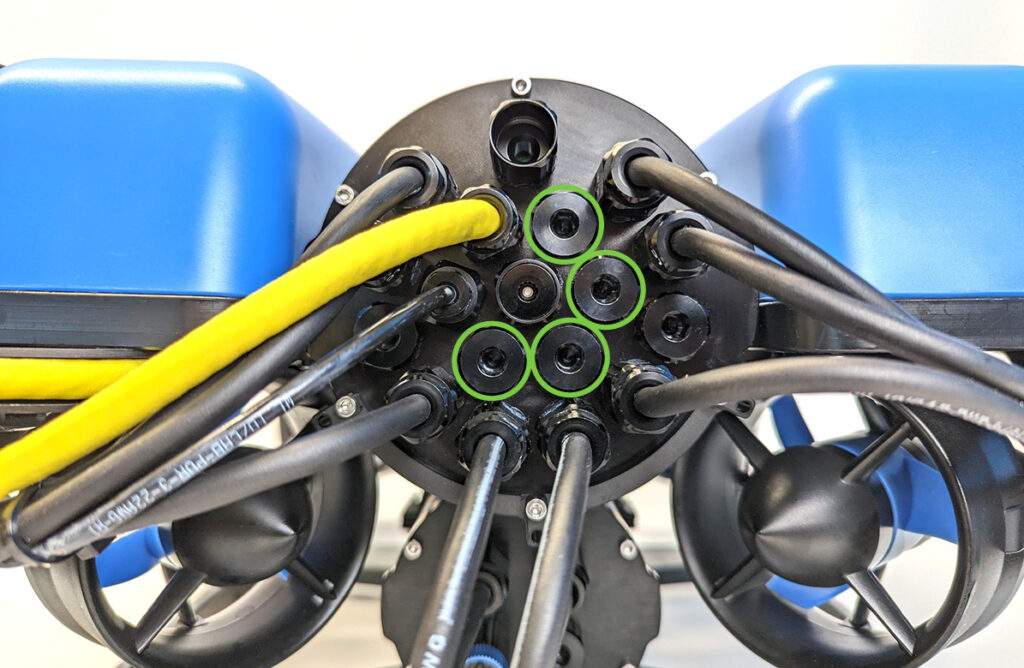
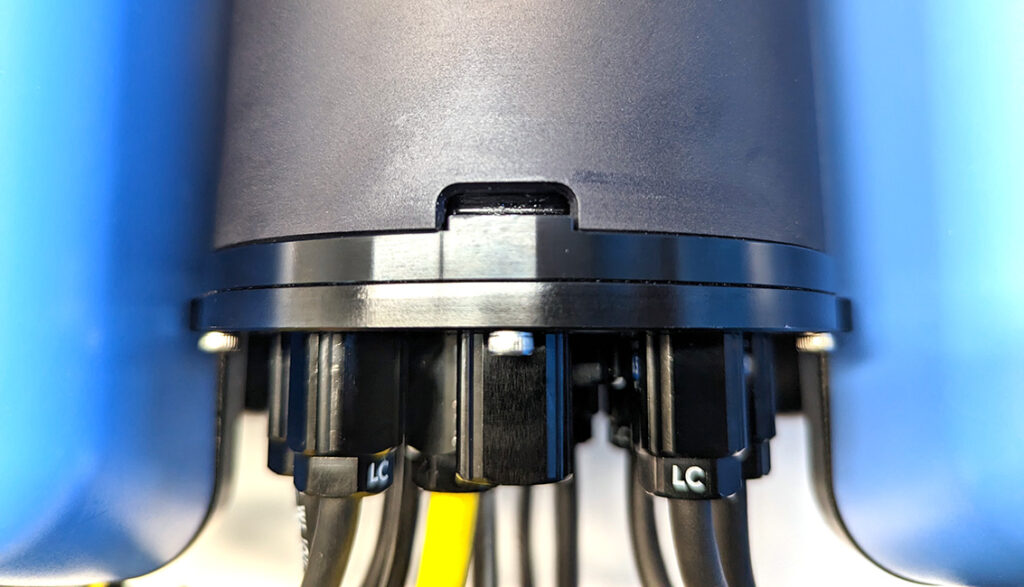
3. Choose one of the blank penetrators in the middle of the end cap and use the M10 Bulkhead Wrench to remove it.
Installing the Penetrator
To install Ping’s penetrator into the end cap, you will need the following parts and tools:
- 1 x Ping sonar
- 1 x Penetrator Nut (included with the Ping)
- 1 x Penetrator O-ring (included with the Ping)
- 1 x Silicone Grease (Molykote 111)
- 1 x M10 Bulkhead Wrench
1. Your Ping may have the JST GH cable adapter already connected to the end of the cable, disconnect this adapter before moving on to the next steps.
2. Wipe the exterior surface of the end cap around the penetrator hole you previously removed the blank penetrator from. Ensure the area around the hole where the O-ring will sit is free of dust or debris.
3. Inspect the penetrator O-ring to make sure it is not dirty or damaged.
4. Lubricate the O-ring with a thin layer of silicone grease and install it in the groove on the underside of the penetrator.
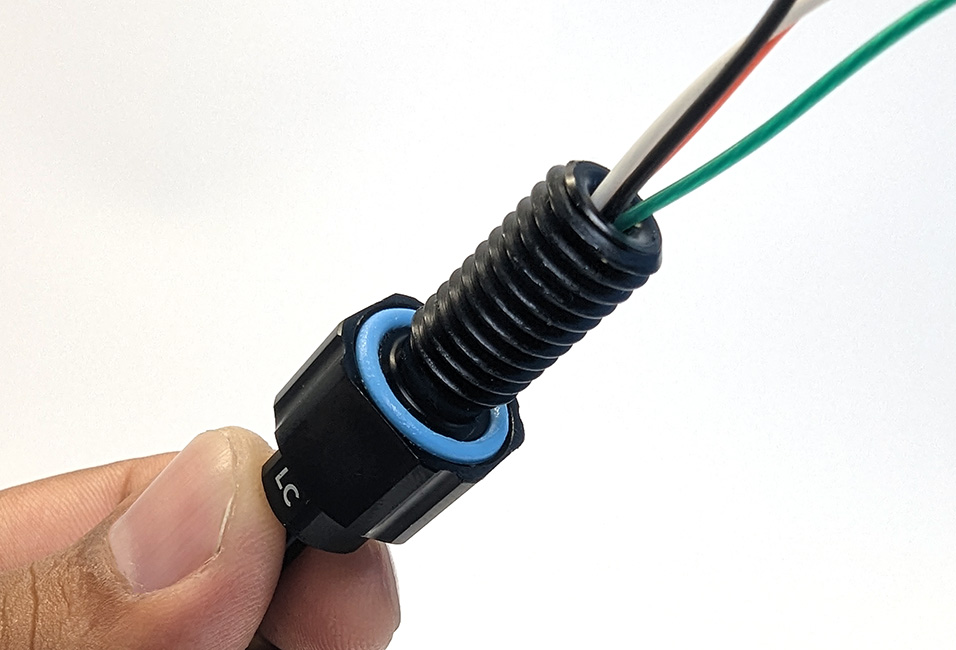
5. Install the penetrator in the hole and fasten the penetrator nut on the other side. Tighten the nut and bulkhead by hand until finger-tight. Use the Bulkhead Wrench to fully tighten the penetrator. The penetrator should no longer rotate in the hole and you should not be able to loosen it using your fingers when installed properly.
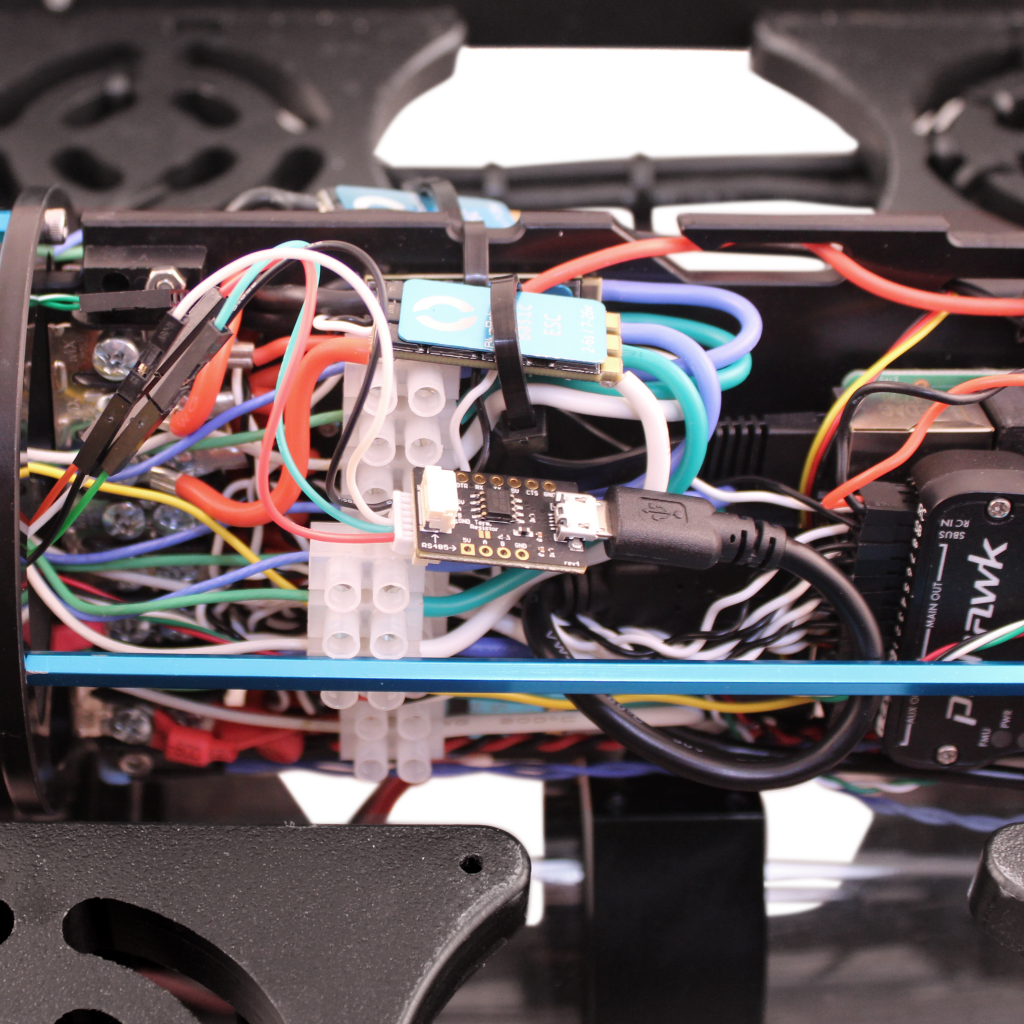
Wire Connections
The connection of the Ping wires inside the ROV depends on whether your BlueROV2 is equipped with a Navigator Flight Controller or a Pixhawk Autopilot. If your BlueROV2 has a Navigator, follow the instructions under ‘Installation with a Navigator’. If your BlueROV2 has a Pixhawk, follow the instructions under ‘Installation with a Pixhawk’.
Installation with a Navigator
For this step you will need:
- 1 x Header pin to JST GH Cable Adapter (included with Ping)
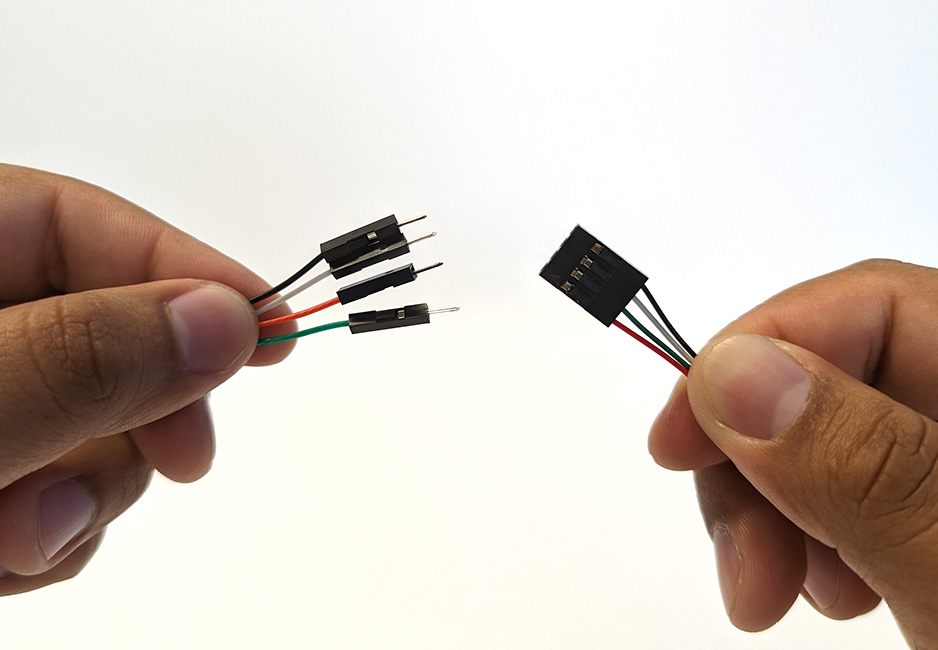
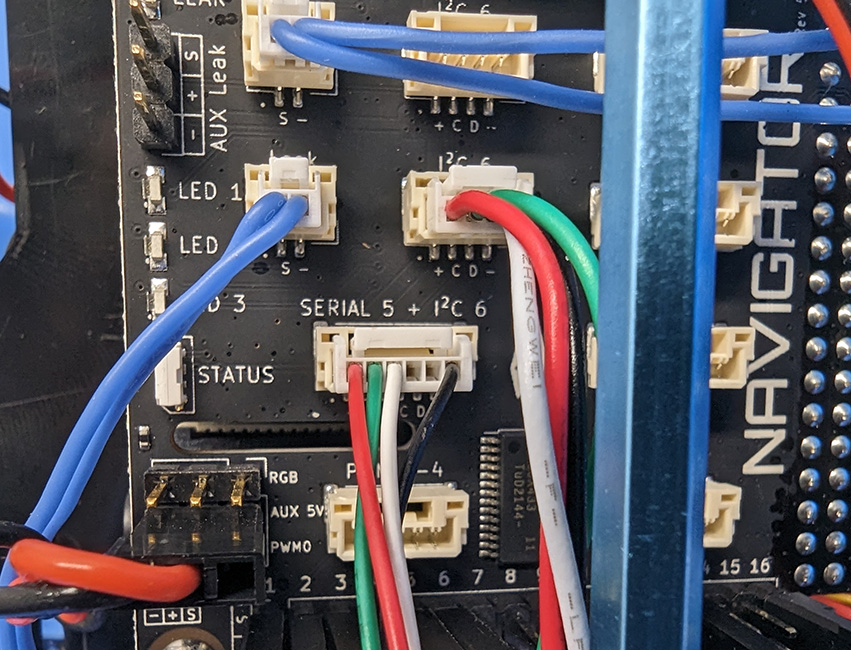
1. Plug the male header pins from the Ping cable into the female 4-position header from the JST GH cable adapter, matching the wire colors as you do so (red to red, black to black, white to white, green to green).
2. Plug the 6-position JST GH connector into the ‘SERIAL 5 + I2C 6′ port on the Navigator.
Installation with a Pixhawk
For this step you will need:
- 1 x Header pin to JST GH Cable Adapter (included with Ping)
- 1 x BLUART USB to TTL Serial Adapter (not included)
- 1 x micro-USB to USB-A cable (not included)
1. Plug the male header pins from the Ping cable into the female 4-position header from the JST GH cable adapter, matching the wire colors as you do so (red to red, black to black, white to white, green to green).
2. Plug the 6-position JST GH connector into the 6-position serial port on the BLUART adapter.
3. Connect a micro-USB cable to the BLUART then plug the USB-A side of the cable into a USB port on the Raspberry Pi.
Reassemble the Electronics Enclosure
To reassemble the Electronics Enclosure, you will need:
- The M3 mounting screws you removed previously
- Silicone grease (Molykote 111)
- 1 x 2.5 mm hex driver
1. Apply a thin coat of silicone grease to the two radial O-rings on the O-ring flange and the inner end of the tube.
2. Reinstall the tube and dome assembly onto the flange. If the ROV has a locking-style enclosure, ensure the rotation locking tab sits inside the slot in the tube.
3. Insert the locking cord through the slot. Older ROVs may not have a locking cord.
4. Reinstall the PRV or vent plug back in the bulkhead. Turn the plug clockwise until it stops to seal it.
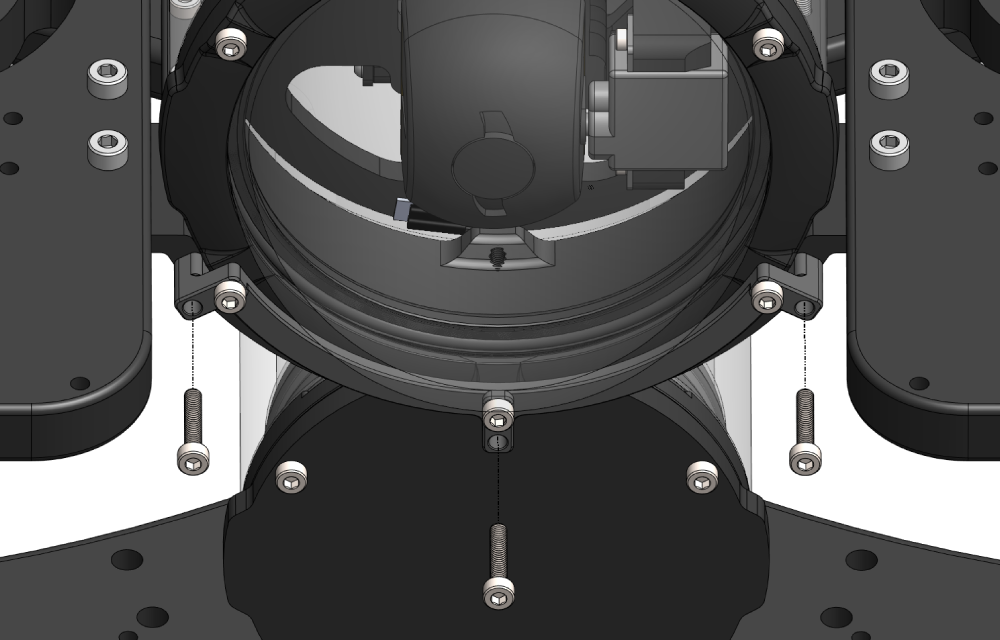
5. Place the Electronics Enclosure on the enclosure cradles and line up the mounting clips with the screw holes on the cradles. Use the 2.5 mm hex to install the screws through the mounting clips and into the front and rear enclosure cradles
Mounting the Ping to the BlueROV2 Frame
To mount the Ping to the BlueROV2 frame, you will need:
- 1 x Ping mounting bracket (included with Ping)
- 1 x 2 mm hex driver
- 1 x 3 mm hex driver
- 4 x M3x5 button head cap screws (included with Ping)
- 2 x M5x16 button head cap screws (included with Ping)
- 1 x Power drill and a 5.50 mm (or 7/32”) drill bit
- 1 x Bottle of threadlocker
- 1 x Marking pen
1. Use the four M3x5 button head cap screws and the 2 mm hex driver to secure the Ping to the mounting bracket.
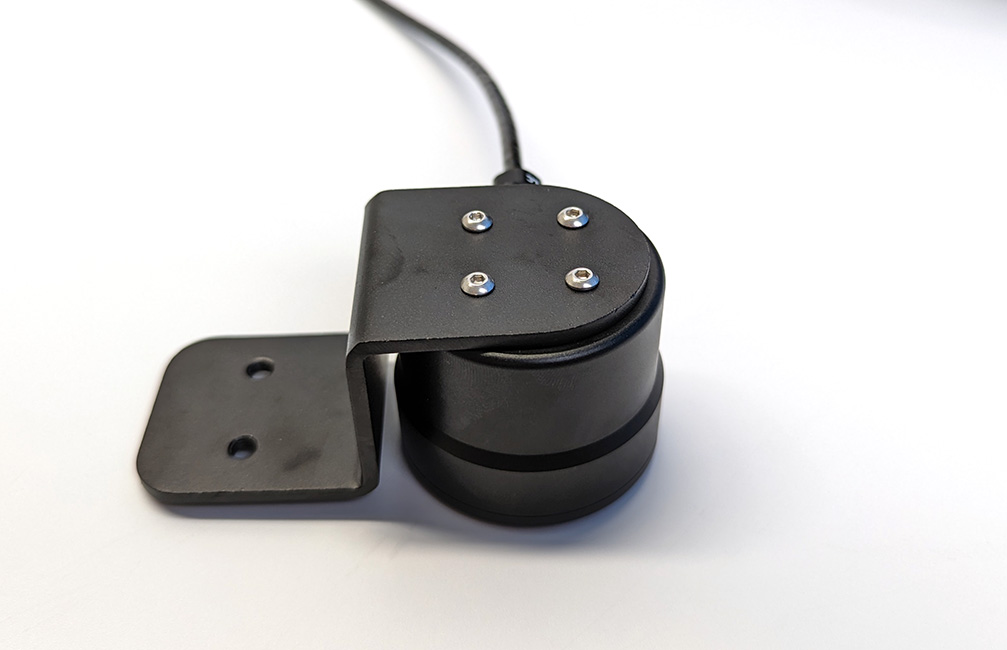
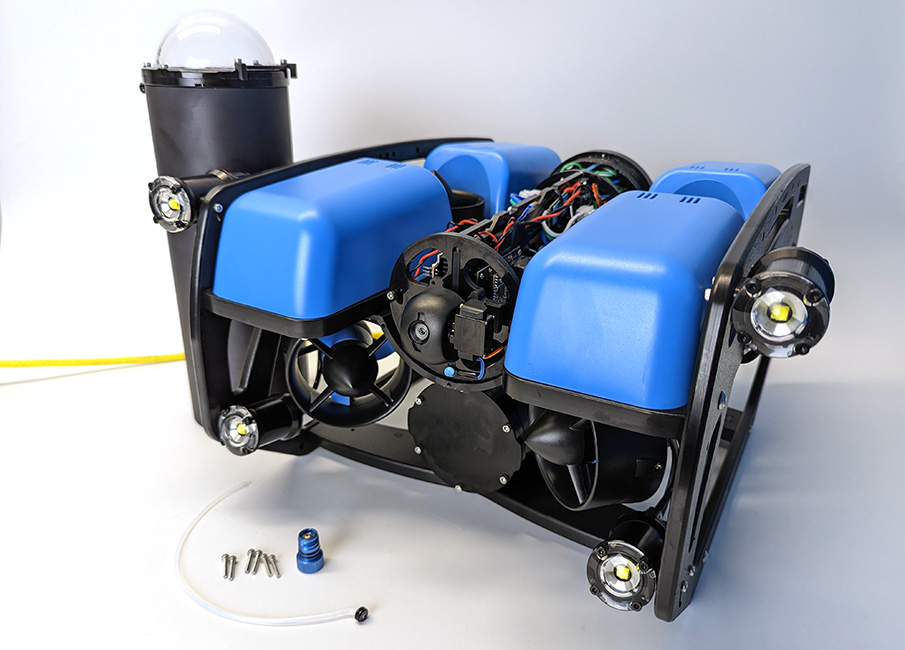
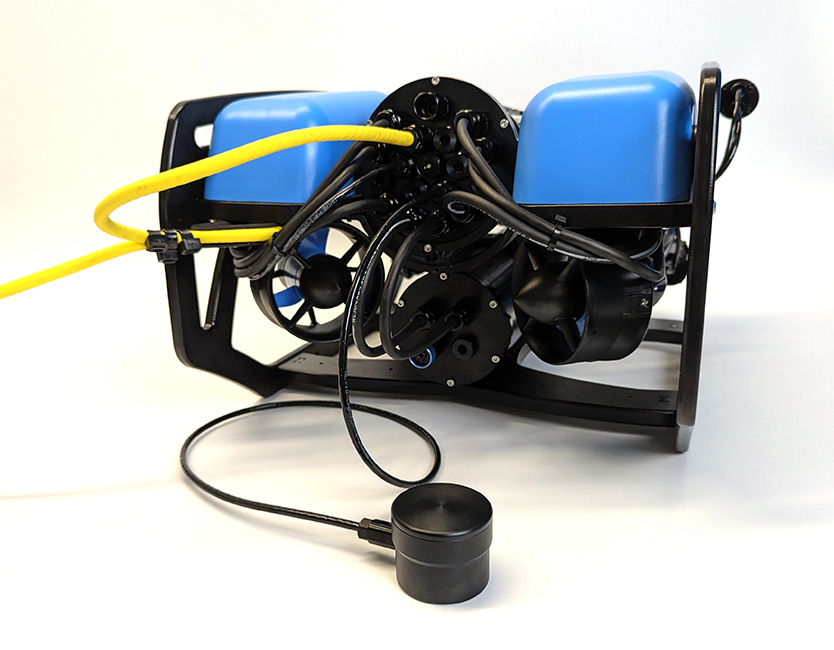
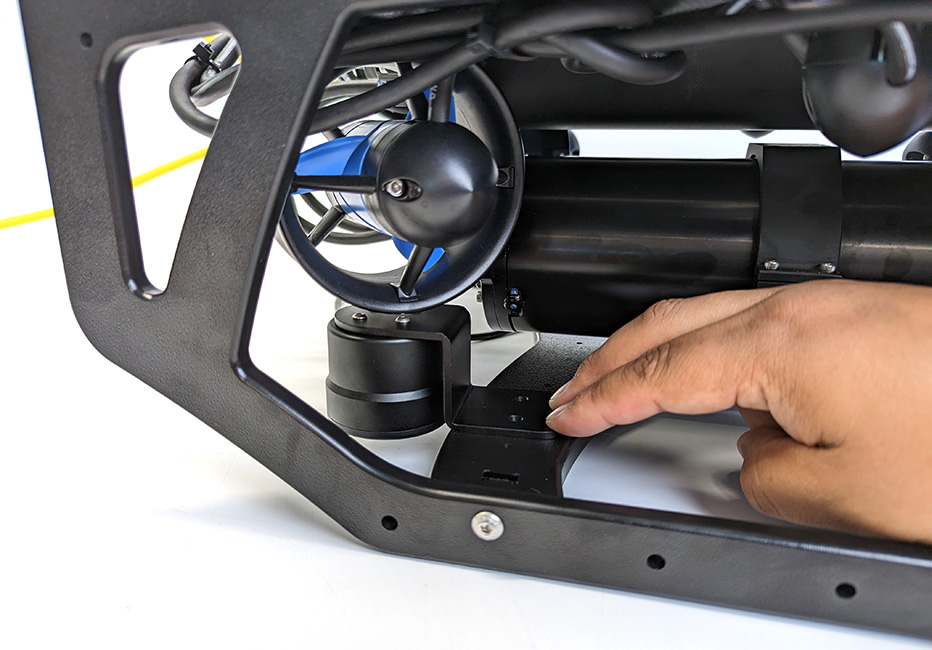
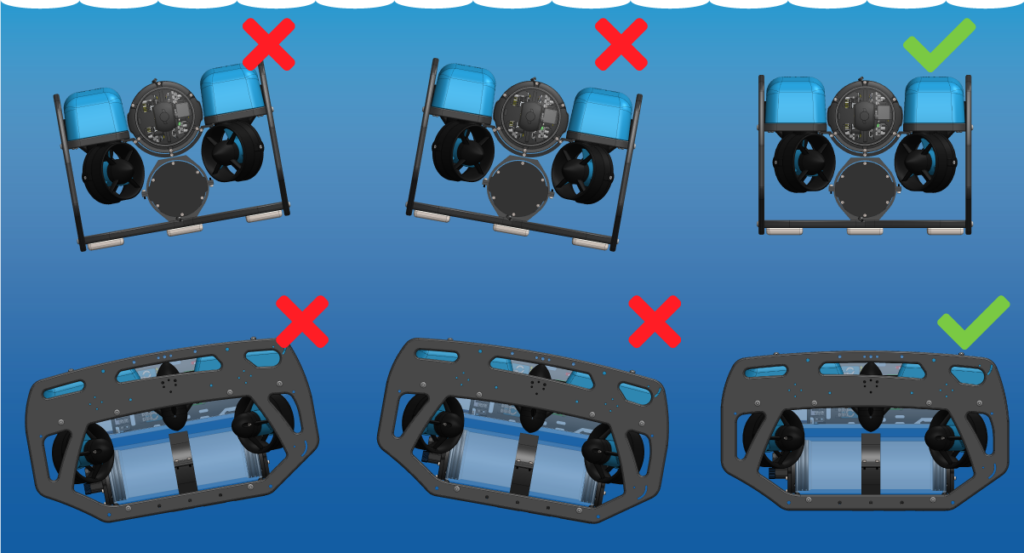
2. There is no template for where the Ping must be mounted on the frame, the final placement is up to the user. The Ping should be mounted on top of the BlueROV2 bottom frame panel with the face of the transducer facing down. Find a location where it will not contact the battery enclosure and the transducer is not obstructed.
Example Ping mounting location.
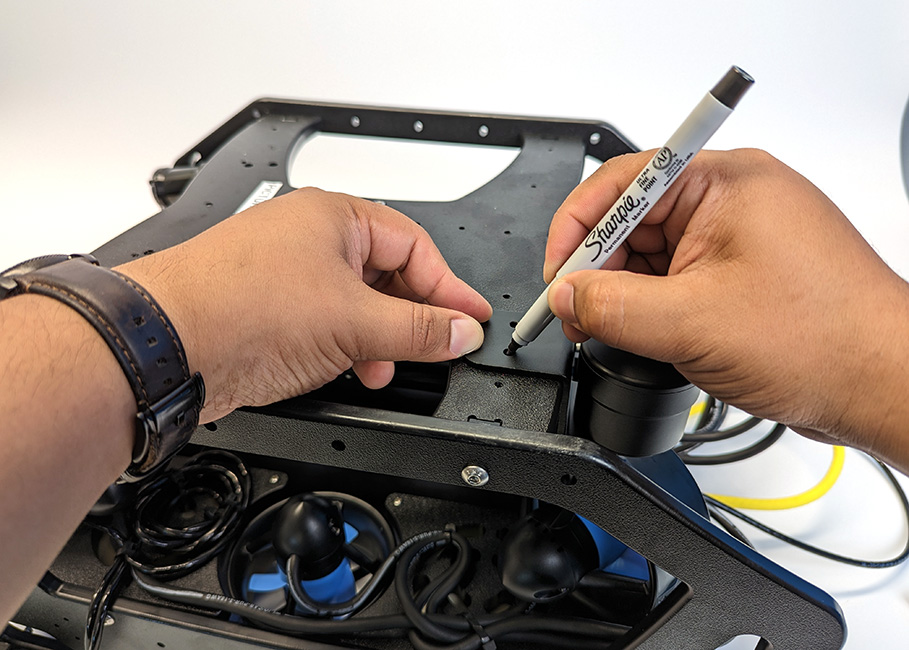
3. After you have decided on a location to mount the Ping, flip the ROV upside down and use the mounting bracket as a template to mark the placement of the two M5 holes using the marker.
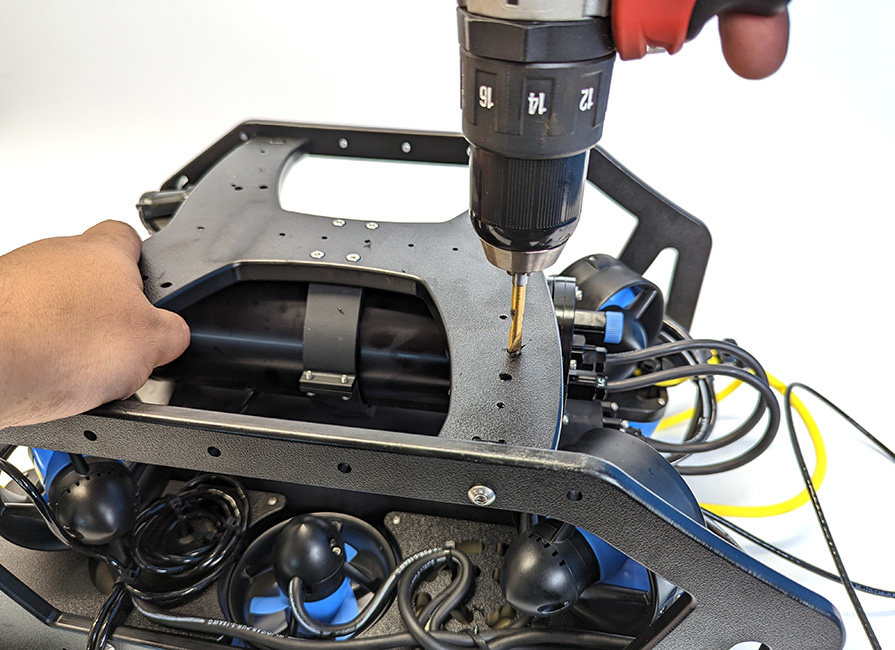
4. Use the power drill to drill mounting holes straight through the bottom frame panel.
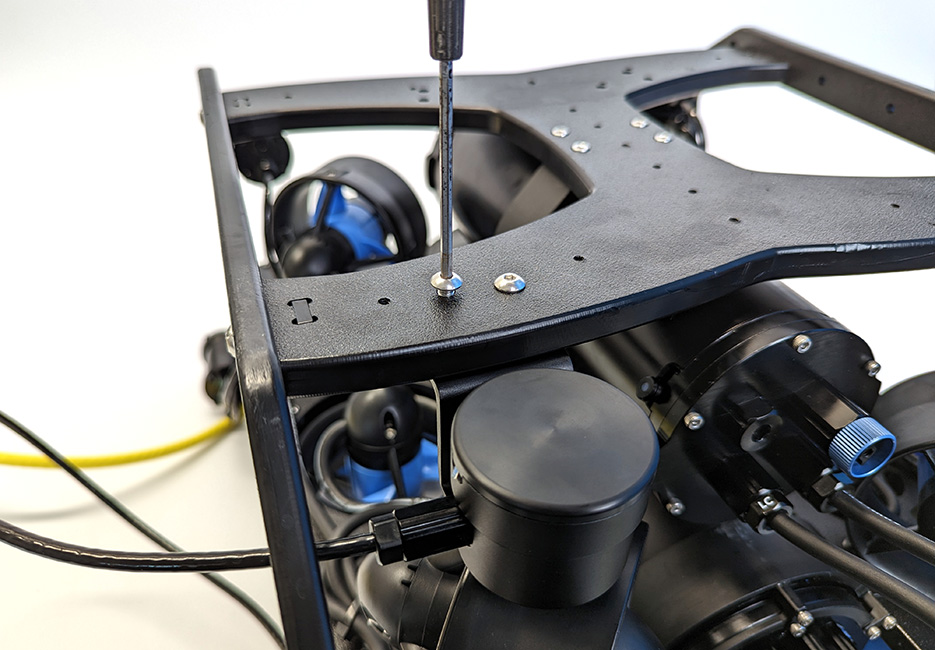
5. Coming from the rear of the BlueROV2, route the Ping assembly through the frame to its mounting location. Apply a drop of threadlocker to the bottom of the M5x16 screws. Use the 3 mm hex driver and the M5x16 screws to secure the mounting bracket to the frame. The screws should go through the bottom panel and screw into the mounting bracket on the other side.
Cable Management
The goal of good cable management is to secure the cable to the ROV frame to prevent it from getting damaged by the thruster propellers or getting caught on something during operation. Secure the cable to the frame using zip ties so there are no loose cable and make sure to check that the cable cannot reach a thruster propeller after you have finished.

Adjusting the Ballast on the Frame
The Ping adds some weight to the BlueROV2 frame so the ROV ballast will need to adjusted to keep it neutrally buoyant and balanced in the water. Add, remove, or relocate the ballast weights on the bottom of the frame to adjust the ballast. You can view complete instructions for adjusting the ballast in the ‘Servicing the BlueROV2’ section of the BlueROV2 Operation guide.
Viewing the Ping Output in Ping Viewer
Ping Viewer is the graphical user interface for the Ping. It allows you to change settings and view and record data from the Ping device.
1. Follow the Ping Viewer Quick Start to install the latest version of Ping Viewer.
2. Power on your BlueROV2 and connect it to your computer.
3. Start Ping Viewer, after a few seconds it should automatically detect the connected Ping sonar and display it in the device manager menu.
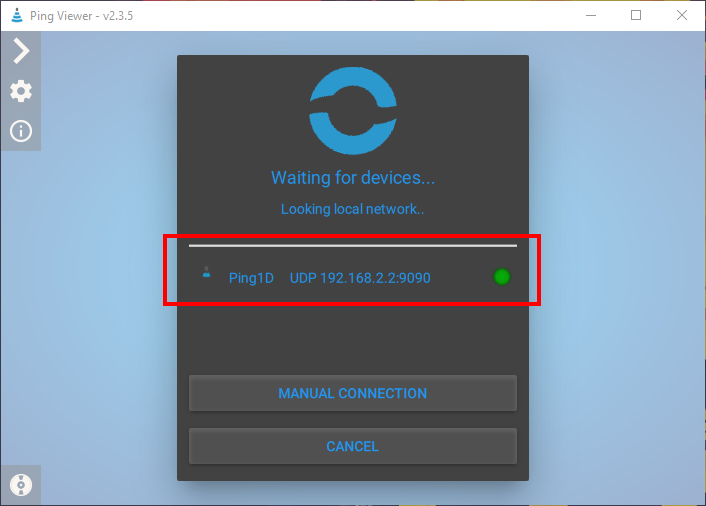
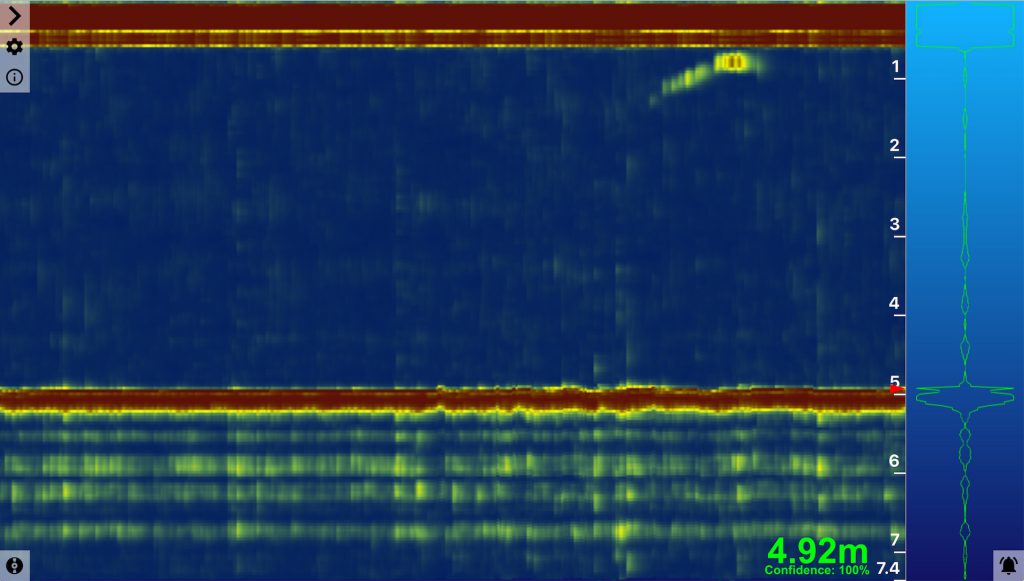
4. Select the Ping from the device manager menu and the waterfall display should automatically start.
Review the complete Ping Viewer documentation to learn about the available Ping device settings and other features.
Viewing Ping Distance Measurements in QGroundControl and Cockpit
The Ping’s distance measurements can be viewed as rangefinder distances in QGroundControl or Cockpit while operating the BlueROV2. The distance measurements can also be automatically saved in the vehicle’s autopilot logs for every mission. To enable range finder distances:
1. Power up your BlueROV2 and connect it to your computer. If you don’t know how to do that, please check out the BlueROV2 Software Setup guide first.
2. Access BlueOS (the BlueROV2’s operating system) by typing 192.168.2.2 or blueos.local into a web browser address bar.
3. From BlueOS, click on the Ping Sonar Devices page from the left sidebar, you should see the Ping device detected in this menu. Enable the MAVLink Distances setting, this makes it so the Ping distance measurements are available to the autopilot system and logged in the autopilot logs for every mission.

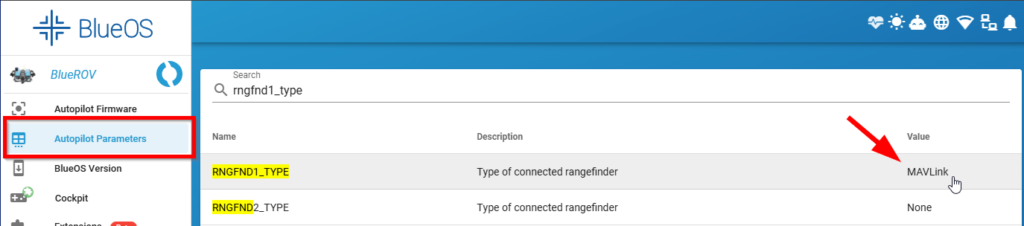
4. Click on Autopilot Parameters from the left sidebar. In the search field, type in “rngfnd1_type” to find the RNGFND1_TYPE parameter. Change this parameter from None to MAVLink.
5. Click on the BlueOS power options from the bottom of the left sidebar and select RESTART AUTOPILOT.
View Distance In QGroundControl
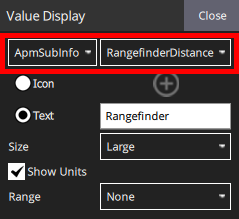
1. In QGC, hover your mouse over the vehicle telemetry panel, click on the pencil icon that appears to edit the telemetry panel.

2. Click on the telemetry information you want to change, you can also click on the + and – icons to add or remove rows and columns of telemetry info.
3. The rangefinder distance is found under the ApmSubInfo category as RangefinderDistance. Click Close then click on the padlock icon when you are done.
View Distance In Cockpit
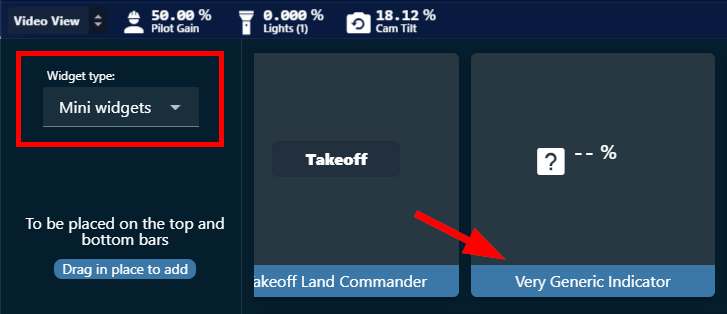
1. In Cockpit, open the main menu and click on Edit Interface.
2. On the bottom of the page, change the Widget type to Mini widgets and find the Very Generic Indicator widget. Drag and drop the widget to the desired location on the bottom bar.
3. The configuration panel should open up. Click on Custom, then Click to choose… under the Variable heading. Search for “range” then select the RANGEFINDER/distance variable.
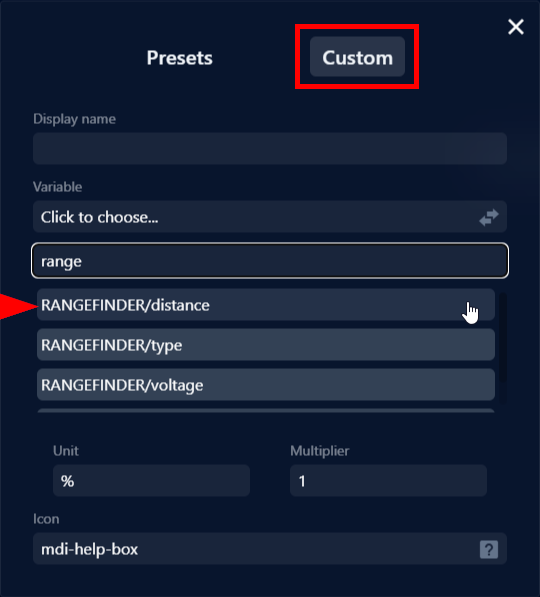
4. You can change the unit display, title, and icon to whatever you like, close the panel when you are done.
Other Guides and Feedback
Ping Sonar Technical Manual
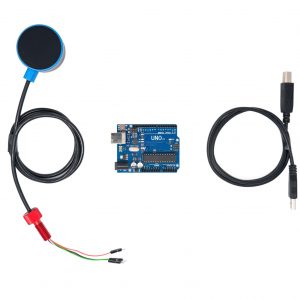
Using the Ping Sonar with an Arduino
We’re always trying to improve our documentation, instructions, software, and user experience. If you’d like to leave feedback about how we can make this guide better, let us know here.