
Navigator Software Setup
Guides in this series
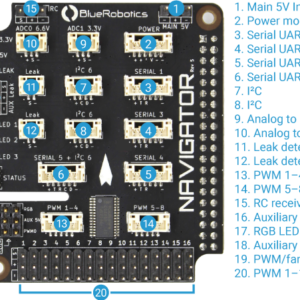
Navigator Hardware Setup
Navigator Software Setup
Navigator Developer Guide
Introduction
BlueOS is a collection of tools and features for managing a vehicle through a browser accessible user interface. It allows you to quickly and easily get started with your Navigator powered vehicle. This guide will show you how to install ArduPilot firmware using BlueOS and configure your vehicle using ground control station software.
Installing BlueOS
The Navigator kit comes with a 16 GB SD card preloaded with BlueOS software to help you get started quickly, so no installation is required.
If you ever need to image your own SD card, or reimage an SD card with a fresh installation of BlueOS, we have provided some instruction here:
1. Download and install balena Etcher, be sure to select the correct version for your operating system.
2. Download the latest stable BlueOS version from this link. The BlueOS image will be downloaded as a .zip file, you do not need to unzip it or extract the contents.
3. Insert a microSD card with at least 4GB capacity into your computer using an SD card reader/writer.
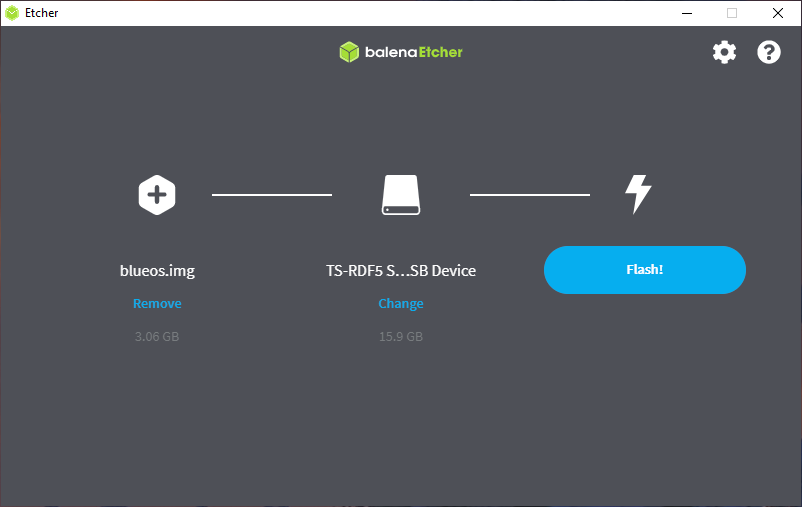
4. Open balena Etcher and select the BlueOS .zip file and your SD card, click “Flash” and wait for the process to complete.
5. Eject the SD card, it is now ready to be inserted into the Raspberry Pi.
Accessing BlueOS
BlueOS creates a browser accessible user interface to install vehicle firmware and manage other aspects of the vehicle.
With the Navigator and Raspberry Pi fully assembled, insert the SD card into the Raspberry Pi and power on the system. The very first boot may take a couple of minutes as it expands the filesystem to the SD card capacity. It should take around 2 minutes for a 16GB class 10 SD card.
The BlueOS web interface can then be accessed using the following methods:
Direct Ethernet Connection
The Raspberry is preconfigured with a static IP address of 192.168.2.2 and expects the ground control station computer to have an IP address of 192.168.2.1.
1. Connect the Raspberry Pi directly to your computer using an Ethernet cable. If your computer does not have an Ethernet port, a USB Ethernet adapter can be used.
2. With the Raspberry Pi powered on and connected to the computer (via the Ethernet port or a USB Ethernet adapter), configure the network settings according to the operating system you are using:
Windows 10 & 11
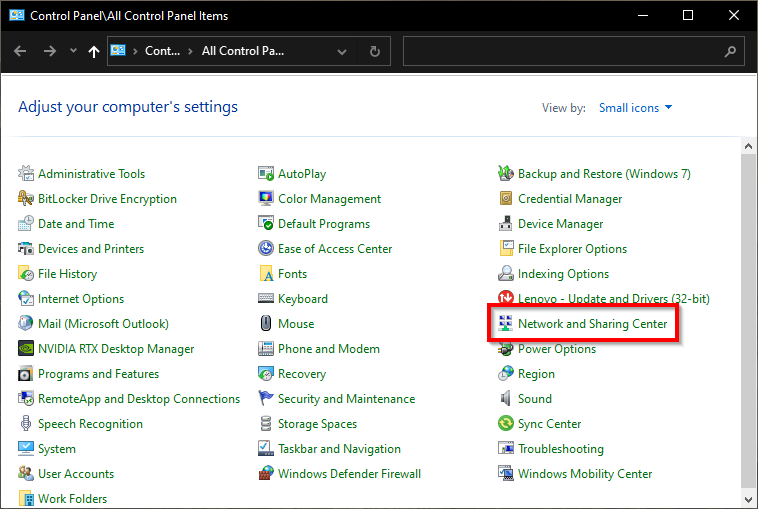
1. Go to the Windows Control Panel then select Network and Sharing Center. If you do not see Network and Sharing Center, change the View by option to large or small icons.
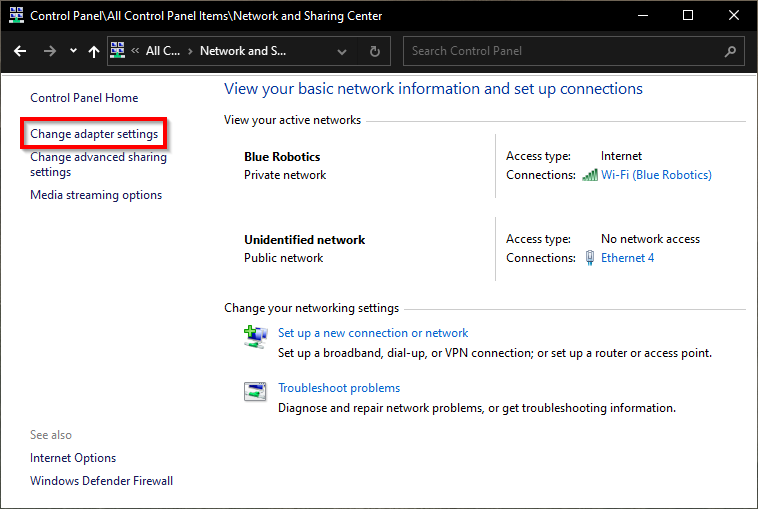
2. In the Network and Sharing Center panel, select Change adapter settings.
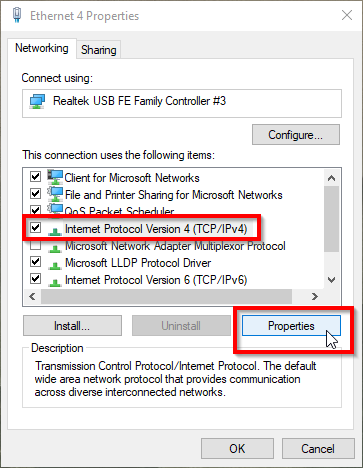
3. Right-click on the network adapter the Raspberry Pi is connected to and select Properties. There may be other network adapters displayed here depending on what is installed in your computer, make sure you select the correct adapter.

4. In the properties dialog, click on Internet Protocol Version 4 (TCP/IPv4), then click Properties.
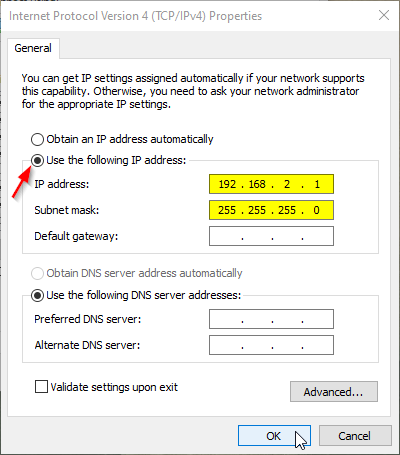
5. Select “Use the following IP address” And enter 192.168.2.1 for the IP address and 255.255.255.0 for the Subnet mask. Select OK, you can then close out the rest of the windows.
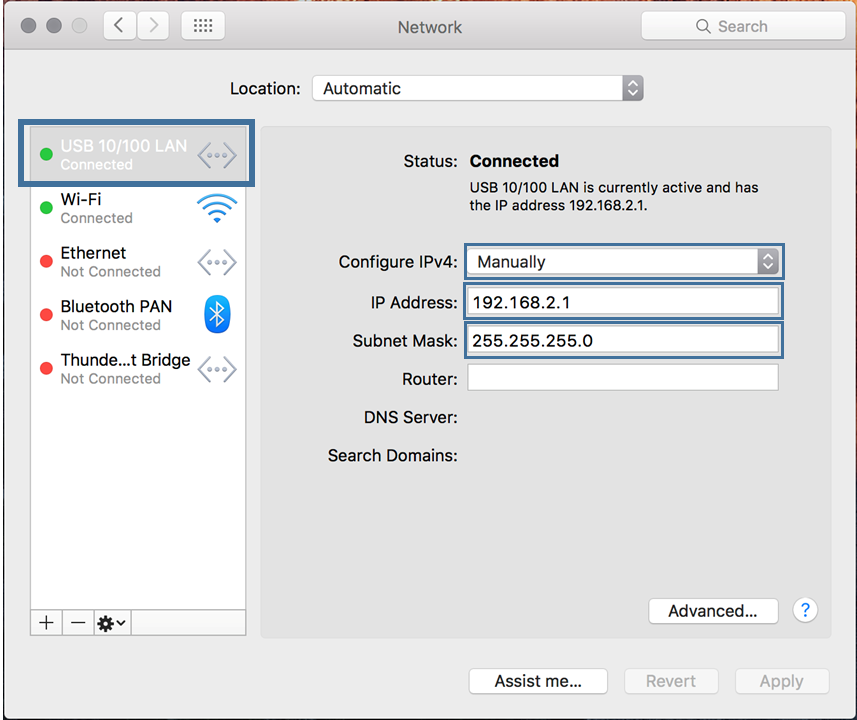
MacOS
1. Go to System Preferences > Network.
2. Select the adapter the Raspberry Pi is connected to on the left side. If it is connected to the Ethernet port, select Ethernet, if it is connected with a USB Ethernet adapter, select the USB option.
3. Change the dropdown next to Configure IPv4 to “Manually”.
4. Enter 192.168.2.1 for the IP Address and 255.255.255.0 for the Subnet Mask and then select Apply.
Linux Ubuntu
1. Click on the Wifi icon in the toolbar at the top of the screen. If the Raspberry Pi is connected to the computer via USB Ethernet adapter, click on Ethernet Connecting/USB Ethernet Connecting. If the Raspberry Pi is connected to the computer directly via an Ethernet Cable, click on Wired Connecting/PCI Ethernet Connecting. From the drop down menu, select “Wired Settings”
.png)
.png)
2. Click on the gear icon next to your connection type.
.png)
3. Go to the IPv4 tab for the connection type. Select IPv4 Method as “Manual” and enter the address information as shown in the figure. Click Apply to complete the setup.
.png)
.png)
The BlueOS web interface can now be accessed by typing the IP address 192.168.2.2 or blueos.local into the browser address bar.
Connecting with a Router
1. Connect the Raspberry Pi to a Router using an Ethernet cable. The Raspberry Pi should be assigned an IP address by the router.
2. The Raspberry Pi is now accessible from any computer connected to the same local area network.
3. Access the BlueOS web interface by typing blueos.local into the browser address bar.
Connecting with Wifi
If the Raspberry Pi is connected to a Wifi network, the BlueOS web interface can be accessed by typing blueos-wifi.local into the browser address bar from a computer that is connected to the same network.
Using BlueOS
After accessing the BlueOS interface, make sure to follow the friendly on screen instructions to connect to the internet and perform any available updates.
In this guide you will use the BlueOS web interface to download and install the correct firmware for your vehicle type but BlueOS also offers many additional tools to help manage your vehicle, be sure to check out the full BlueOS documentation to learn more.
Installing Vehicle Firmware
ArduPilot firmware is installed and runs directly on the Raspberry Pi. Firmware can be selected and installed from the BlueOS Vehicle Firmware page.
The following are the minimum versions compatible with Navigator:
- ArduSub – 4.5.1
- ArduRover – 4.6.0
- ArduPlane – 4.2.3
- ArduCopter – 4.2.3
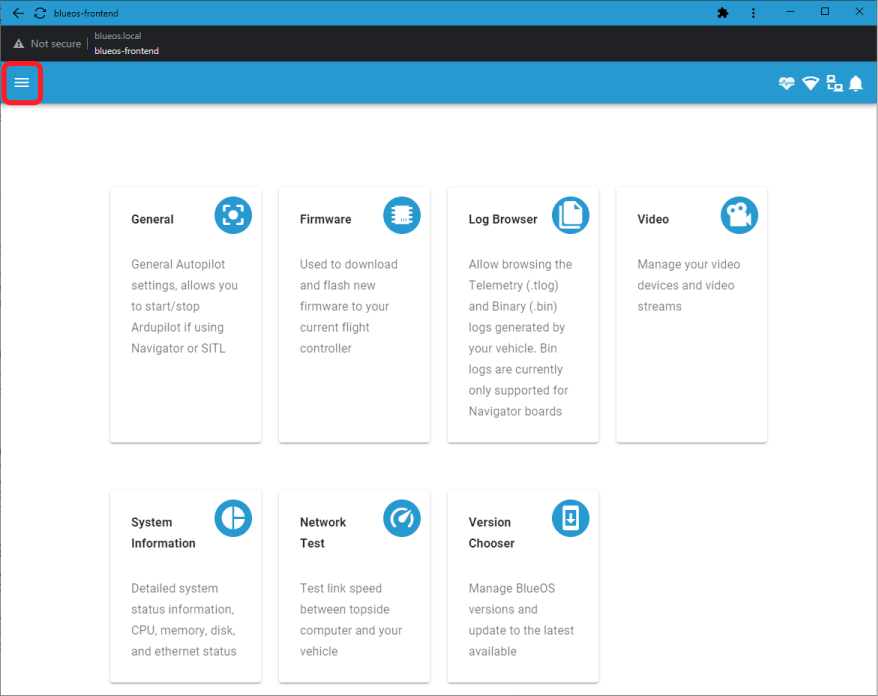
1. From the BlueOS web UI, expand the main sidebar menu.
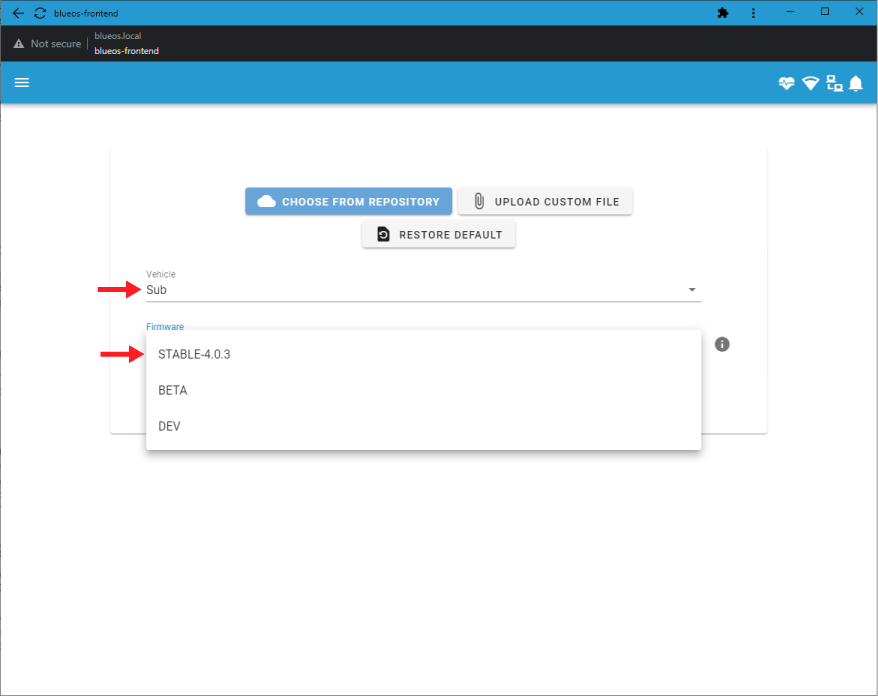
2. Expand the Vehicle submenu and click on Firmware.

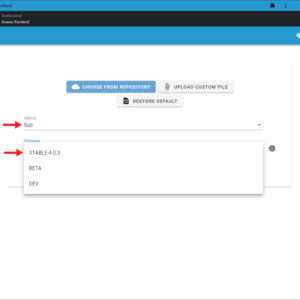
3. From the Firmware page, use the Vehicle dropdown menu to select the vehicle type then select the firmware version to download and install from the Firmware dropdown menu. If you don’t know which version to install, use the latest stable version.
4. After the firmware installation is complete, the vehicle is ready to be set up in the ground control station (GCS) software.
Installing Ground Control Station Software
There are a number of GCS software options available on many platforms. A helpful overview and comparison of GCS software is available in the ArduPilot documentation.
We use and recommend QGroundControl, which can be downloaded from the official site here (v4.2.2 or later required). The rest of this guide will show the setup steps using QGroundControl software but the process should be similar for most other GCS software.
Common Vehicle Setup
The exact setup procedure varies depending on the vehicle type and connected peripherals. The instructions shown below are common steps for most vehicle types.
Connect to Vehicle to GCS
Follow the instructions for connecting directly with an Ethernet cable, QGroundControl will automatically connect to the vehicle.
Sensor Calibration
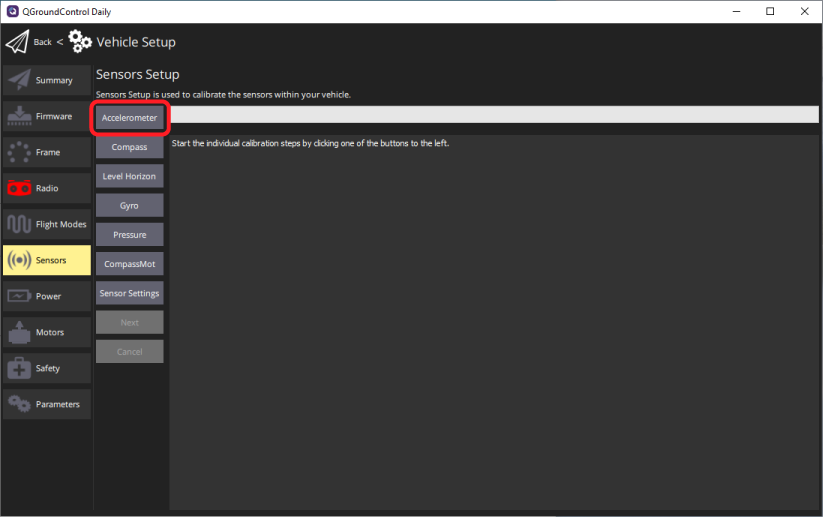
1. In QGC Vehicle Setup, click on the Sensors tab in the left sidebar.
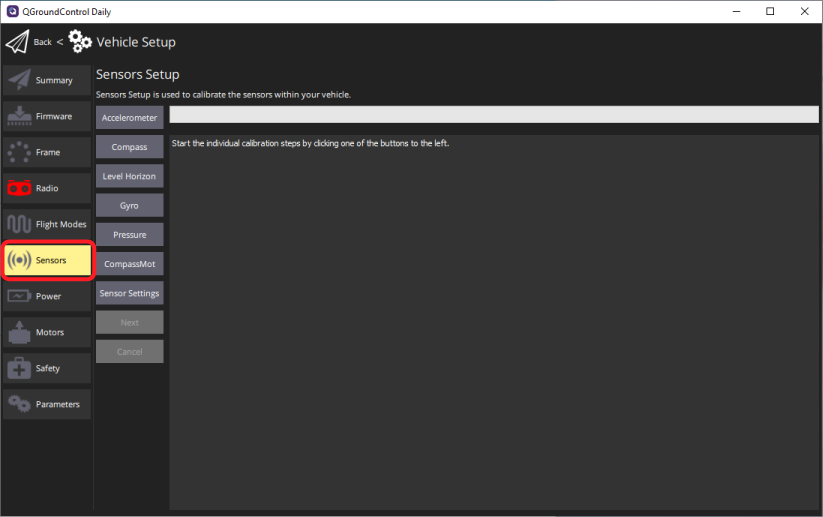
2. Click on Accelerometer.
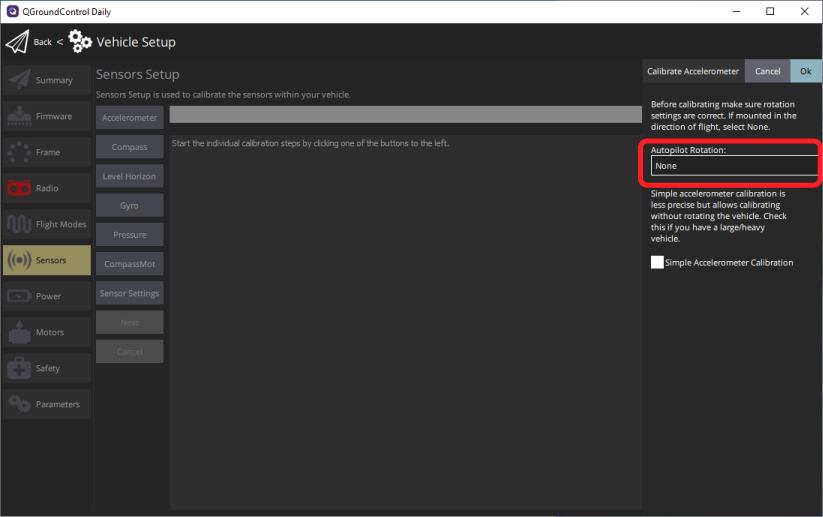
3. Set the Autopilot Rotation to match the Navigator’s mounting orientation.
- For the default orientation, topside facing up and arrow pointing forwards, select “None”.
- For non-standard orientation, refer to the Alternative orientations section in the ArduPilot documentation to determine which rotation option matches the Navigator’s actual mounting orientation.
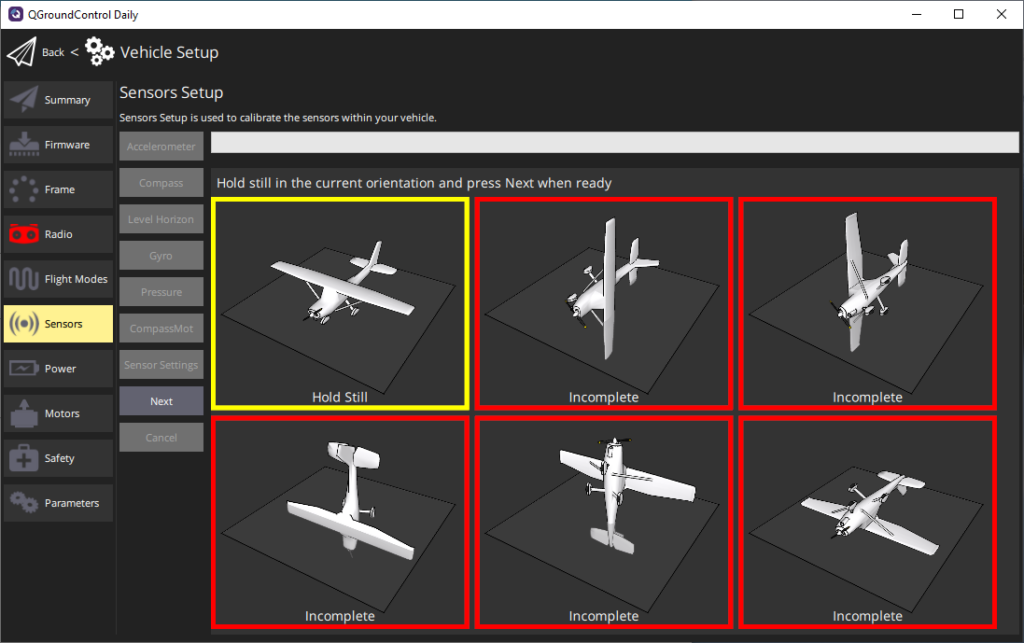
4. Continue with the calibration process and follow the on screen instructions to rotate and hold the vehicle in various positions.
5. Click on Compass.
6. Set the Autopilot Rotation to the same option selected during accelerometer calibration. Leave the compass priorities in the default order.
7. Continue with the calibration process and follow the on screen instructions to randomly rotate the vehicle around all of its axes.
Power Module Setup
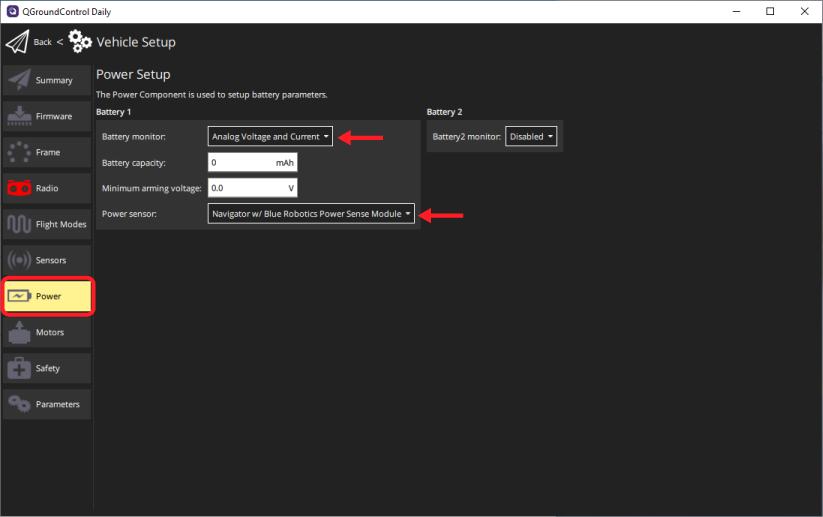
1. In QGC Vehicle Setup, click on the Power tab in the left sidebar.
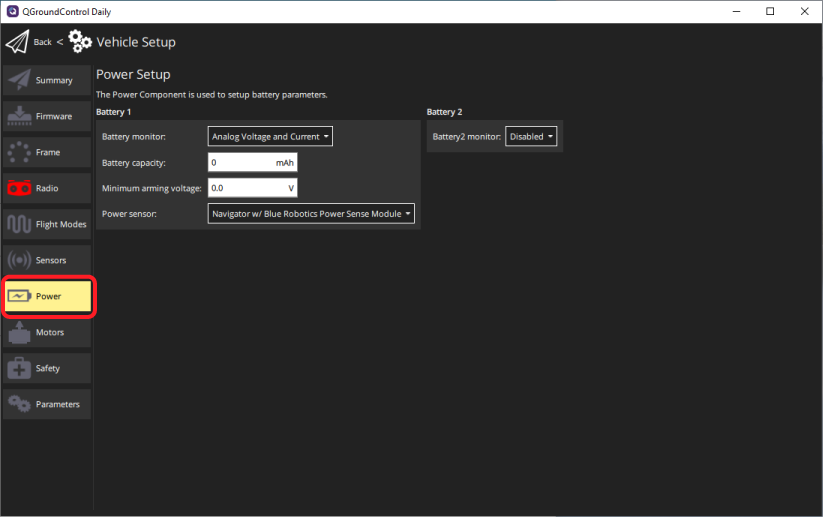
2. Select “Analog Voltage and Current” from the Battery monitor dropdown.
3. Select the correct option from the Power sensor dropdown menu.
- If using a Blue Robotics Power Sense Module, select “Navigator w/ Blue Robotics Power Sense Module” from the dropdown menu. No further configuration is necessary.
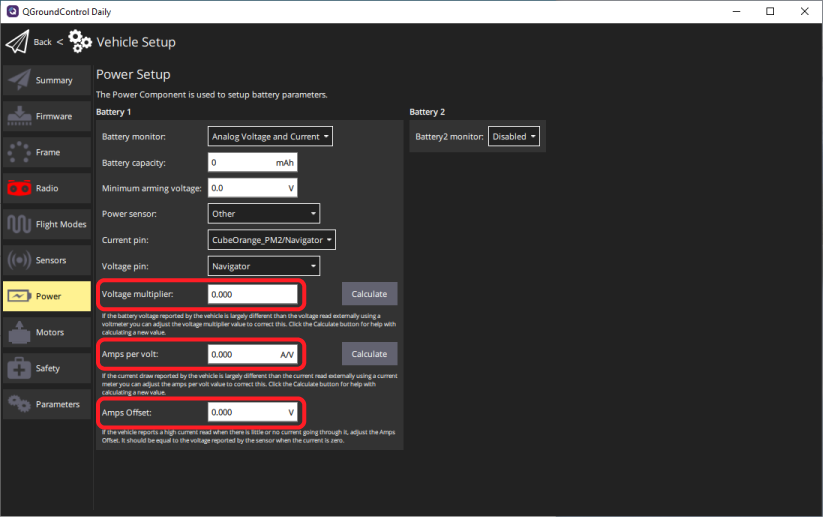
- If using any other type of power module, select “Other” from the dropdown menu and proceed to the next step.
4. Set the Current pin dropdown menu option to “CubeOrange_PM2/Navigator” and set the Voltage pin dropdown menu option to “Navigator”.

5. Enter the Voltage multiplier, Amps per volt, and Amps Offset values according to your power module’s documentation.
Additional Setup
Refer to the ArduPilot documentation for your vehicle type to continue setup for frame type configuration, radio control calibration, telemetry radio and GPS setup, etc.