
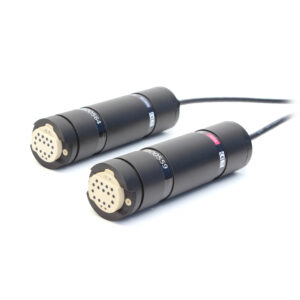
Integrating the ANB Sensors pH Sensor on the BlueBoat
The ANB Sensors pH sensor is calibration-free and installs easily on the BlueBoat. It comes in two versions:
- AQ5 – rated to 5 meters depth, with a 3-meter cable
- OC300 – rated to 300 meters depth, with a 1-meter cable
The AQ5’s 5-meter depth rating makes it a good fit for surface use, so that’s the version we’ll use in this guide.

Before Installation
Before installing the pH sensor on your BlueBoat, take a moment to get familiar with how it works by connecting it to your computer and completing the following steps. You’ll need a BLUART USB to RS-485 adapter (or similar RS-485 FTDI adapter) to connect. For initial testing, it’s also helpful to have the front of the sensor immersed in a cup of water to trigger the immersion sensor.
1. Visit ANB’s documentation to learn how to operate the sensor using their software tools.
- Note: ANB’s documentation references a Data Transfer Unit (DTU) for connecting the device. In this guide, we use the BLUART adapter instead.
2. Download ANB’s desktop software from their website (Windows only):
- anb_utils – a terminal-based program used to update the pH sensor’s firmware and configure its measurement settings.
- ANB GUI – provides a user-friendly interface for viewing sensor output and general operation.
3. Connect the 4-pin JST GH connector from the pH sensor to the RS-485 input on the BLUART, then use a micro USB cable to connect the BLUART to your computer.
- You’ll need to know the correct COM port for the sensor. If you have other USB devices connected, it can be hard to tell them apart—open Windows Device Manager, navigate to Ports (COM & LPT), and watch for the new entry as you plug in the BLUART.
Once the sensor is connected and you’ve identified the COM port, launch anb_utils and connect to the sensor. If a firmware update is available, the program will notify you (this requires an internet connection). Follow the on-screen instructions to update.
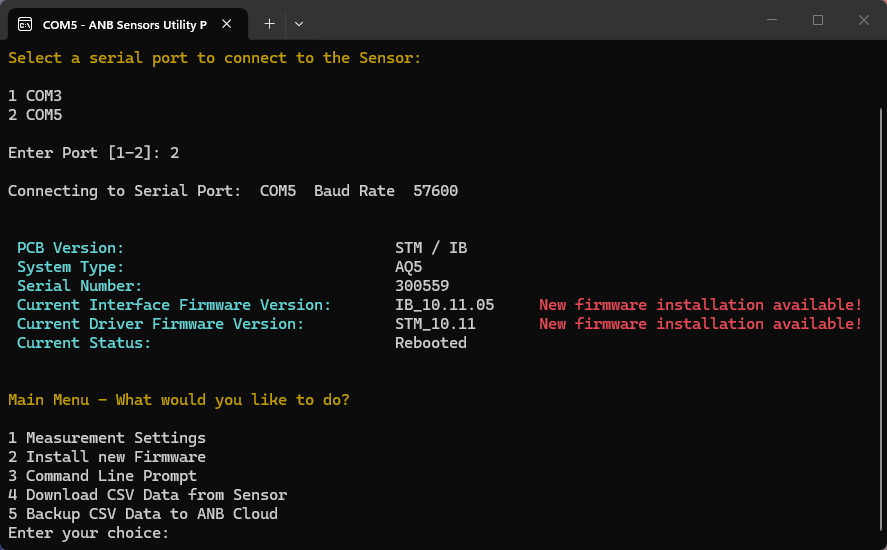
The sensor’s measurement settings are also configured through anb_utils. Each setting option is explained here.
- The default settings work fine for most situations.
- In some cases, enabling Profiling Mode can provide a faster response to pH changes, at the expense of accuracy.
Close anb_utils when you’re finished.
4. Launch ANB GUI and select the COM port from the dropdown. The sensor’s information should appear in the Sensor Details area at the top.
5. Select START to begin scanning. The sensor takes a few minutes to self-calibrate before displaying its first measurements—please be patient! After a few minutes, you should see values plotted on screen.

Once you’re satisfied with initial testing, you can move on to installing the sensor on the vehicle.
Parts and Tools Required
Along with the pH sensor itself and your BlueBoat, you’ll need the following to complete installation:
- 1 x BLUART
- 1 x Short micro USB cable (like this or similar)
- 1 x M10 Bulkhead Wrench (or 16 mm wrench)
- 1 x 5 mm hex key (included in BlueBoat kit)
- 1 x 2.5 mm hex tool
Be sure to also check the Mounting the Sensor section below for any additional parts or tools needed for your preferred mounting method.
Install the Cable
The pH sensor cable is installed through the starboard hatch lid. To do that, you’ll need:
- pH sensor with included bulkhead O-ring and nut
- BLUART USB-to-RS485 adapter
- M10 Bulkhead Wrench or 16 mm wrench
- 2.5 mm hex key
- Silicone grease (included with sensor)
1. Make sure the BlueBoat is powered off and remove the starboard hatch lid assembly from the BlueBoat by disconnecting all cables.
2. Remove the cover from the starboard hatch lid assembly by unscrewing the thumb nut.
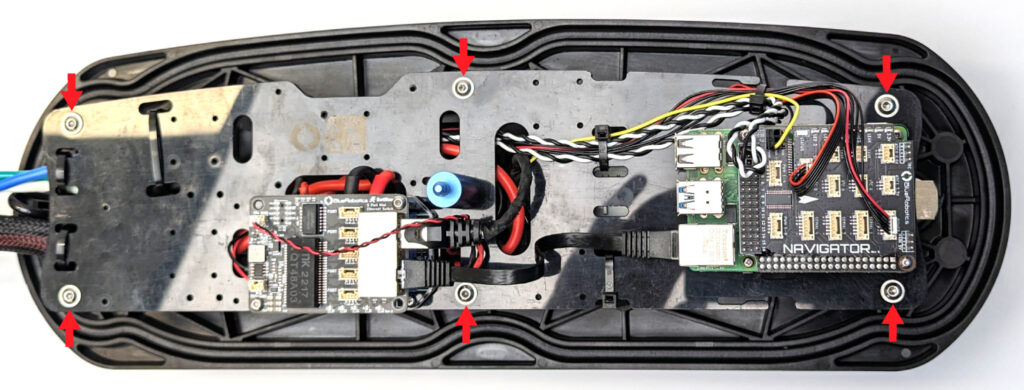
3. Use the 2.5 mm hex key to remove the six hex nuts from the electronics tray (on older boats these will be flange head screws). Move the electronics tray to the side but be careful not to pull on the wires too much.
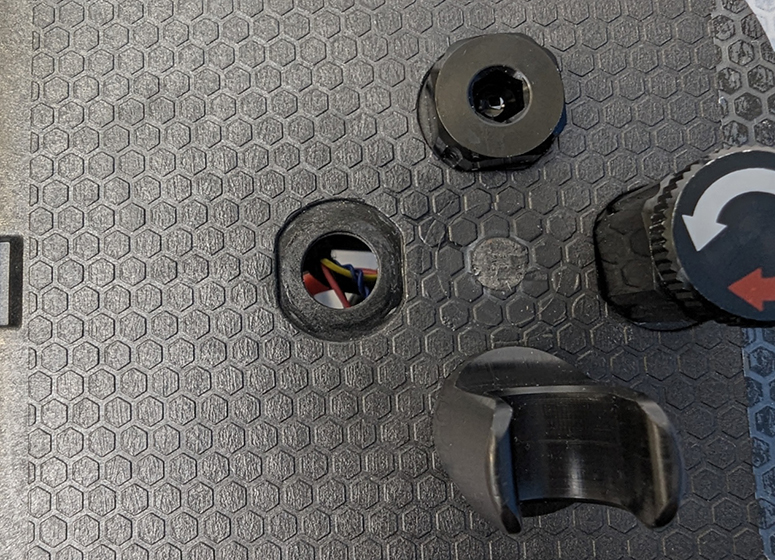
4. Use the M10 Bulkhead Wrench or a 16 mm wrench to loosen the nut from one of the blank penetrators.

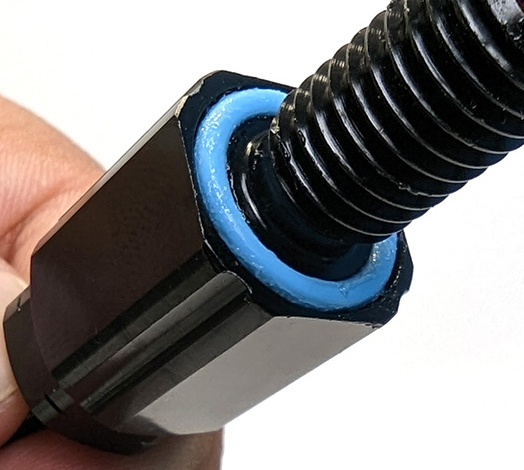
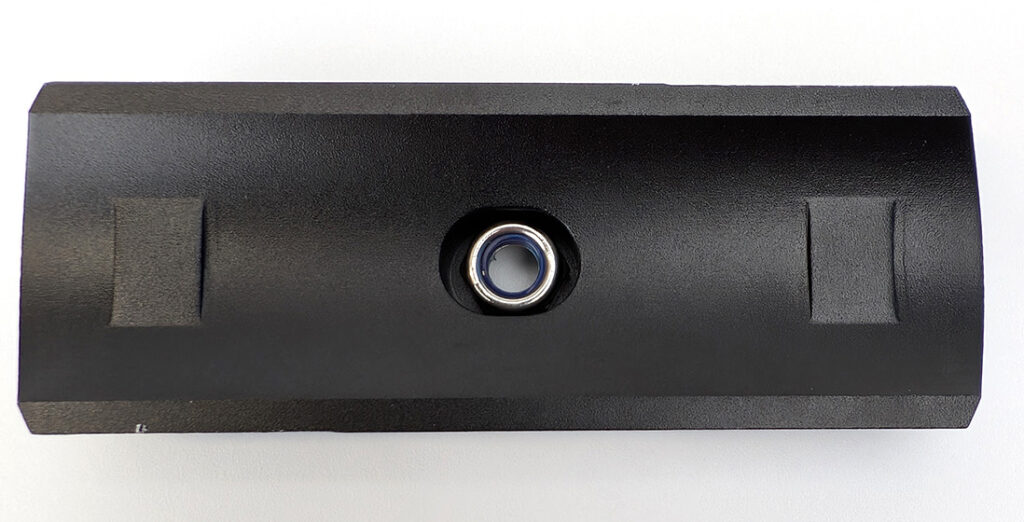
5. Remove the bulkhead nut, O-ring, and silicone grease from the small box included with the pH sensor. Inspect the O-ring to confirm it’s clean and undamaged, then apply a thin layer of silicone grease and install it in the groove on the underside of the sensor bulkhead.
6. Insert the bulkhead into the hole and fasten the C-nut on the opposite side. Tighten it by hand, then use the wrench to fully secure it.
On older BlueBoats, the hatch lids have recesses shaped to hold the bulkhead in place and prevent it from turning. In this case, make sure the bulkhead is fully seated in the recess, and only use the wrench to turn the C-nut—do not attempt to rotate the bulkhead itself.
7. Mount the electronics tray back on the standoffs using the nuts or screws you removed earlier.
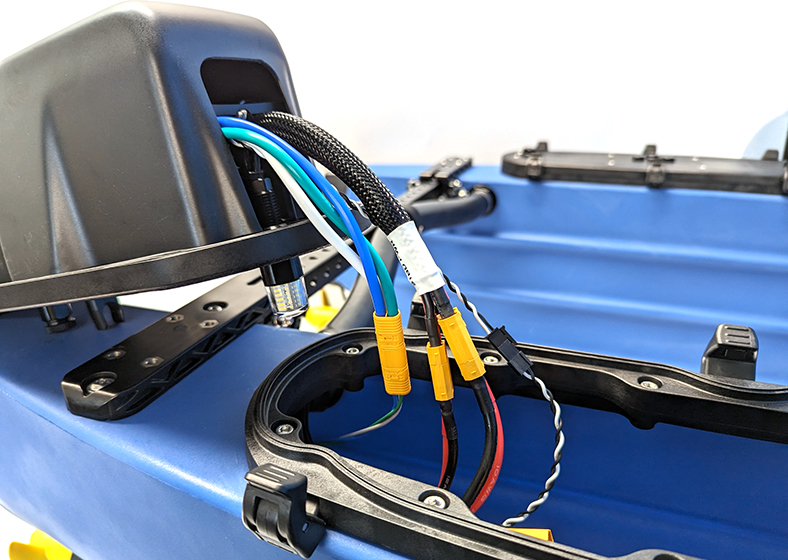
8. Connect the 4-pin JST GH connector from the pH sensor to the RS-485 input on the BLUART.
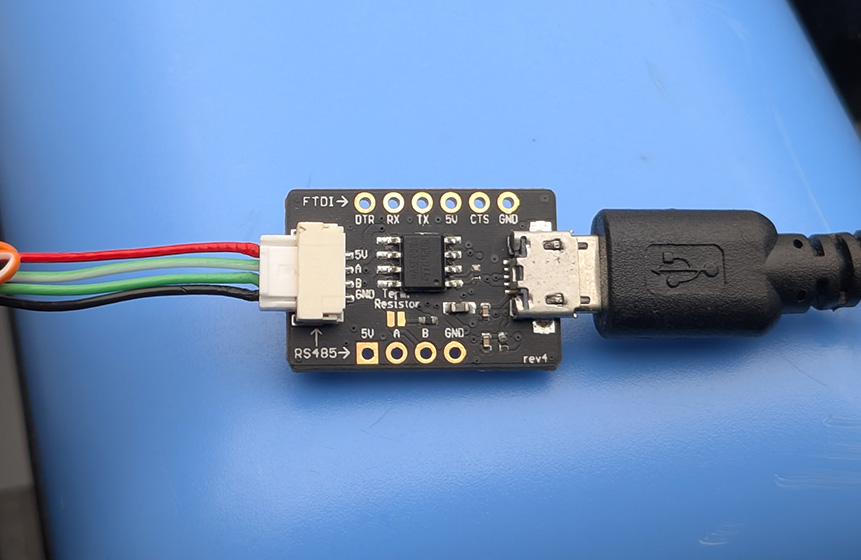
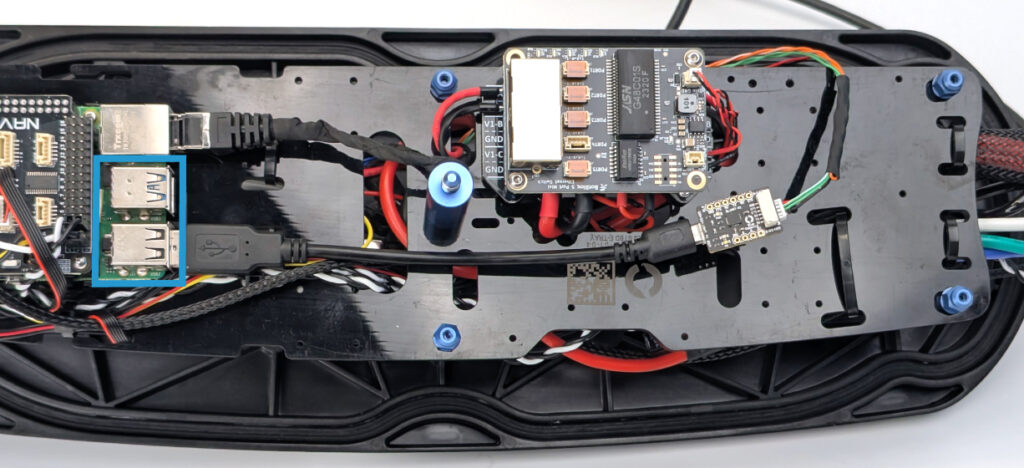
9. Use a micro USB cable to connect the BLUART to one of the USB ports on the Raspberry Pi.
That’s it! You can now reassemble the hatchlid back on the BlueBoat.
Mount the Sensor
To mount the sensor on the BlueBoat, you’ll need:
- 5mm hex key
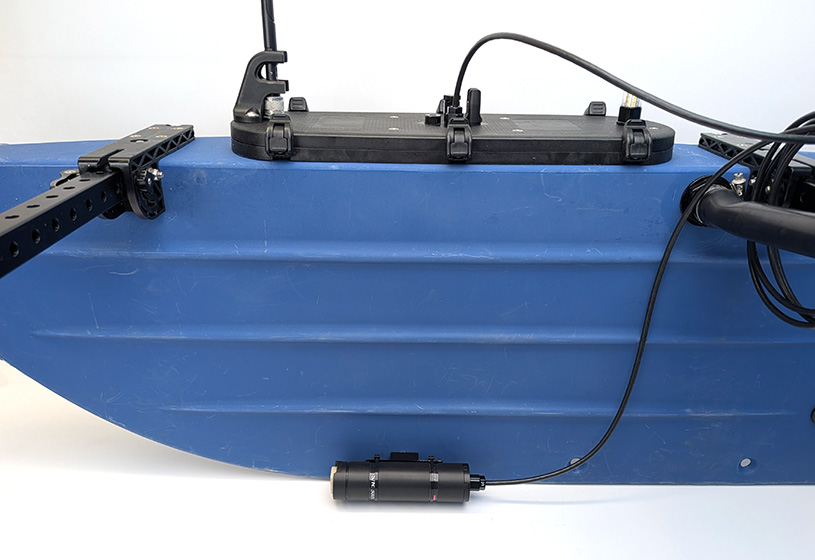
1. Insert the included M6 lock nut into the hole in the sensor mount.
2. Use the two included cable ties to secure the sensor to the mounting bracket, ensuring the ties are seated in the sensor’s mounting grooves and wrap around both the sensor body and the bracket.
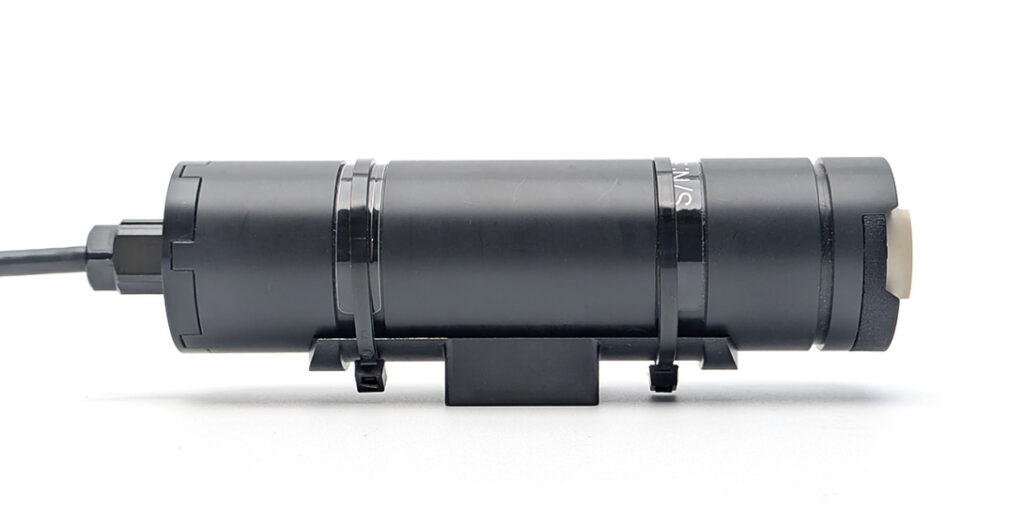
3. The sensor can be mounted to any of the hull mounting points on either hull.
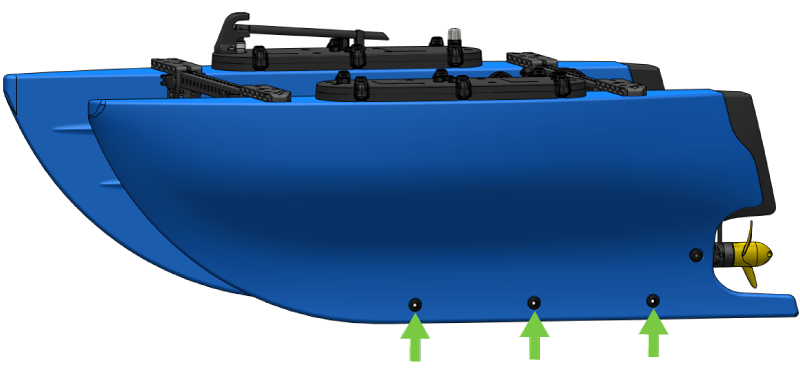
Use the included M6x20 socket head screw, hull mount bushing, and the 5mm hex key to secure the pH sensor and mount to one of the hull mounting points.
Install ANB Sensors BlueOS Extension
The ANB Sensors GUI BlueOS extension looks and functions just like the ANB GUI desktop application, providing a user-friendly interface for viewing sensor data and general operation. It can be installed from the BlueOS extensions store.
1. Connect a battery, power on your BlueBoat and BaseStation, and connect the system to your computer. If you’re not sure how to do this, check out the BlueBoat Software Setup guide first.
2. Access BlueOS (the BlueBoat’s operating system) by typing 192.168.2.2 or blueos.local into a web browser’s address bar.
3. Connect the BlueBoat to a Wi-Fi network.
4. Make sure you’re running BlueOS version 1.1.0 or later. Installing extensions requires at least version 1.1.0. If your system is out of date, follow these instructions to update BlueOS then come back to this guide.
5. Go to the Extensions menu in BlueOS and install the ANB SENSORS GUI extension.

6. After it’s installed, open it from the left sidebar. Expand the Device Identification panel and select the FTDI device from the list.
- If more than one FTDI (BLUART) device is listed, you can identify the correct one by the USB port it’s physically connected to.

7. The sensor’s information should appear in the Sensor Details area at the top. Select START to begin scanning. The sensor takes a few minutes to self-calibrate before displaying its first measurements—please be patient! After a few minutes (~ 4 minutes), you should see values plotted on screen.
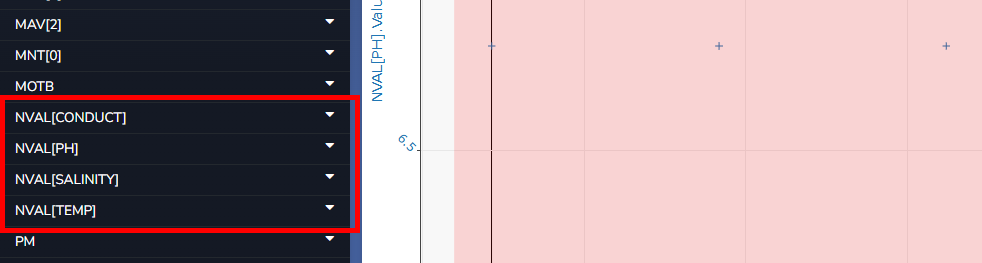
Sensor Data in Autopilot Logs
While the sensor is used with the ANB Sensors GUI extension, measured data is automatically logged in the vehicle’s autopilot log. The data is saved as the following named values:
- NVAL[CONDUCT]
- NVAL[PH]
- NVAL[SALINITY]
- NVAL[TEMP]
The values can be searched and plotted using the BlueOS Log Browser.
Next Steps
Make sure to refer to ANB Sensors’ documentation to learn how to effectively operate and get the most out of the pH sensor. The following sections are particularly useful:
Help and Feedback
- If you need help with this integration, reach out to our support team using our Help Center.
- If you have any ideas on how we can improve this guide, let us know here.