BlueBoat Software Setup
Introduction
Setting up the software for the BlueBoat involves installing ground control station software, connecting your computer to the BaseStation, setting the appropriate wireless settings for your country, and calibrating the BlueBoat sensors.
To complete the software setup for your BlueBoat, you will need the following components:
- Your BlueBoat
- Your BaseStation (with included antenna and USB-C cable)
- A computer—most PCs and laptops running Windows 10 or newer, macOS, or Linux will work well. You can view the system requirements here. Android tablets, Apple tablets, and Chromebooks are not recommended and are currently not supported.
- 1 x BlueBoat battery
- A game controller (optional)
Select Your Operating System
We have instructions available for Windows, macOS, and Linux operating systems. Select the operating system you are using by clicking the buttons below.
Windows Setup macOS Setup Linux SetupBefore You Start
An internet connection is required to update the BlueBoat software. Make sure you are in an area with a strong and reliable Wi-Fi network with internet access before you start.
It’s also a good idea to fully charge your BlueBoat battery and BaseStation prior to starting the software setup process. If you are using a Blue Robotics battery, refer to your battery charging instructions here. To charge your BaseStation:
1. Screw the BaseStation antenna onto the antenna connector on the side of the BaseStation. Orient the antenna so sticks straight up when in use.

2. Unscrew the cover off the USB-C bulkhead connector.
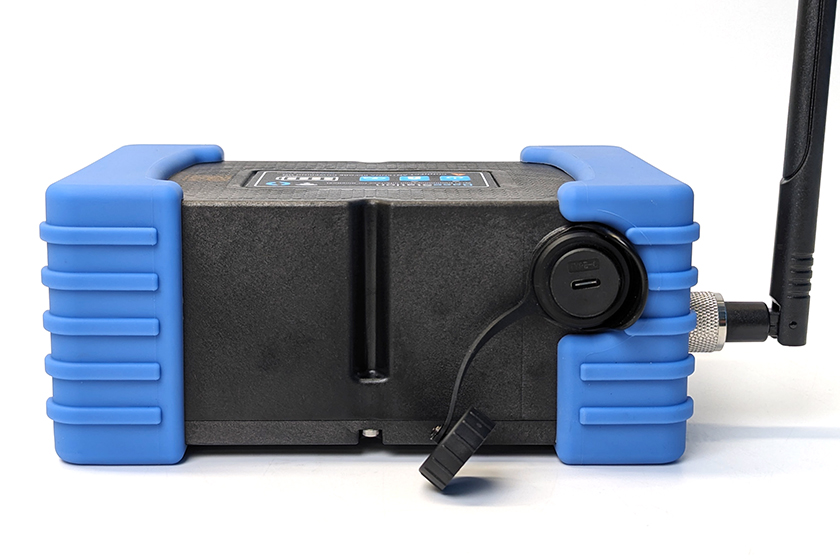
3. Use the included USB-C cable to connect the BaseStation to a USB power source. This could be a USB port on your computer, a USB wall charger, a USB power bank, etc.
4. Press the charging button on the BaseStation panel to begin charging. The orange indicator LED above the charging button and the battery status LEDs should light up to show that the battery is charging.
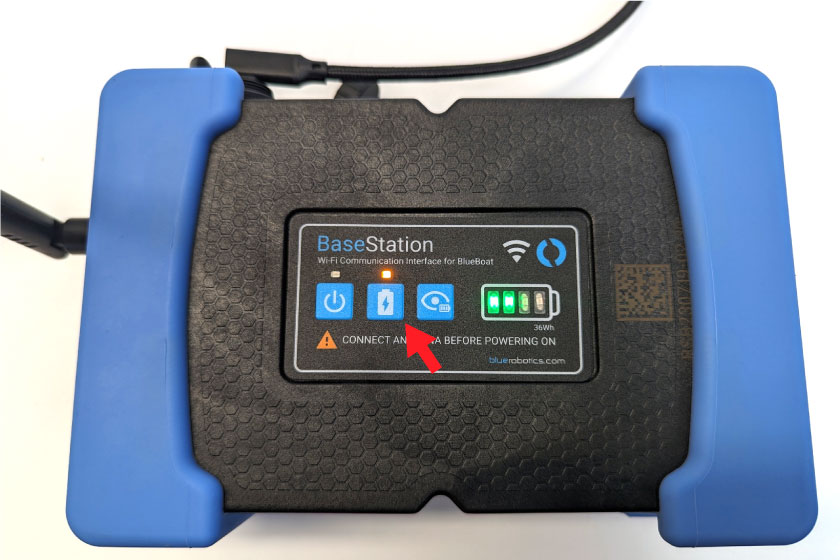
5. The orange indicator LED above the charging button will turn off when charging is complete.
Install QGroundControl
QGroundControl (QGC) is ground control station software that serves as the graphical user interface to control the boat, set up missions, and view real-time vehicle telemetry. Download the latest recommended version from the link below and install it on your computer.
Configure Firewall
If your computer has an active firewall, you will need to add a rule to allow QGroundControl through the firewall.
The instructions for allowing QGroundControl through Windows Defender Firewall are provided below. If you are using a different firewall program, follow the directions for that firewall to allow incoming and outgoing connections from QGroundControl.
1. Go to the Windows Control Panel then select Windows Defender Firewall. If you do not see Windows Defender Firewall, change the View by option to large or small icons.
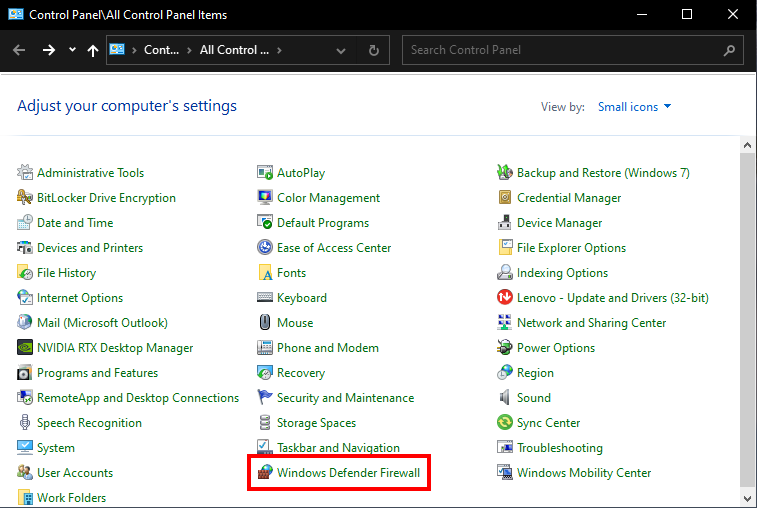
2. Select “Allow an app or feature through Windows Defender Firewall”.

2. Select Change Settings, find “Open source ground control app provided by QGroundControl dev team” or “QGroundControl” in the application list. Check the box next to it and check the boxes for Private and Public then click OK.

Follow the steps under “Set firewall access for services and apps” to allow connections from QGroundControl.
Add a rule to your firewall to allow connections from QGroundControl. QGroundControl may be listed as “Open source ground control app provided by QGroundControl dev team” in the app list.
Network Setup
You now need to connect the BaseStation to your computer. The BaseStation can be connected to your computer wirelessly via Wi-Fi or wired using the included USB-C cable. Keep in mind that if you connect to the BaseStation wirelessly, your computer will no longer have internet access through that wireless connection. Connect the BaseStation to your computer using one of the methods below, you do not need to do both.
Use the buttons below to show the correct instructions for your operating system.
Windows Setup macOS Setup Linux SetupConnecting the BaseStation With a USB Cable
1. Turn on the BaseStation if it is not on already and connect the included USB-C cable to the Type-C port on the back of the BaseStation.
2. Connect the other end of the USB-C cable to your computer. If your computer does not have a USB-C port, you can use a USB Type-C to A adapter.
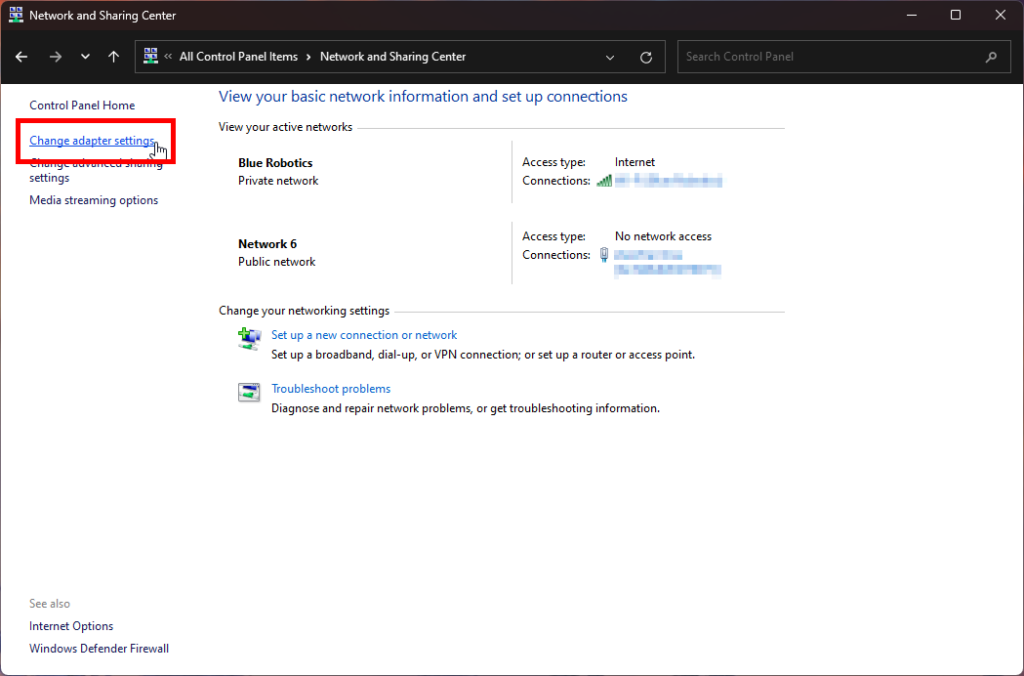
3. Open the Windows Control Panel then select Network and Sharing Center. If you don’t see Network and Sharing Center, change the View by: option to large or small icons.

4. Select Change adapter settings from the left side menu.
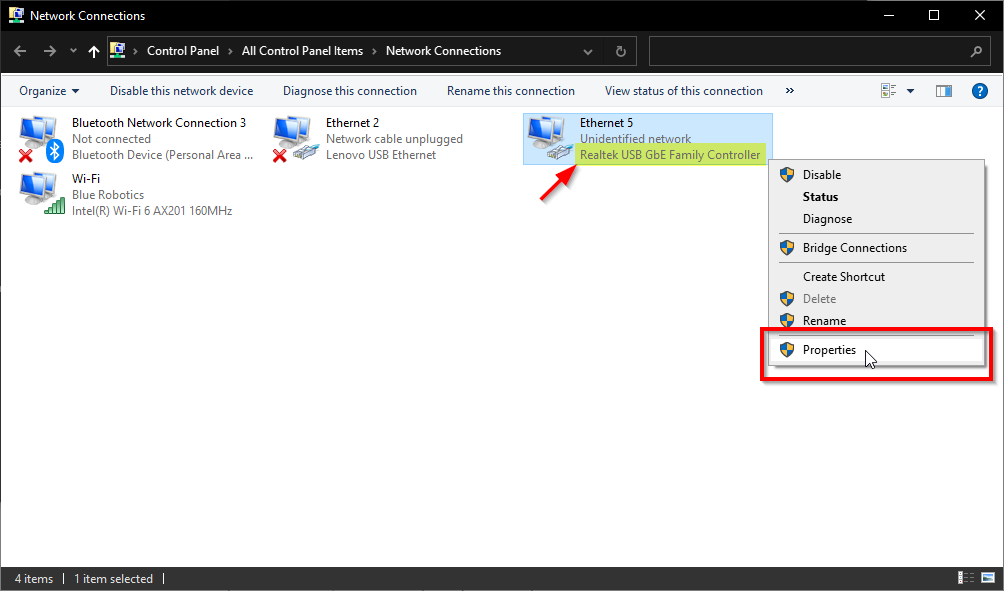
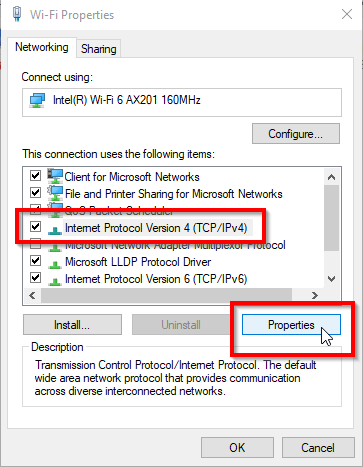
5. The BaseStation has an internal USB Ethernet adapter, it should be displayed as “Realtek USB GbE Family Controller” in this menu. Right click on this Ethernet adapter then choose Properties.
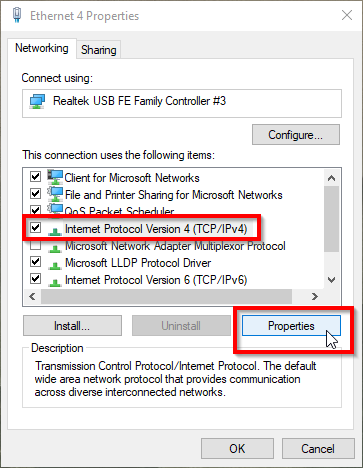
6. In the properties dialog, click on Internet Protocol Version 4 (TCP/IPv4) to highlight it, then click Properties.
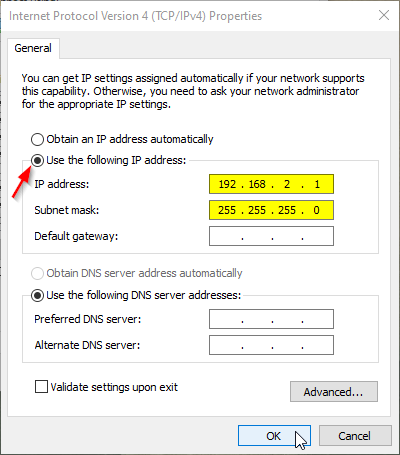
7. Select Use the following IP address And enter 192.168.2.1 for the IP address and 255.255.255.0 for the Subnet mask. Select OK. You can then exit this menu.
1. Turn on the BaseStation if it is not on already and connect the included USB-C cable to the Type-C port on the back of the BaseStation.
2. Connect the other end of the USB-C cable to your computer.
3. Open System Settings then select Network.
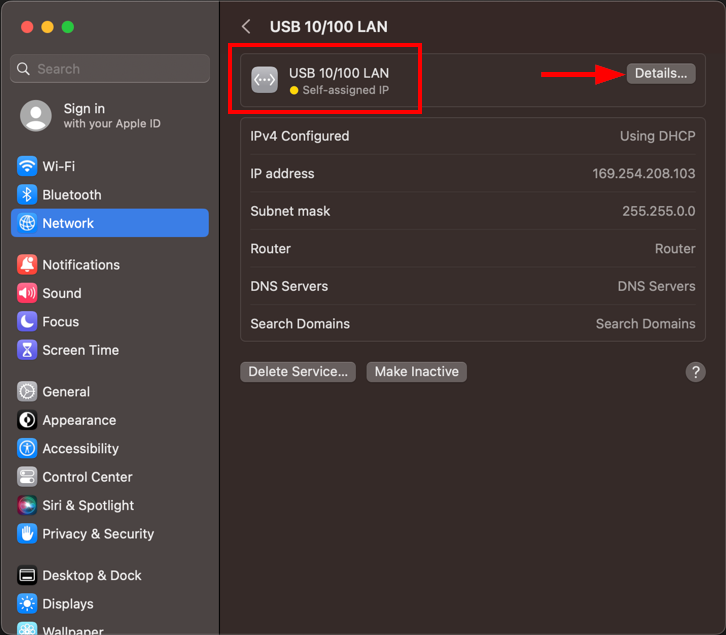
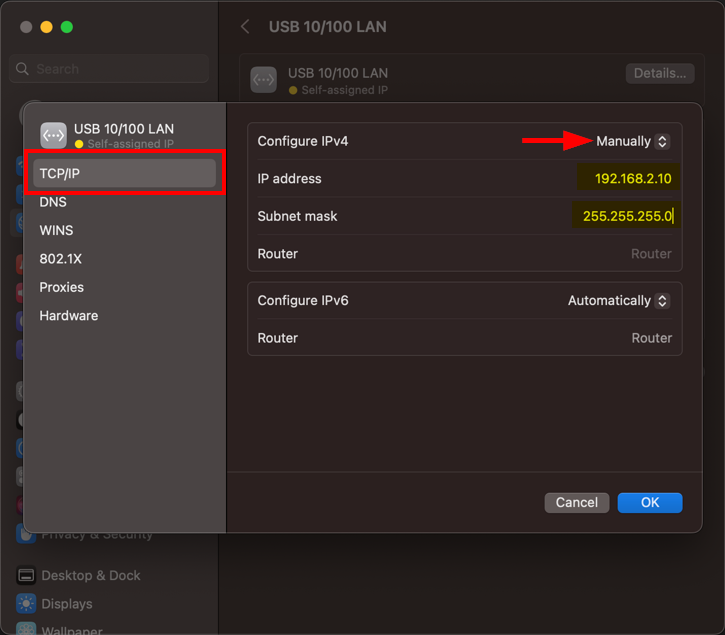
4. The BaseStation has an internal USB Ethernet adapter, it should be displayed as “USB 10/100 LAN” in the Network screen. Select it then click Details….
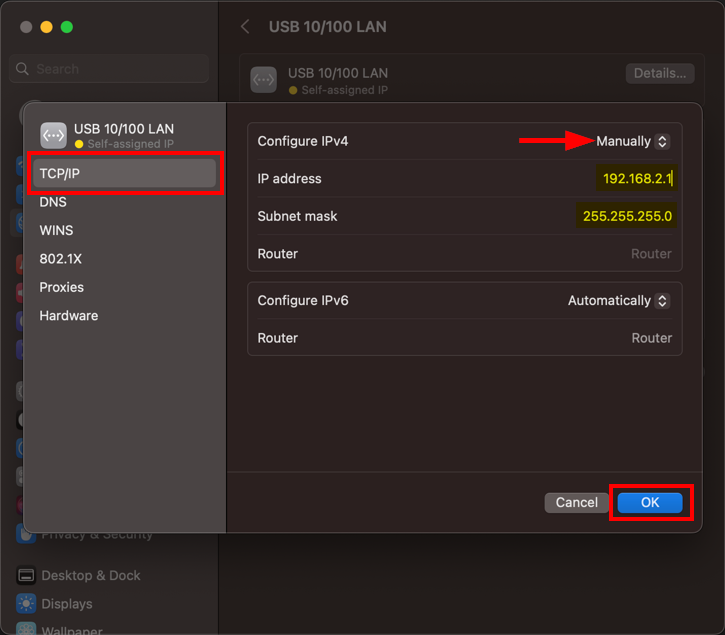
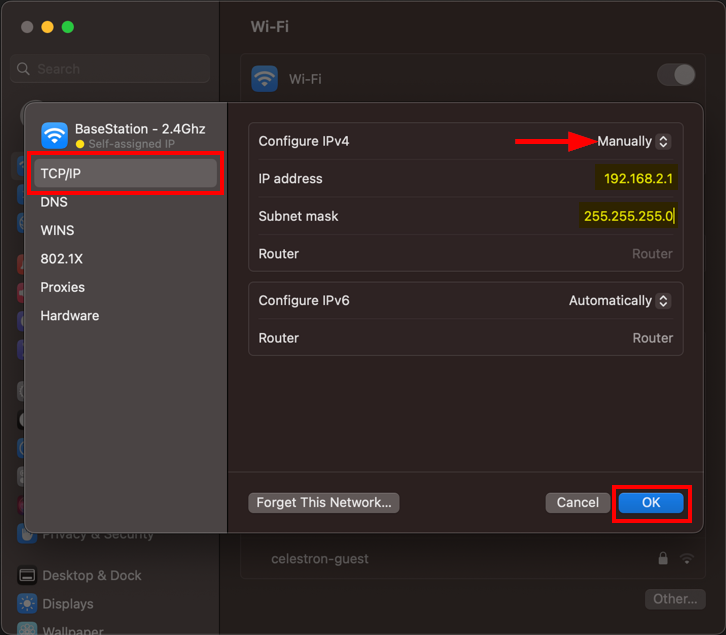
5. In the next menu, select TCP/IP. Set the Configure IPv4 setting to Manually then enter 192.168.2.1 for the IP address and 255.255.255.0 for the Subnet mask and then select OK. You can then exit this menu.
1. Turn on the BaseStation if it is not on already and connect the included USB-C cable to the Type-C port on the back of the BaseStation.
2. Connect the other end of the USB-C cable to your computer. If your computer does not have a USB-C port, you can use a USB Type-C to A adapter.
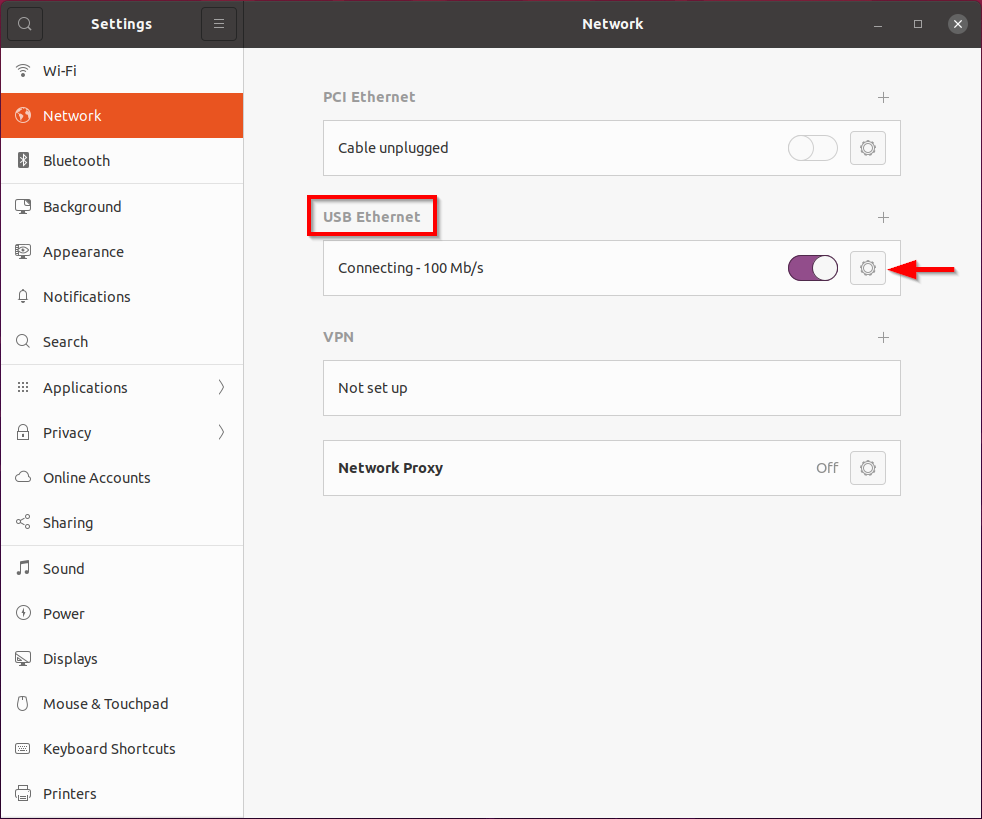
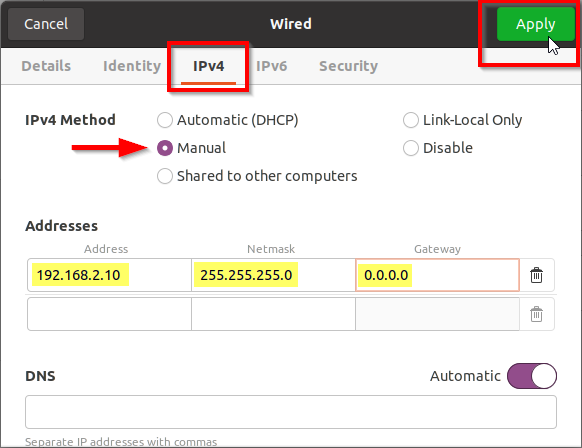
3. Open Settings then select Network.
4. The BaseStation has an internal USB Ethernet adapter, it should be displayed as “USB Ethernet” in this menu, click on the settings icon next to it.
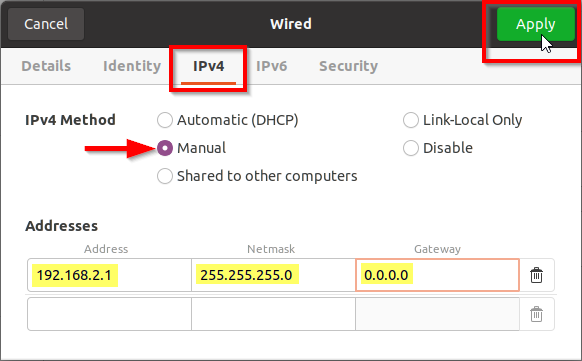
5. Click the IPv4 Settings tab, select Manual for the IPv4 Method setting, enter 192.168.2.1 for Address, 255.255.255.0 for Netmask and 0.0.0.0 Gateway. Click Apply to complete the setup.
Connecting to the BaseStation With Wi-Fi
1. Turn on the BaseStation if it is not on already.
2. Open the Windows Control Panel then select Network and Sharing Center. If you don’t see Network and Sharing Center, change the View by: option to large or small icons.
3. Select Change adapter settings from the left side menu.
4. Find your Wi-Fi adapter in this menu, right-click it and choose Properties.

5. In the properties dialog, click on Internet Protocol Version 4 (TCP/IPv4) to highlight it, then click Properties.
6. Select Use the following IP address And enter 192.168.2.1 for the IP address and 255.255.255.0 for the Subnet mask. Select OK. You can then exit this menu.
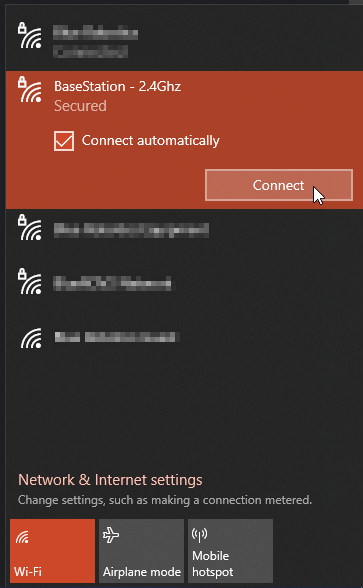
7. The BaseStation creates a wireless network with the SSID “BaseStation – 2.4Ghz”. Open the Wi-Fi network menu and connect to it. The default password is “BaseStation”.
1. Turn on the BaseStation if it is not on already.
2. Open System Settings then select Wi-Fi.
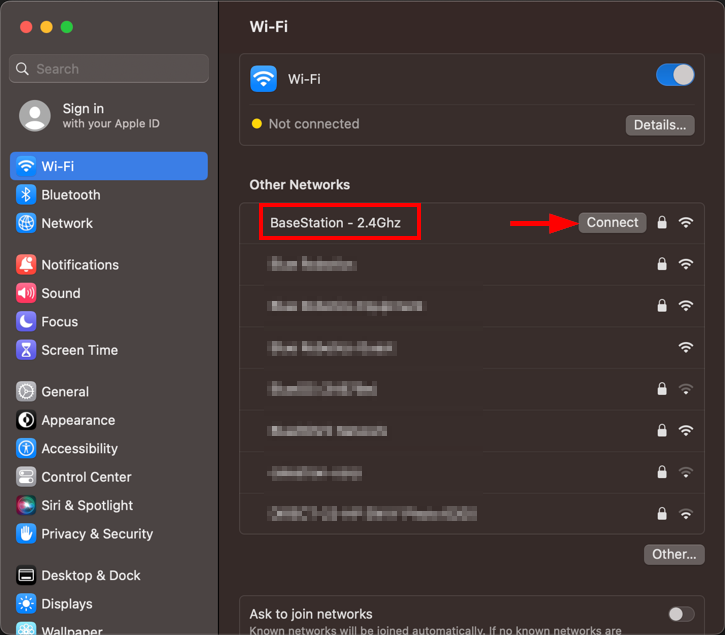
3. The BaseStation creates a wireless network with the SSID “BaseStation – 2.4Ghz”, connect to this network. The default password is “BaseStation”.
4. After it has connected, click on Details… next to the network name.
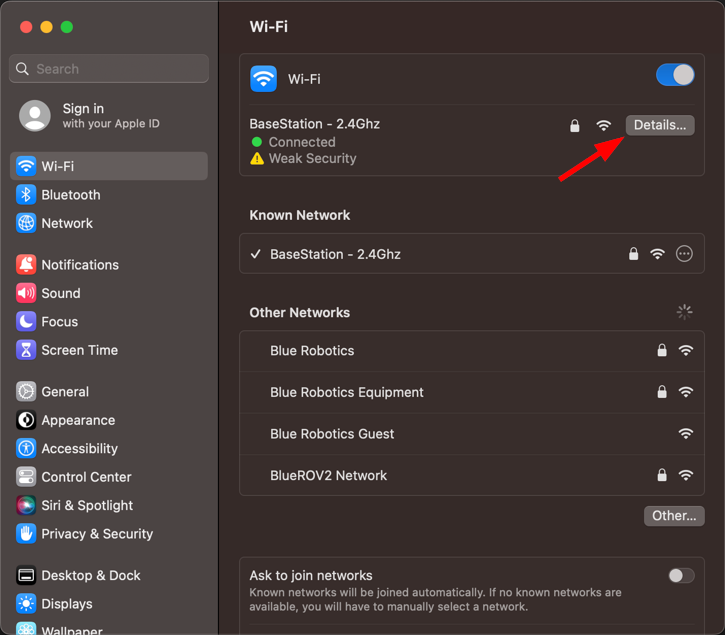
5. In the next menu, select TCP/IP. Set the Configure IPv4 setting to Manually then enter 192.168.2.1 for the IP address and 255.255.255.0 for the Subnet mask and then select OK. You can then exit this menu.
1. Turn on the BaseStation if it is not on already.
2. Open Settings then select Wi-Fi.
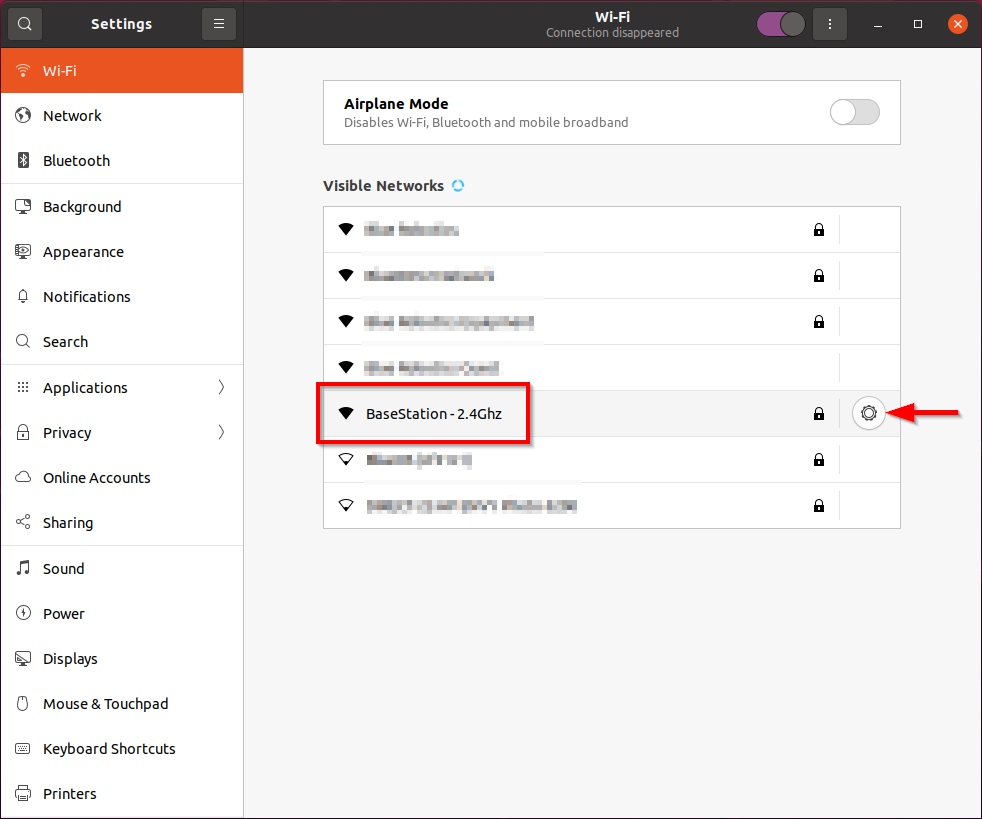
3. The BaseStation creates a wireless network with the SSID “BaseStation – 2.4Ghz”. Find this network in the network list and click the settings icon next to it.
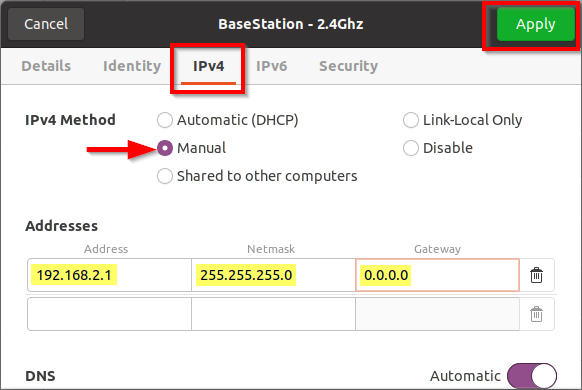
4. Click the IPv4 Settings tab, select Manual for the IPv4 Method setting, enter 192.168.2.1 for Address, 255.255.255.0 for Netmask and 0.0.0.0 Gateway. Click Apply.
5. After applying the settings, connect to the BaseStation network. The default password is “BaseStation”.
Powering-up the BlueBoat
To power-up the BlueBoat, you will need:
- Your BlueBoat
- 1 x BlueBoat battery
The BlueBoat supports connecting up to eight batteries, but we only want to connect one right now for initial setup. Make sure the battery has Velcro strips applied to it to secure it in the hull.
1. Open the starboard side hatch to access inside of the hull.
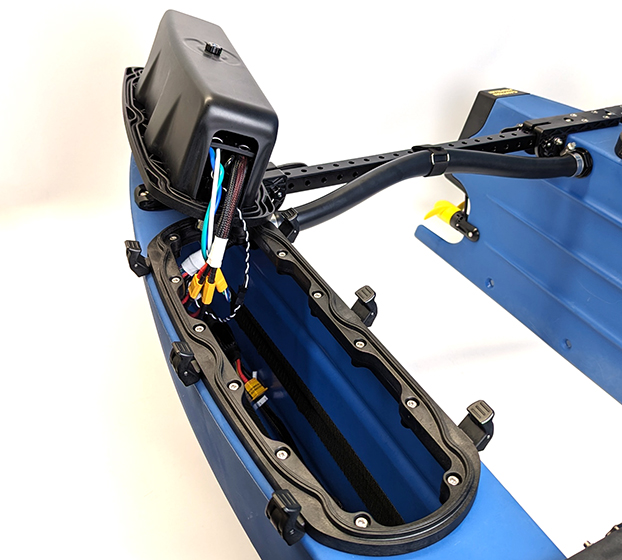
2. Remove the cap from one of the XT90 connectors on the 4S splitter cable (be sure to save it so you can use it later). It does not matter which one you pick, as they are all connected in parallel.
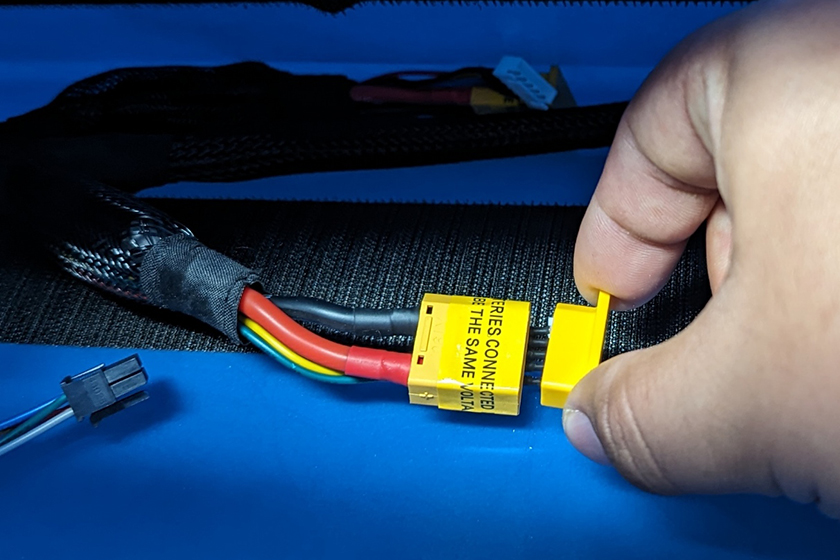
3. Connect the XT90 and balance lead connectors from the battery to the 4S splitter cable. Make sure the battery is securely held in place by the Velcro strips.

4. Close the hatch lid and lock all of the latches by pushing each latch in from the top until it snaps into place.
5. Put the antenna in the fully upright position.

6. Turn the power switch in the “ON” direction until it bottoms out. You should hear a beep and the NavLight will turn on after a few seconds indicating that the BlueBoat is powered on.
Verifying the Network Connection
The BlueBoat will automatically connect to the factory default “BaseStation – 2.4Ghz” BaseStation network. If the BaseStation network SSID or password are changed from the defaults, you will have to manually connect the BlueBoat to the BaseStation. Now is a good time to verify all the connections are good and everything is talking to each other correctly.
For reference, these are the default IP addresses used by the system:
- 192.168.2.1 – your computer’s IP address
- 192.168.2.2 – BlueBoat Raspberry Pi 4 IP address (BlueOS)
- 192.168.2.3 – BaseStation wireless router IP address
- 192.168.2.4 – BlueBoat wireless router IP address
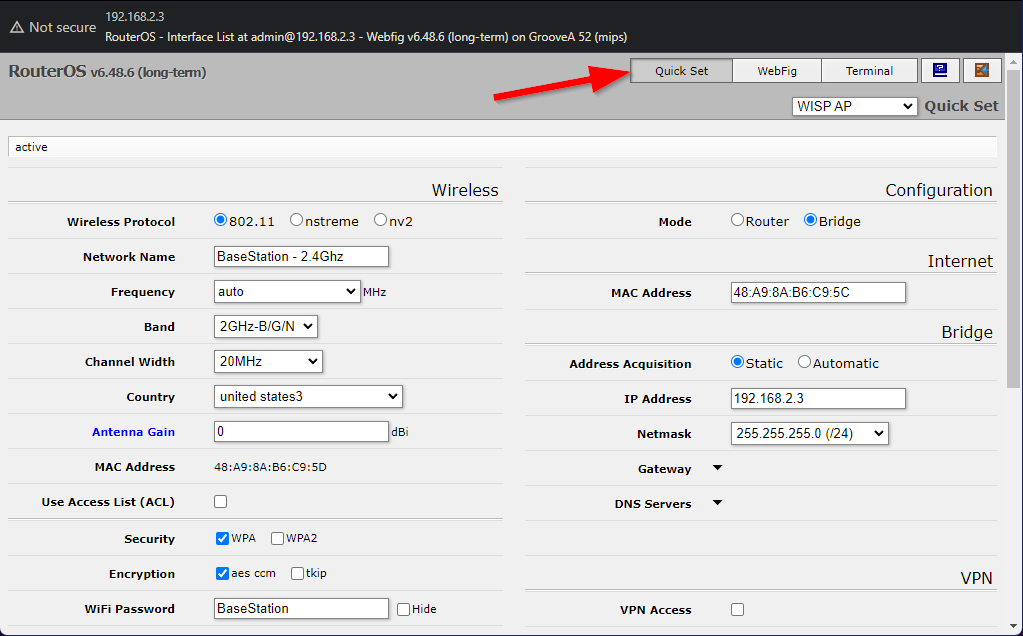
1. In a web browser, type 192.168.2.3 to access the BaseStation router’s web interface. Enter the default password “admin” to log in.
2. If you see the RouterOS user interface, this means you are successfully connected to the BaseStation.
3. Click on Quick Set from the top right corner if you are not on this page already.
Scroll down to the bottom of the page to the Wireless Clients section. The BlueBoat should be listed as a connected client here with the IP address 192.168.2.2. This section will also display the signal strength of the connection to the BlueBoat.
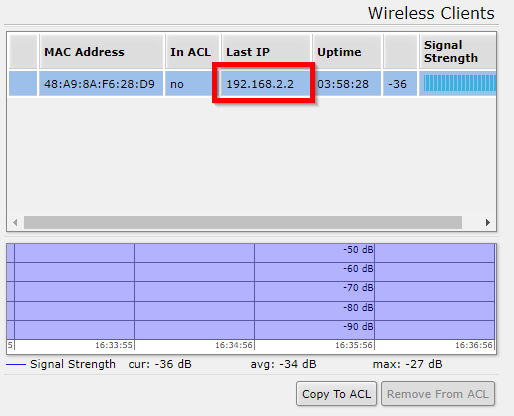
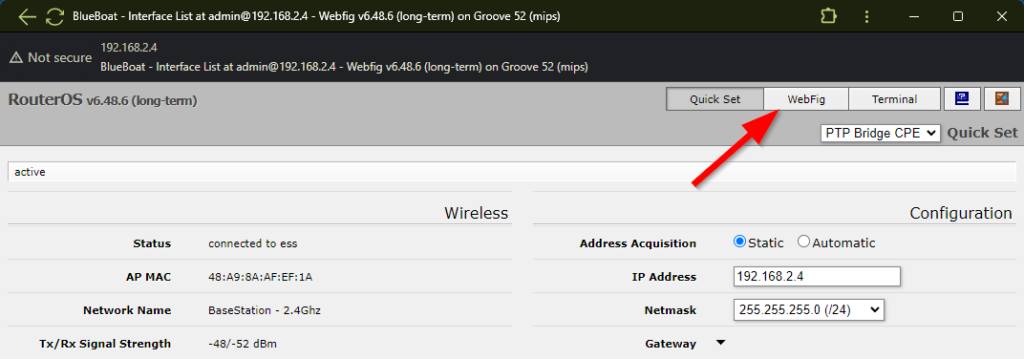
The BlueBoat listed as a connected client is your confirmation that BlueBoat is connected successfully. If you want to be extra sure, you can also access the BlueBoat’s router via IP address 192.168.2.4 (default password “admin“). The Quick Set page will display its connection status and the name of the network it’s connected to, which should be BaseStation – 2.4Ghz for the BaseStation.
Configure Country and Antenna Gain Settings
Wireless regulations vary from country to country. To ensure that the BlueBoat and BaseStation wireless communication systems operate legally and comply with local regulations, the country profile and antenna gain must be configured correctly in the router settings.
BlueBoat Settings
- As of 9 July 2024, the BlueBoat wireless settings are set to comply with United States regulations by default. If you are operating the BlueBoat in the United States and purchased the BlueBoat after 9 July 2024, you do not need to change the country or antenna gain settings and you can skip this section.
- If you are operating in the United States and purchased your BlueBoat or BaseStation before 9 July 2024, follow the instructions below.
- If you are operating the BlueBoat in any country other than the United States, follow the instructions below.
1. Ensure you have completed all previous sections of this guide to connect your computer to the BaseStation and powered on your BlueBoat.
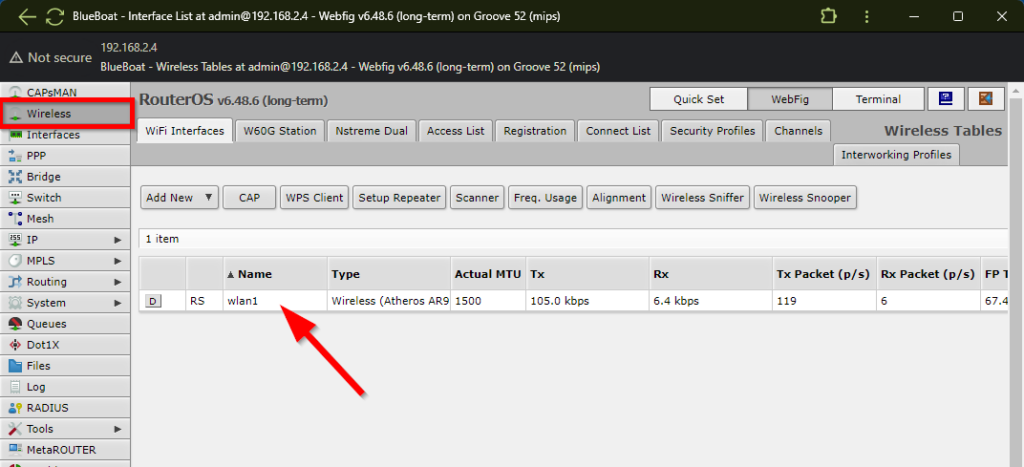
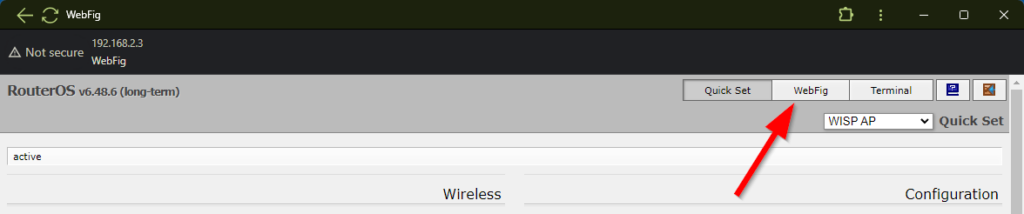
2. In a web browser, type 192.168.2.4 to access the wireless router inside the BlueBoat. From the web interface, click on WebFig from the upper right corner.
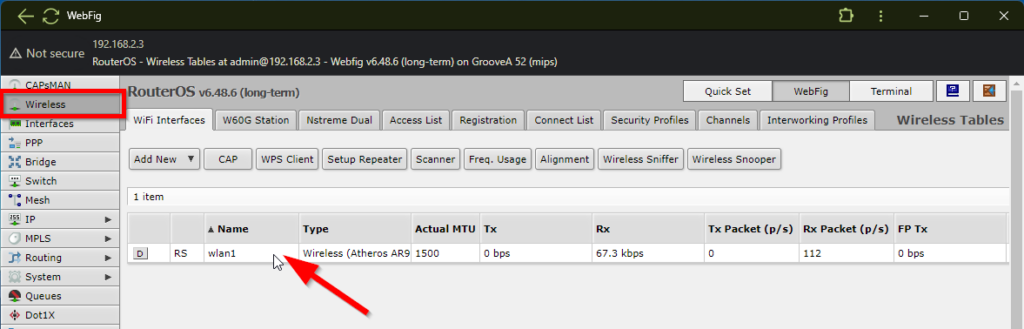
3. On the next screen, click on Wireless from the left sidebar then select the wlan1 interface.
4. On the following screen, scroll down until you see the Country setting. Select the country you are operating in from the dropdown menu. Some countries have more than one associated setting. In this case, use the recommended country setting listed in the table below.
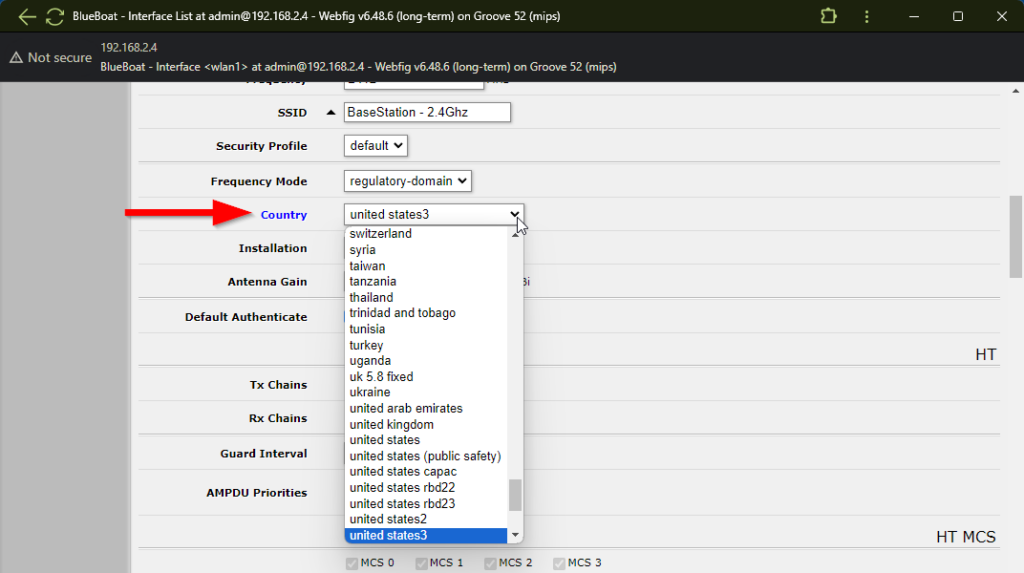
| Country | Recommended Profile |
|---|---|
| Brazil | brazil |
| Canada | canada2 |
| Egypt | egypt |
| ETSI Countries | etsi2 |
| France | france |
| Germany | germany |
| Indonesia | indonesia5 |
| Japan | japan6 |
| South Korea | korea republic3 |
| New Zealand | new zealand |
| Russia | russia4 |
| United States | united states3 |
5. Scroll down a little bit to the Antenna Gain field and enter the value listed in the table below. Please note that these values only apply if you are using the stock omnidirectional antenna on the BlueBoat.
| Country | Gain Setting ¹ |
|---|---|
| United States ² | 0 |
| Canada ² | 0 |
| All other countries | 6 |
| ¹ These gain settings only apply when using the stock 7dBi omnidirectional antenna. ² We may enter 0 dBi as these countries allow for a higher EIRP limit in outdoor use. * These gain settings account for a 1 dBi signal loss through the antenna coupling and connector. |
|
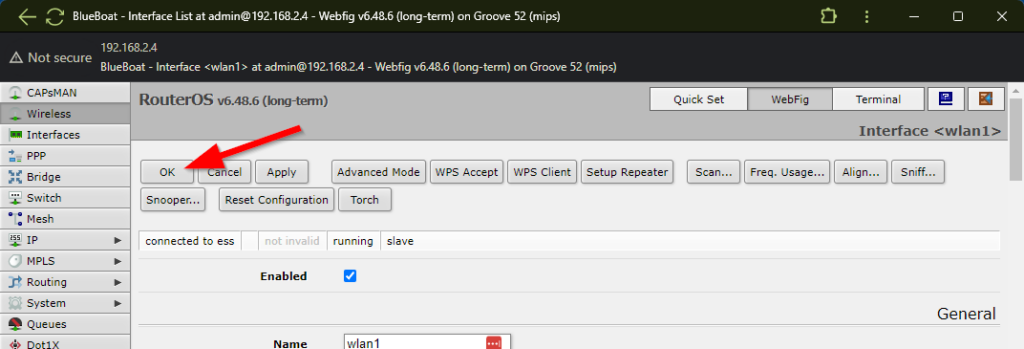
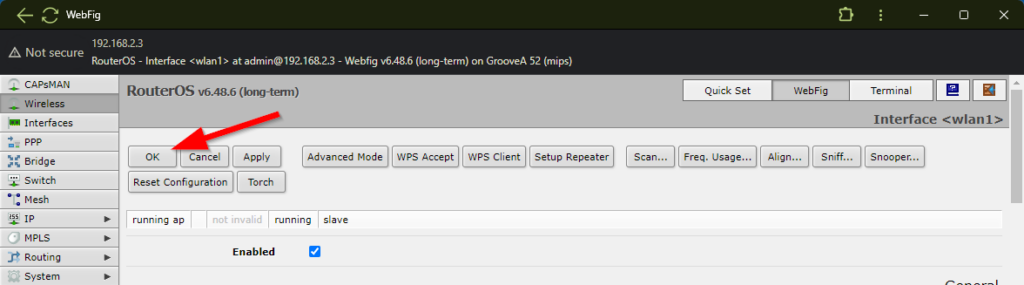
6. Scroll back to the top of the page and click on OK to save the settings.
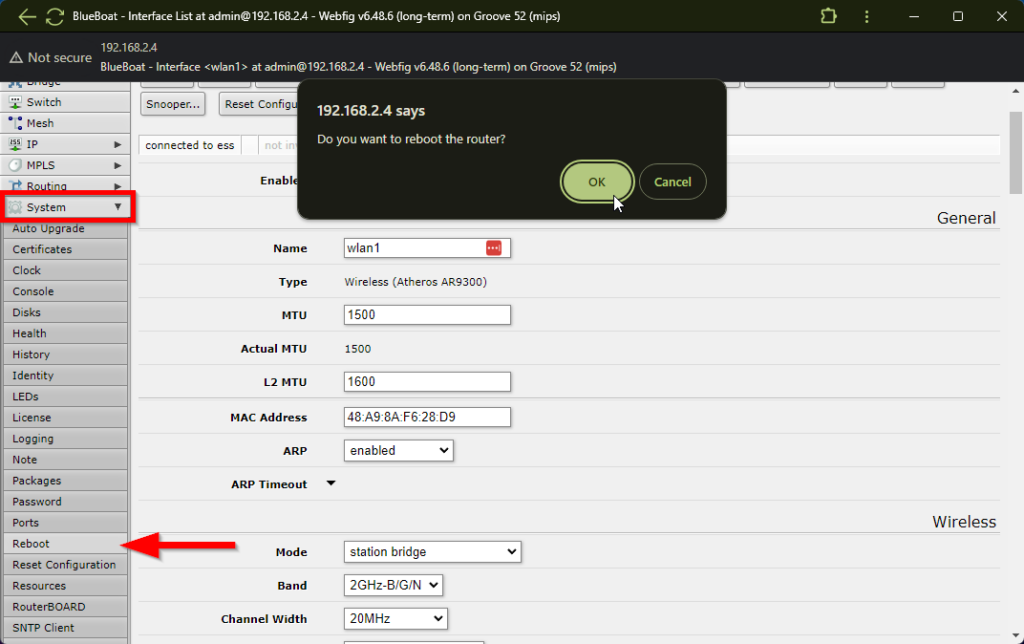
7. After the setting has been confirmed, expand the System menu from the left sidebar, then click Reboot. Confirm your selection by clicking OK.
8. The BlueBoat router will take around a minute to reboot. In the meantime, proceed to the next section to set the BaseStation settings.
BaseStation Settings
- As of 9 July 2024, the BaseStation wireless settings are set to comply with United States regulations using the stock antenna by default. If you are operating in the United States, purchased the BaseStation after 9 July 2024, and are using the stock omnidirectional antenna, you do not need to change the country or antenna gain settings and you can skip this section.
- If you are operating in the United States and purchased the BaseStation before 9 July 2024, follow the instructions below.
- If you are using one of the BaseStation Directional Antenna Kits, follow the instructions below.
- If you are operating the BlueBoat in any country other than the United States, follow the instructions below.
1. In a web browser, type 192.168.2.3 to access the wireless router inside the BaseStation. From the web interface, click on WebFig from the upper right corner.
2. Click on Wireless from the left sidebar then select the wlan1 interface.
3. On the following screen, scroll down until you see the Country setting. Select the country you are operating in from the dropdown menu. Some countries have more than one associated setting. In this case, use the recommended country setting listed in the table below.
| Country | Recommended Profile |
|---|---|
| Brazil | brazil |
| Canada | canada2 |
| Egypt | egypt |
| ETSI Countries | etsi2 |
| France | france |
| Germany | germany |
| Indonesia | indonesia5 |
| Japan | japan6 |
| South Korea | korea republic3 |
| New Zealand | new zealand |
| Russia | russia4 |
| United States | united states3 |
4. Scroll further down until you see the Antenna Gain field and enter the value listed for the antenna you are using and the country you are operating in from the table below.
| Country | Stock Omnidirectional Antenna Gain | Panel Antenna Gain | Yagi Antenna Gain |
|---|---|---|---|
| United States | 0 | 0 | 1 |
| Canada | 0 | 0 | 1 |
| All other countries | 6 | 12 | 16 |
| These gain settings account for a 1 dBi signal loss through the antenna coupling and connector. | |||
5. Scroll back to the top of the page and click on OK to save the setting.
Allow a minute or so for the BaseStation to change settings before proceeding to the next section.
Update Software
Before continuing setup, you must update the onboard BlueOS software and ArduRover firmware to get the latest feature updates and bug fixes. The BlueBoat will need access to Wi-Fi in order to perform the updates, make sure you are in an area with a strong and accessible Wi-Fi network before continuing with the update process.
Accessing BlueOS
BlueOS is a collection of tools and features for managing the BlueBoat through a web browser-based user interface. It comes preinstalled on the BlueBoat’s onboard Raspberry Pi computer. To access the BlueOS web interface:
1. Make sure you have followed the first part of this guide and have paired the BlueBoat and BaseStation, connected the BaseStation to your computer, and powered on both the BlueBoat and the BaseStation.
2. In a web browser window, type 192.168.2.2 or blueos.local in the browser address bar.
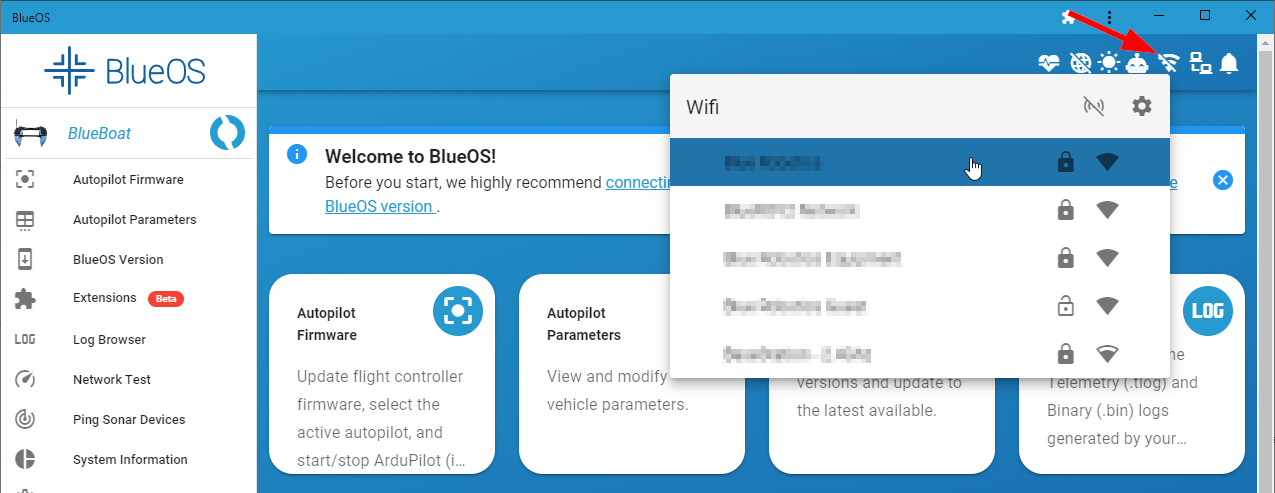
3. You will be taken to the BlueOS web interface home screen. Do as the friendly welcome tour suggests and connect to your Wi-Fi network by clicking the network from the Wi-Fi menu and entering the password.
- Be aware that in this step you are connecting to your own Wi-Fi network from your router that has internet access, not the network generated by the BaseStation.
Updating BlueOS
To perform a BlueOS software update:
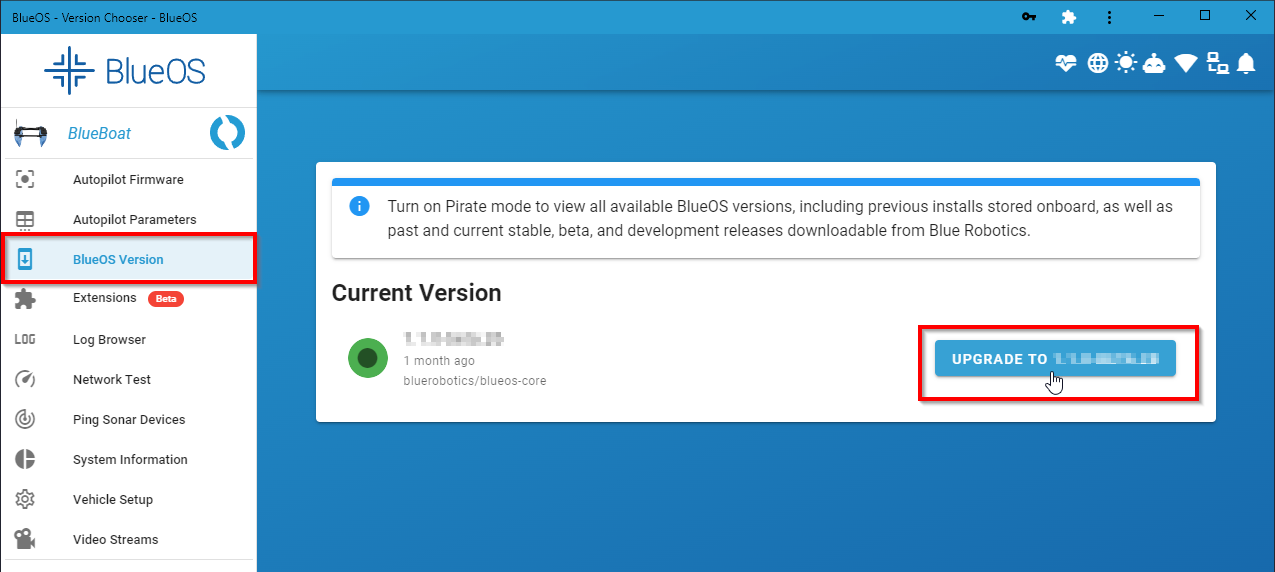
Click on BlueOS Version from the left sidebar. This page will show the currently installed BlueOS version. It will also display an “UPGRADE TO …” button if there is update for BlueOS available. Go ahead and upgrade to the latest version if one is available. The process may take a few minutes depending on the internet connection speed. Wait for the update process to complete, the page will automatically refresh once it is done and the new BlueOS version will be displayed.
Updating ArduRover
ArduRover is the autopilot firmware that runs on the Raspberry Pi. To perform an ArduRover firmware update:
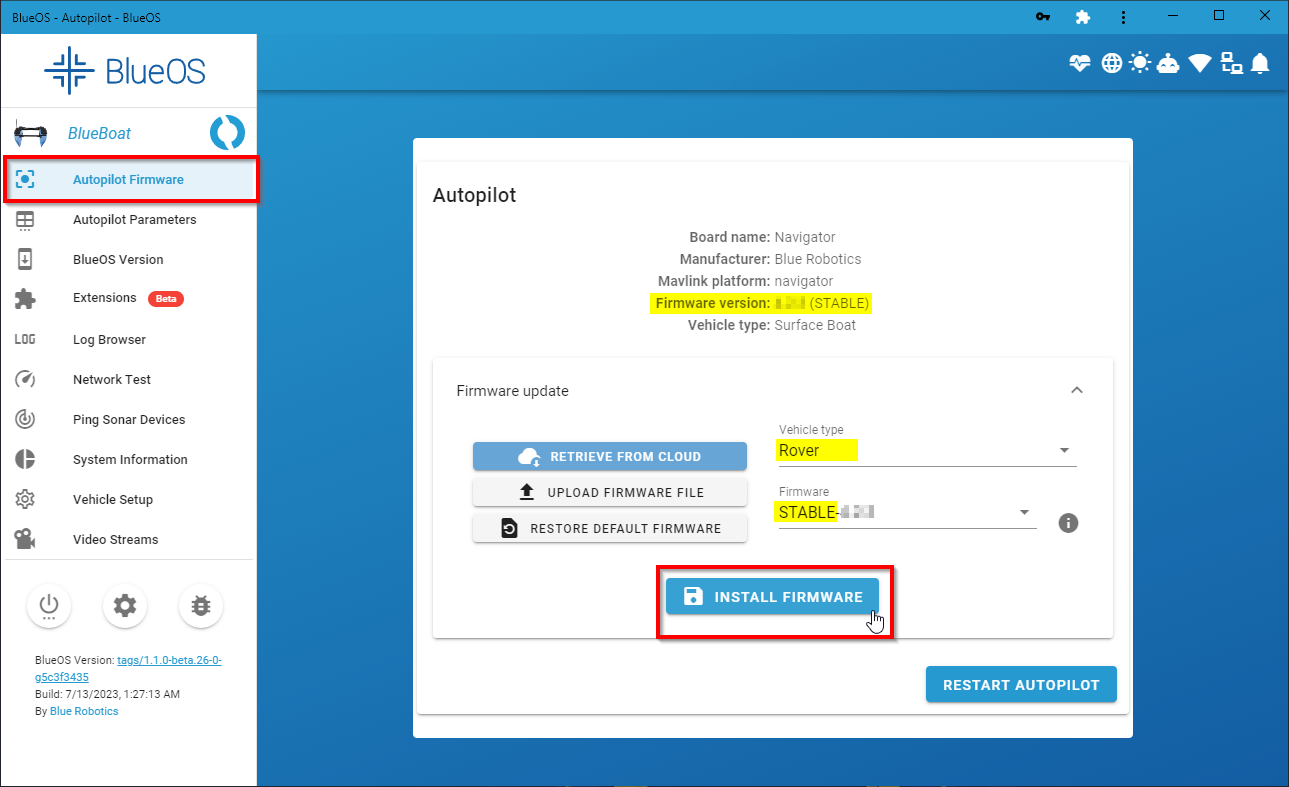
1. Click on Autopilot Firmware from the left sidebar. The currently installed firmware version will be displayed in the autopilot summary information at the top.
2. Expand the Firmware update section. Select Rover from the Vehicle type dropdown menu. From the Firmware dropdown menu, select the latest STABLE version available (higher number means newer). If the latest stable matches what is currently installed, you don’t have to do anything. Otherwise, if a newer version is available, click INSTALL FIRMWARE and wait for the process to finish.
Connecting to QGroundControl
1. With the BlueBoat and BaseStation powered on, open the QGroundControl application.
2. Wait a few seconds for the BlueBoat to auto-connect and the green parameters bar to finish loading from left to right.
3. If this is the first time setting up the BlueBoat, you will receive a message that additional setup is required. Follow the next sections to finalize vehicle setup.
Sensor Calibration
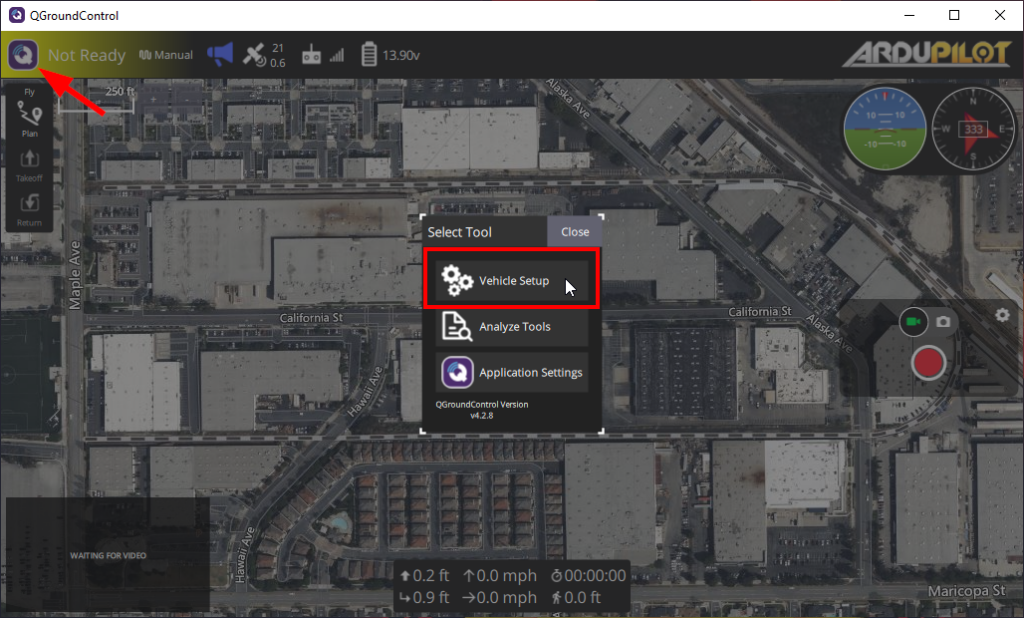
1. QGroundControl should automatically take you to the Vehicle Setup section the first time it connects. If it doesn’t, click on the “Q” icon in the upper left corner to open the QGC menu and click on Vehicle Setup.
2. Click on Sensors on the left sidebar.
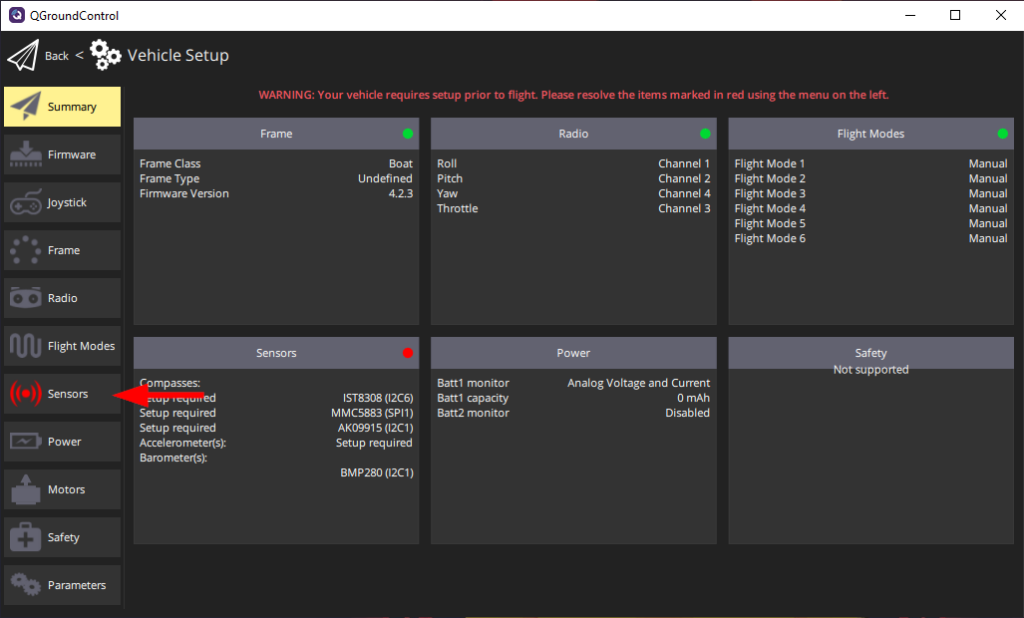
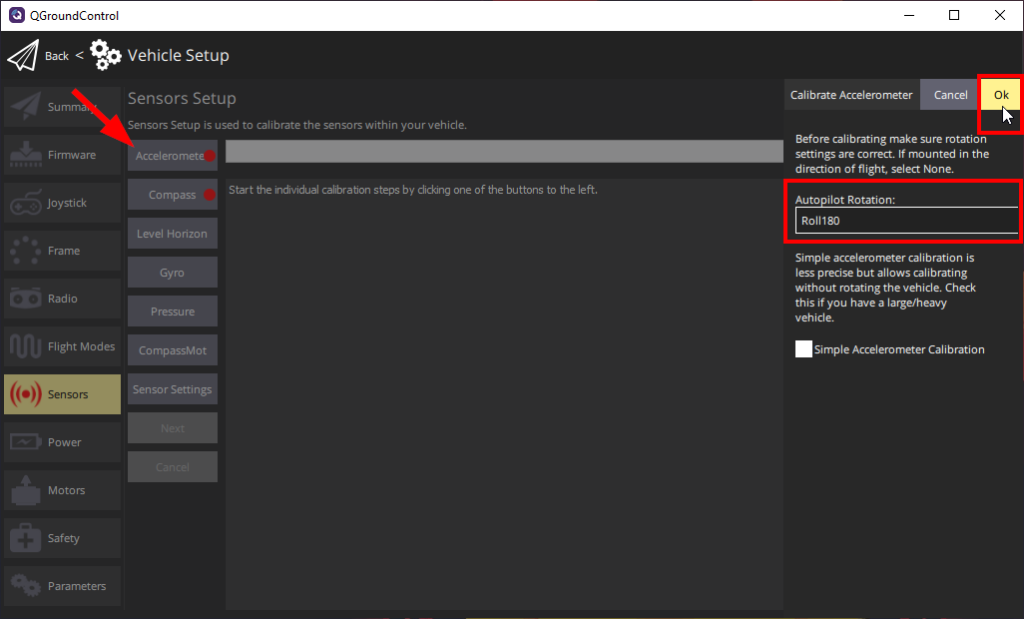
3. Click on Accelerometer, ensure Roll180 is set for Autopilot Rotation then click Ok. Follow the onscreen instructions for the accelerometer calibration process. You will be prompted to reboot the autopilot when it is done. Go ahead and click Reboot and wait for it to reconnect.
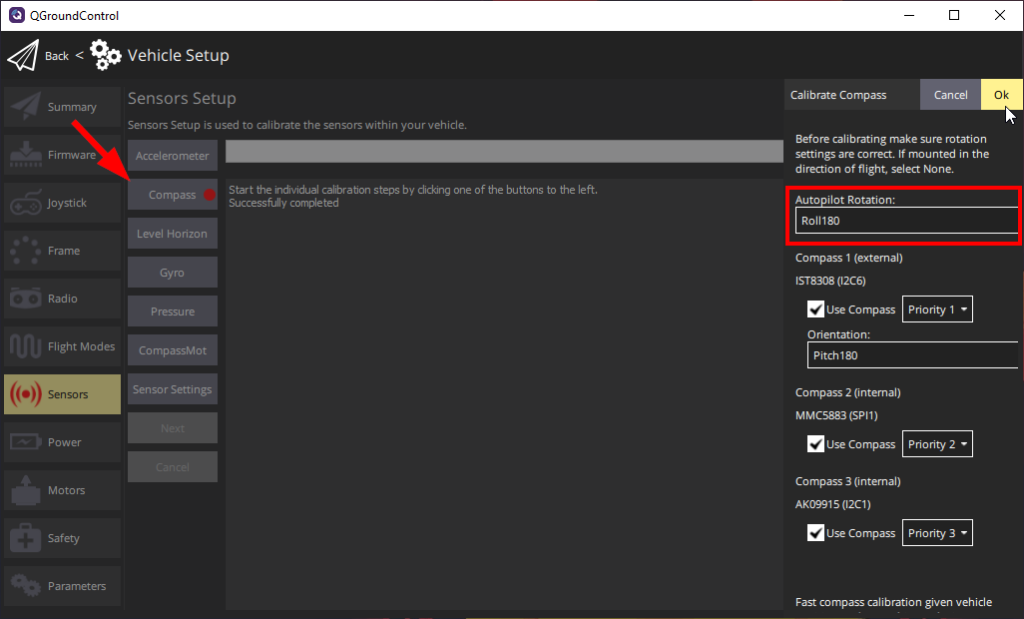
4. Click on Compass, ensure Roll180 is set for Autopilot Rotation then click Ok. Follow the onscreen instructions for the compass calibration process. You will be prompted to reboot the autopilot when it is done. Go ahead and click Reboot and wait for it to reconnect.
Check Motor Directions
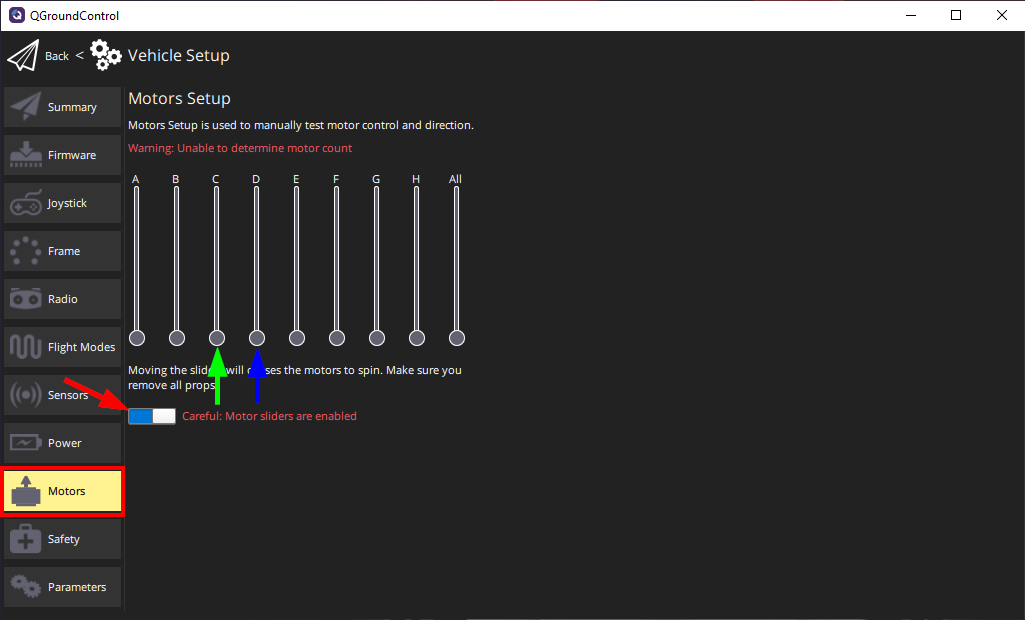
From the Vehicle Setup screen, click on Motors on the left sidebar. Click the button to enable the motor sliders. Slider “C” controls the port side motor and slider “D” controls the starboard side. Move the slider for each motor up (you only have to move it a little bit) and check the spin direction of the corresponding motor.
While viewing the boat from the rear, the port side motor (LH) should spin counter-clockwise and the starboard side motor (RH) should spin clockwise when the sliders are moved up. If the motors are not spinning correctly, follow the instructions in the Reversing a Motor Direction section.
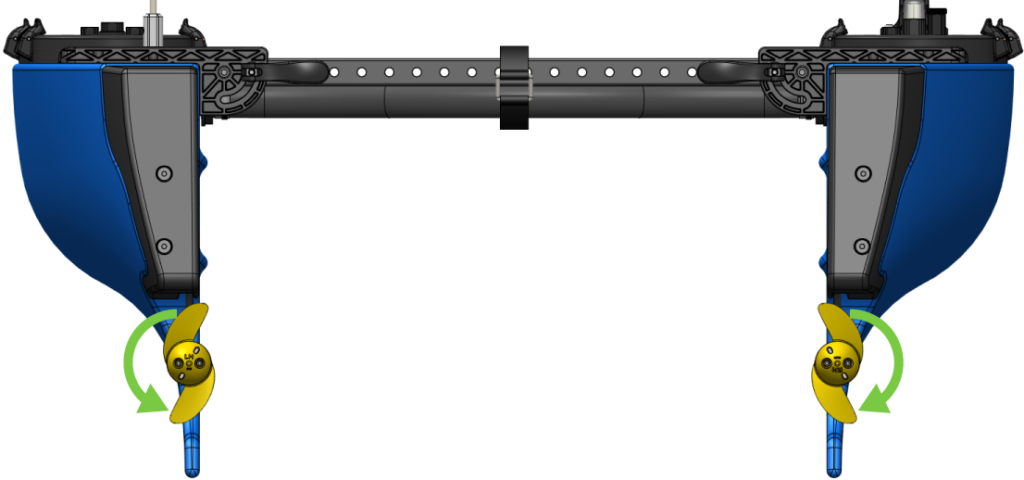
You can also determine spin direction by checking which way the propellers are pushing the air. When the sliders are moved up, each motor should push air backwards, away from the boat.
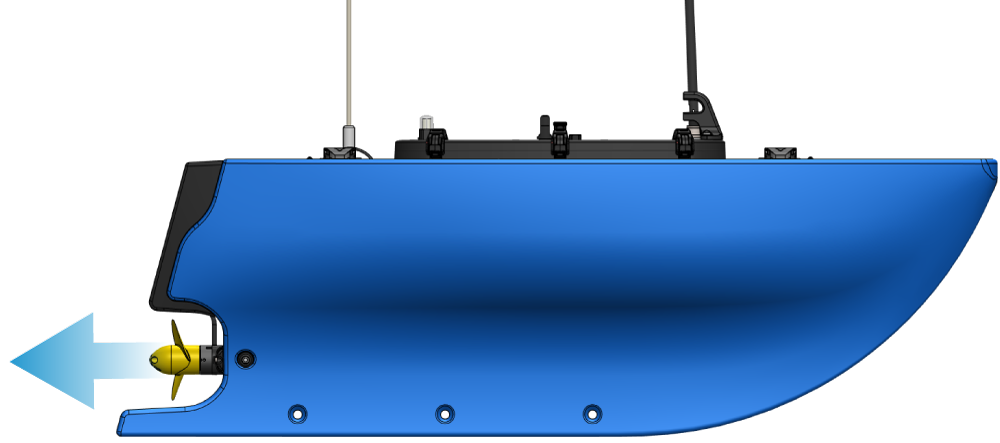
If the motors are not pushing air in the correct direction, first check that the propellers are installed on the correct side. The propeller marked “LH” should be installed on the port side, and the propeller marked “RH” should be on the starboard side. If you have verified that the propellers are installed correctly and are still pushing air in the wrong direction, follow the instructions under ‘Reversing a Motor Direction’ to reverse the motor.
Reversing a Motor Direction
Follow these instructions to reverse a motor direction. You can skip this section if your motors are already spinning in the correct direction.
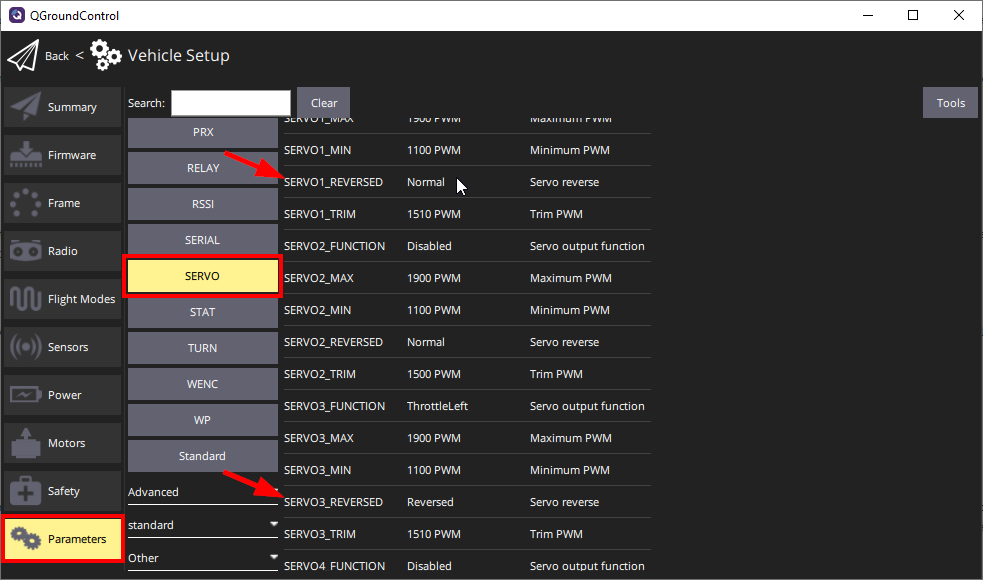
1. From the Vehicle Setup screen, go to Parameters then SERVO. Find the SERVO#_REVERSED parameter for the motor that needs to be reversed:
- SERVO1 is the starboard side motor.
- SERVO3 is the port side motor.
2. Switch the parameter setting to reverse the motor (e.g. if it was “Normal” set it to “Reversed” or if it was “Reversed” set it to “Normal”).
6S Battery Settings
If you installed 6S battery splitter cables in your BlueBoat and are using 6S batteries, make sure to follow the 6S Battery Splitter Cable Installation guide and set the additional parameters. If you are using the standard 4S splitter cables and batteries you can ignore this part!
Controller Setup
The BlueBoat can be operated without a game controller using autonomous modes, but we recommend having one available in case you need to take manual control or if GPS aided navigation is not available. The Xbox controller is our recommended controller for the best experience but most standard game controllers are compatible.
Xbox Controller Initial Setup
The Xbox controller is plug-and-play with Windows systems. It can be used wired with a USB-C cable or wirelessly via Bluetooth. To use the controller wirelessly, your computer must have Bluetooth enabled and the controller must be paired from the Bluetooth settings menu.
To pair the controller with your computer:
1. Turn on the Xbox controller by holding down the middle Xbox button until it lights up.
2. Put the controller in pairing mode by holding down the small pairing button on the top of the controller until the middle Xbox button starts to blink.
3. Open the Start menu and go to Settings > Devices > Bluetooth & other devices.
4. In the Windows Bluetooth menu, select Add Bluetooth or other device and select the Bluetooth option.
5. Select the controller from the list. The controller must be in pairing mode to show up as a selectable device.
The middle Xbox button can be used as a user-assignable function button. By default, it is configured to open the Windows Game Bar. This needs to be disabled before this button can be used in QGroundControl.
1. Open the Start menu and go to Settings > Gaming.
2. Uncheck the Open Xbox Game Bar using this button… option.
The Xbox controller must be paired via Bluetooth before it can be used in QGroundControl. To pair the controller:
1. Turn on the Xbox controller by holding down the middle Xbox button until it lights up.
2. Put the controller in pairing mode by holding down the small pairing button on the top of the controller until the middle Xbox button starts to blink.
3. Open Bluetooth settings, then select the controller from the list of nearby devices.
The Xbox controller is plug-and-play when connected with a USB-C cable in the most recent Ubuntu version and many other Linux versions.
Logitech F310 Controller Initial Setup
Set the switch on the back of the controller to the “X” position and plug in the USB cable.
Set the switch on the back of the controller to the “D” position and plug in the USB cable.
Set the switch on the back of the controller to the “X” position and plug in the USB cable.
Controller Calibration
The controller may require calibration before you can enable it for use in QGroundControl. If your controller requires calibration, the Joystick tab on the Vehicle Settings page will be red, and you should follow these steps to calibrate your controller. If your controller does not require calibration, the Joystick tab will not be red, and you can skip this step!
1. From the Vehicle Setup screen, click on the red Joystick tab in the sidebar on the left. If you do not see a Joystick tab, this means that the controller is not detected by QGroundControl or not connected to the computer.
2. Click Calibration, then click Start.
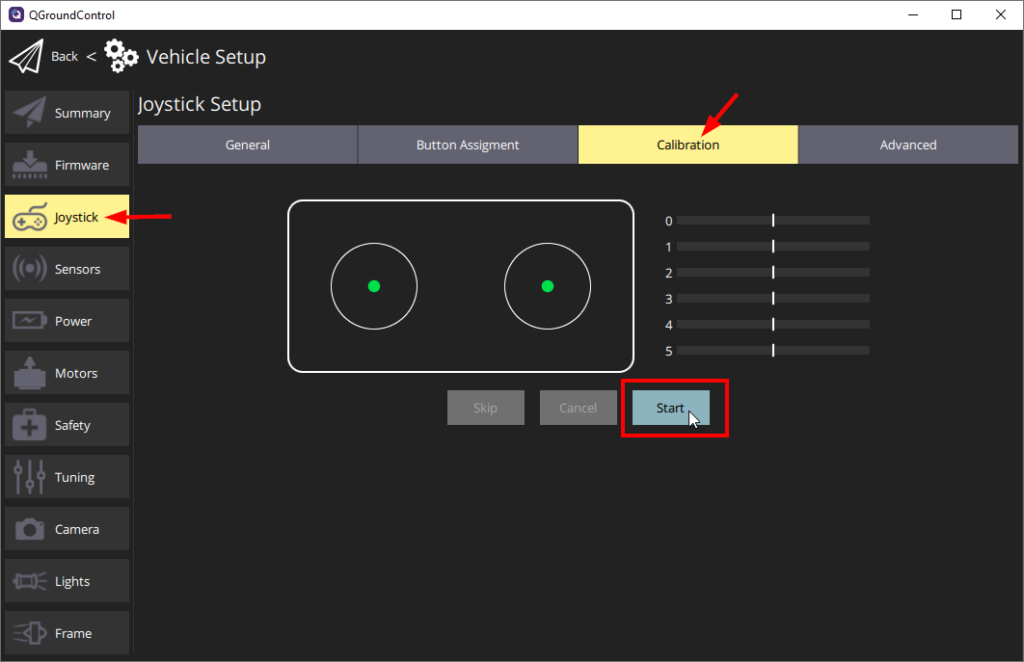
3. Follow the step-by-step instructions and move the sticks as indicated in QGroundControl. Move the thumbsticks slowly and allow the stick to return to center between movements.
When completed, the Joystick tab will no longer be red, and the Enabled checkbox on the Joystick page will be checked.
Controller Settings
The following settings must be enabled for the controller to function properly.
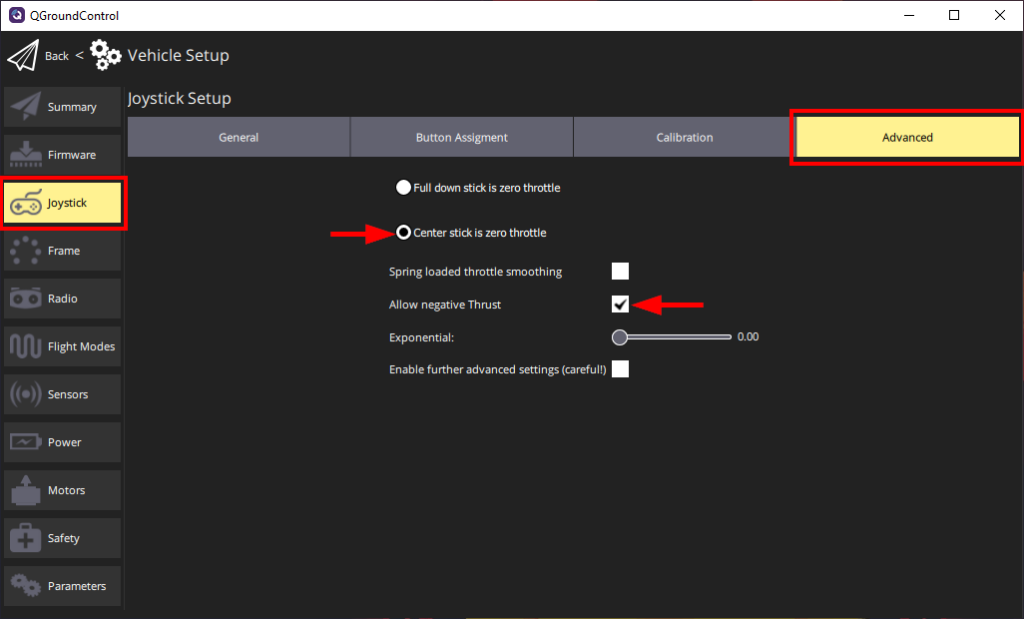
1. From the Vehicle Setup screen, click on Joystick from the left sidebar.
2. Click on the Advanced tab then enable the options for Center stick is zero throttle and Allow negative Thrust.
Button Assignment
There is no predefined button layout so you will have to manually assign all of the button functions. To assign the button functions:
1. From the Vehicle Setup screen, click on Joystick from the left sidebar.
2. Go to Button Assignment, this screen will show a list of all the buttons and their assigned functions.
3. Press the button that you want to configure on the controller. The corresponding button number in the list will light up next to a dropdown menu with the list of functions that can be assigned to it.
4. Select the desired function from the dropdown. An example layout is shown below but you can configure the layout as you like.
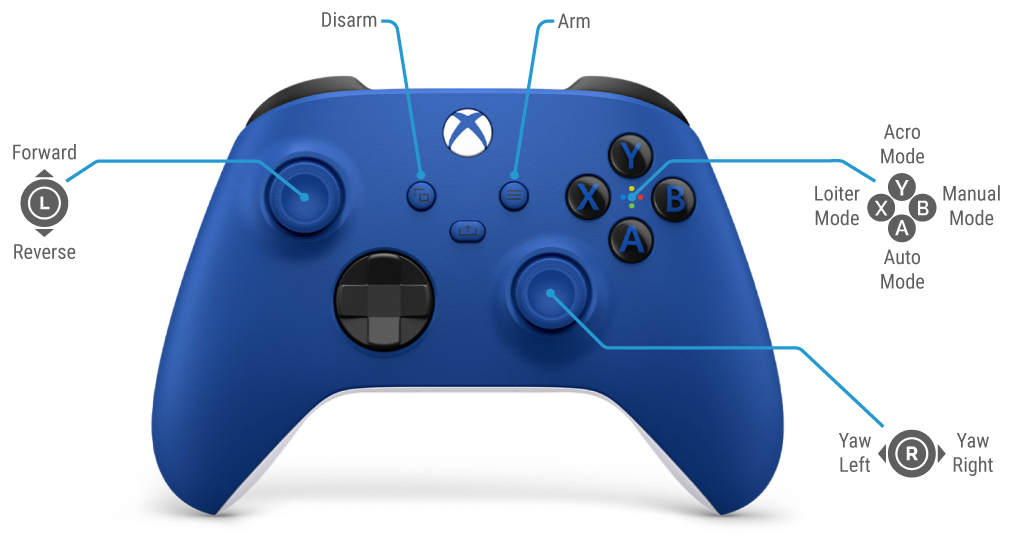
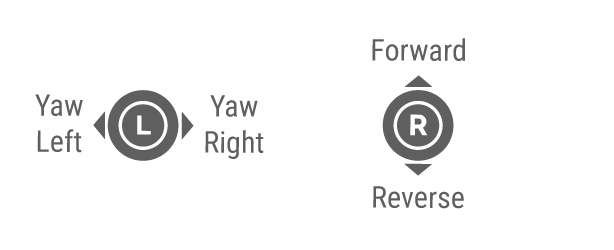
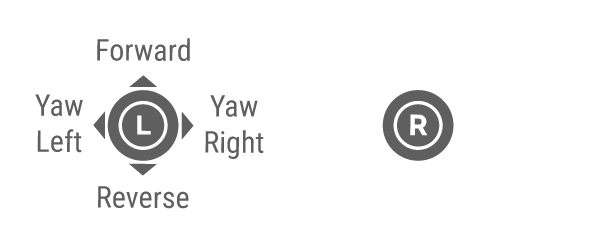
Controller Thumbstick Modes
QGroundControl allows you to change which thumbsticks control the forward/reverse and rotational (yaw) movement of the boat.
1. From the Vehicle Setup screen, click on Joystick from the left sidebar.
2. Go to General and select an option from RC MODE. The different modes are shown below:
RC Mode 1

RC Mode 2

RC Mode 3
RC Mode 4
Backing Up Your Parameters
After you have the BlueBoat all set up, it’s a good idea to create a backup of your autopilot parameters so they can be easily restored should the need arise. To backup your autopilot parameters:
1. Access BlueOS and navigate to the Autopilot Parameters page.
2. Scroll down to the bottom of the list of parameters and click on the SAVE button.
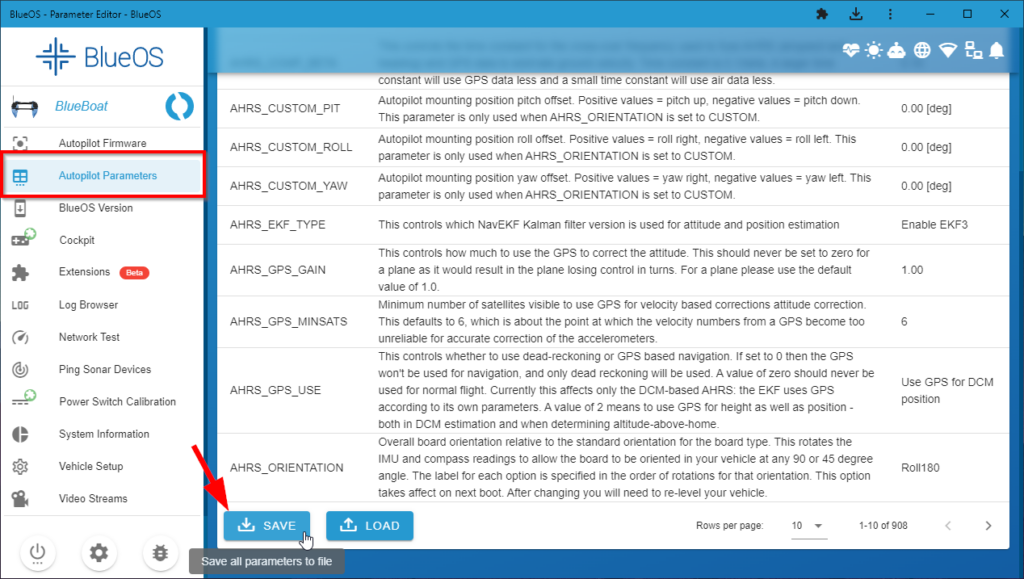
3. The parameter file (.params) will be saved to whichever folder is designated as the “Downloads” or “Save to…” folder in your web browser settings. Keep this file in a safe location.
4. To restore a parameter file, use the LOAD button from the same Autopilot Parameters page.
Next Steps
Your BlueBoat is now ready for operation! Head over to the BlueBoat Operator’s Guide to learn how to carry out your first mission. After that, check out the BlueBoat General Integration Guide to learn about the various ways BlueBoat supports integrating payloads.
BlueBoat Operator’s Guide

BlueBoat General Integration Guide
Advanced Network Settings
The following sections describe BlueBoat and BaseStation router configuration options for advanced use. The default settings should work well for most users, we recommend not changing these unless you have a reason to!
All advanced settings can be accessed from the BlueBoat or BaseStation router web interface. In a web browser, type 192.168.2.4 for the BlueBoat or 192.168.2.3 for the BaseStation. Enter the default password “admin” to log in.
Select WebFig from the top right corner to access all router settings.
Changing the BaseStation Network SSID and Password
To change the SSID:
1. Select Wireless from the left sidebar then select the wlan1 interface.
2. On the following screen, scroll down until you see the SSID field. Enter the desired SSID here.
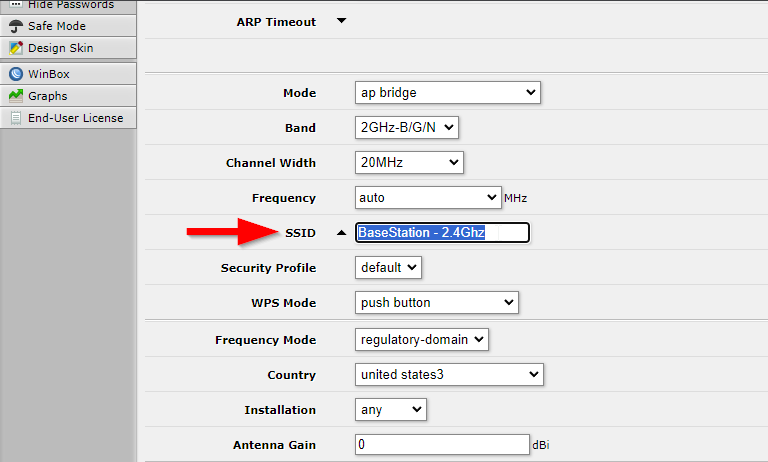
3. Click on OK at the top of the page to save the setting.
To change the password:
1. Select Wireless from the left sidebar then select the Security Profiles tab.
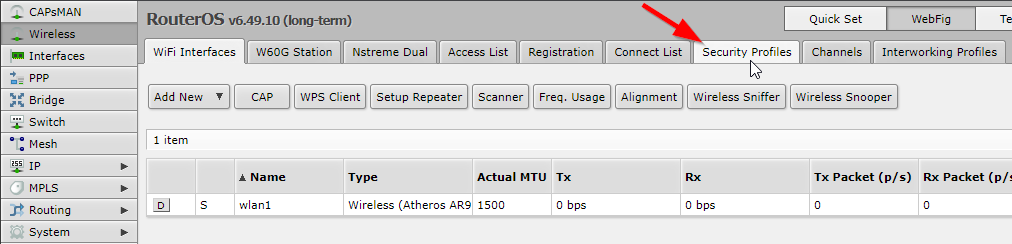
2. Click on the default profile.
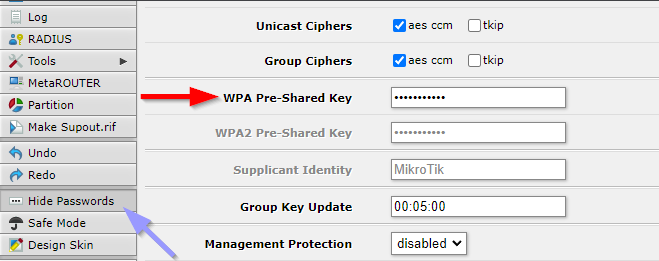
3. Enter the desired password in the WPA Pre-Shared Key field. You can show and hide the current password by clicking the Hide Passwords option from the left sidebar.
Changing Router Admin Password
The admin password is used to access the router web interface. It is “admin” by default for all BlueBoats and BaseStations. To change this password:
1. Expand the System menu from the left sidebar, then click Users, then the default admin user profile.
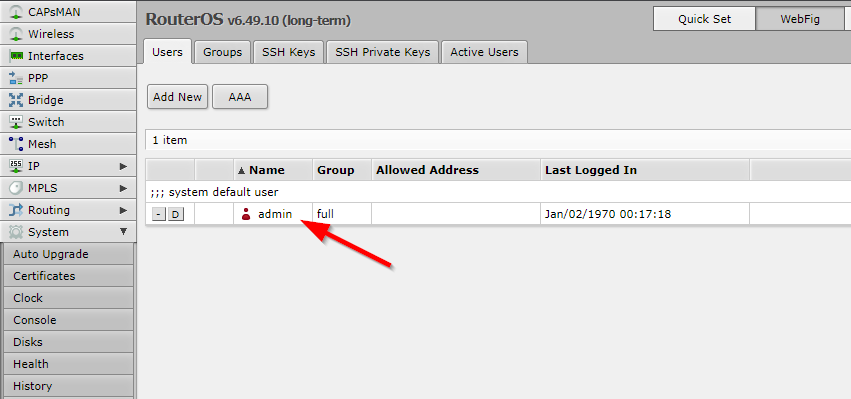
2. The user password can be changed from the Password… menu on the next screen.
Antenna Gain and Calculating EIRP
Effective Isotropic Radiated Power (EIRP) measures the power radiated by an antenna. Countries regulate EIRP levels in wireless communication systems to limit interference with other wireless devices and ensure safety. In RouterOS, each country profile setting has a maximum EIRP value based on that country’s regulations. RouterOS adjusts the transmit (Tx) power based on the antenna gain value entered in the wireless settings, increasing or decreasing Tx power to ensure the total EIRP remains within the limits of the selected country profile. When entering the antenna gain value in the router settings…
- Always use the correct gain value for your antenna. Incorrect values can lead to operating above legal EIRP limits or reduced performance:
- Entering a value lower than the actual gain will increase transmit power, potentially improving effective communication range but also exceeding legal EIRP limits.
- Entering a higher value than the actual gain reduces transmit power unnecessarily, reducing the effective communication range.
- Consider reducing the entered gain value by 1 dB to account for losses at the antenna connector and coupler.
For reference, here is the formula to calculate total EIRP:
EIRP (dBm) = Tx Power (dBm) + Antenna Gain (dBi) − Losses (dB)
Where:
- Tx Power is the power of the transmitter in decibels relative to one milliwatt (dBm).
- Antenna Gain is the gain of the antenna in decibels relative to an isotropic radiator (dBi).
- Losses represents the losses in the system, including cable losses, connector losses, and any other losses, in decibels (dB). In the BlueBoat and BaseStation, the losses through the antenna connector and coupler are about 1 dB.
BlueBoat and BaseStation Pairing
BlueBoats purchased before 26 June 2024 need to be manually paired to the BaseStation to connect to it. You must also perform this pairing process if you changed the BaseStation network SSID or password from the defaults and are connecting the BlueBoat for the first time.
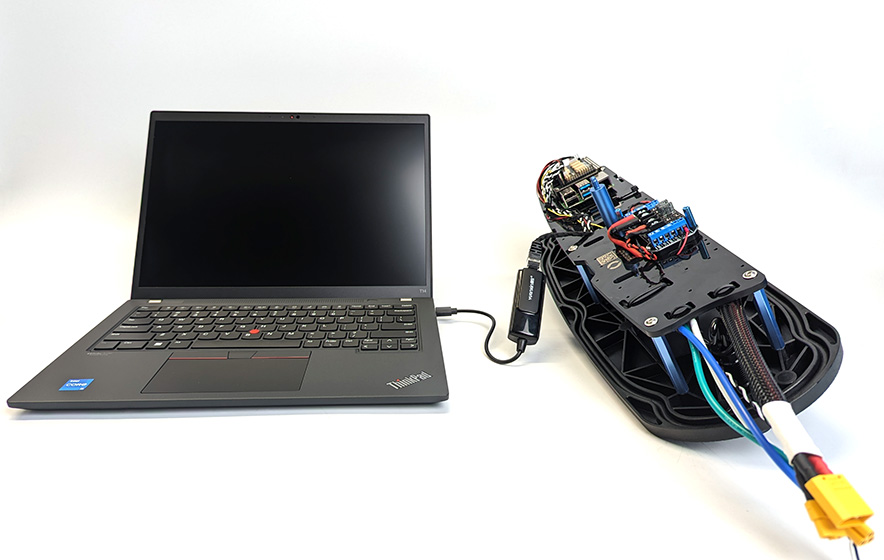
1. Open the BlueBoat starboard side hatch lid and disconnect all the cables that are connected to it (STBD PWR cable, motor cable, ESC signal cable). Remove the hatch lid assembly from the BlueBoat, this is the only part of the BlueBoat you will need to complete the pairing process.
2. Remove the hatch lid clamshell (cover) by unscrewing the thumb nut. This gives you access to the electronics on the electronics tray.
3. Unplug the Ethernet cable from the Raspberry Pi. A flat tool like a screwdriver is helpful to push in the tab to disconnect the plug.
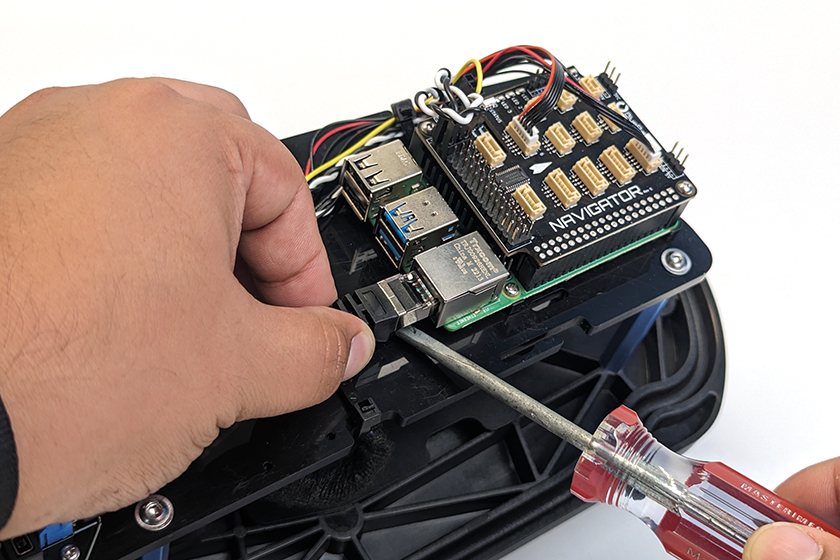
4. Connect this Ethernet cable to the USB Ethernet adapter included in the BlueBoat kit, then connect the adapter to a USB port on your computer. Note that in this step, you are connecting the router in the BlueBoat to your computer via the adapter, not the Raspberry Pi.
5. Connect a fully charged battery to the XT90 connector on the STBD PWR cable.
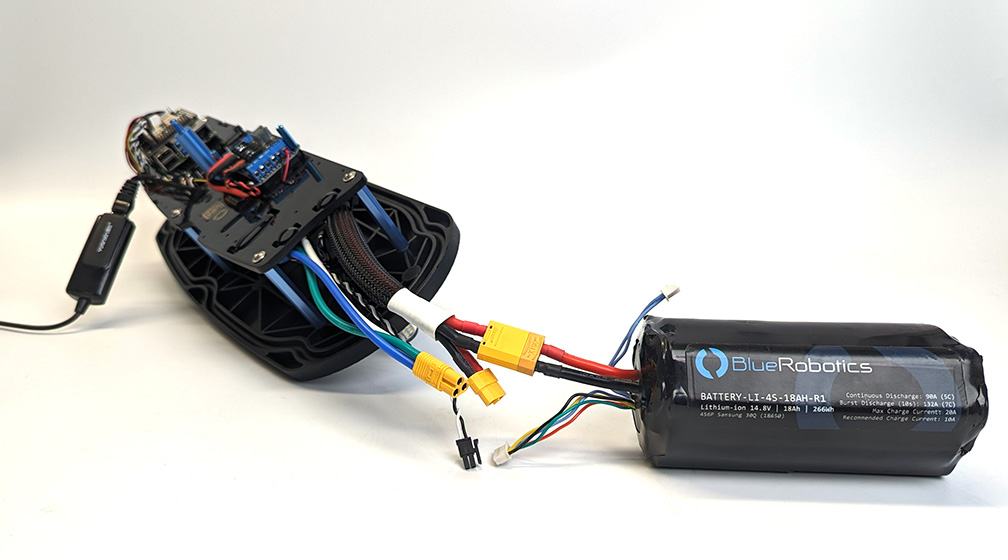
6. Turn on the electronics by turning the power switch in the “ON” direction until it bottoms out.

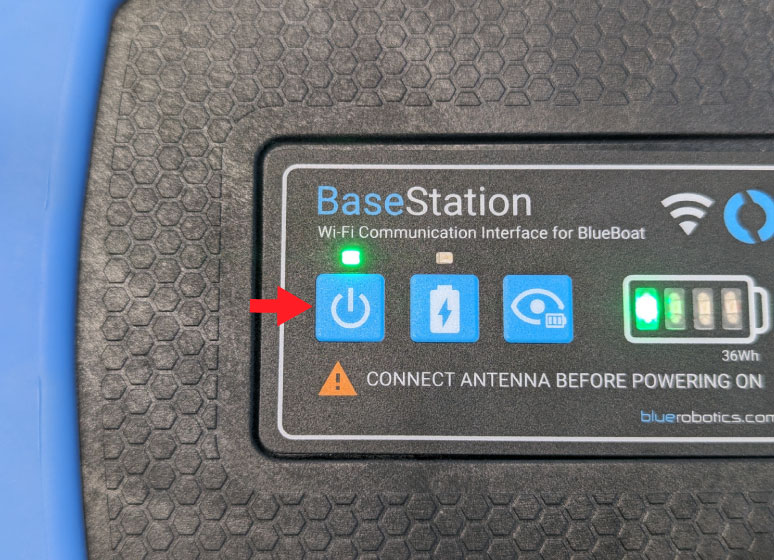
7. Turn on the BaseStation by pressing and holding the power button for 2 seconds then releasing. The green LED above the power button should illuminate when it is powered on.
8. The USB Ethernet adapter must be configured with an IP address on the 192.168.2.X subnet (e.g. 192.168.2.10). Do not use the following reserved IP addresses:
- 192.168.2.1 – your computer’s IP address
- 192.168.2.2 – BlueBoat Raspberry Pi 4 IP address (BlueOS)
- 192.168.2.3 – BaseStation wireless router IP address
- 192.168.2.4 – BlueBoat wireless router IP address
Select your operating system below to show instructions for setting the IP address.
Windows Setup macOS Setup Linux SetupWindows
(8.1) Open the Windows Control Panel then select Network and Sharing Center. If you don’t see Network and Sharing Center, change the View by: option to large or small icons.
(8.2) Select Change adapter settings from the left side menu.
(8.3) The USB Ethernet adapter should be displayed as “Realtek USB FE Family Controller” in this menu. Right click on this Ethernet adapter then choose Properties.

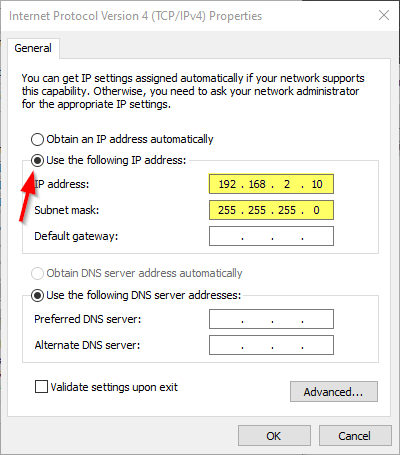
(8.4) In the properties dialog, click on Internet Protocol Version 4 (TCP/IPv4) to highlight it, then click Properties.
(8.5) Select Use the following IP address And enter 192.168.2.10 for the IP address and 255.255.255.0 for the Subnet mask. Select OK. You can then exit this menu.
macOS
(8.1) Open System Settings then select Network.
(8.2) The USB Ethernet adapter will be displayed as “USB 10/100 LAN” in the Network screen. Select it then click Details….
(8.3) In the next menu, select TCP/IP. Set the Configure IPv4 setting to Manually then enter 192.168.2.10 for the IP address and 255.255.255.0 for the Subnet mask and then select OK. You can then exit this menu.
Linux (Ubuntu)
(8.1) Open Settings then select Network.
(8.2) The USB Ethernet adapter will show up as “USB Ethernet” in this menu, click on the settings icon next to it.
(8.3) Click the IPv4 Settings tab, select Manual for the IPv4 Method setting, enter 192.168.2.10 for Address, 255.255.255.0 for Netmask and 0.0.0.0 Gateway. Click Apply to complete the setup.
9. Type 192.168.2.4 into a web browser address bar. This is the IP address of the wireless router in the BlueBoat starboard hatch lid assembly.
10. You should now be in the wireless router’s interface menu. Click Disconnect.
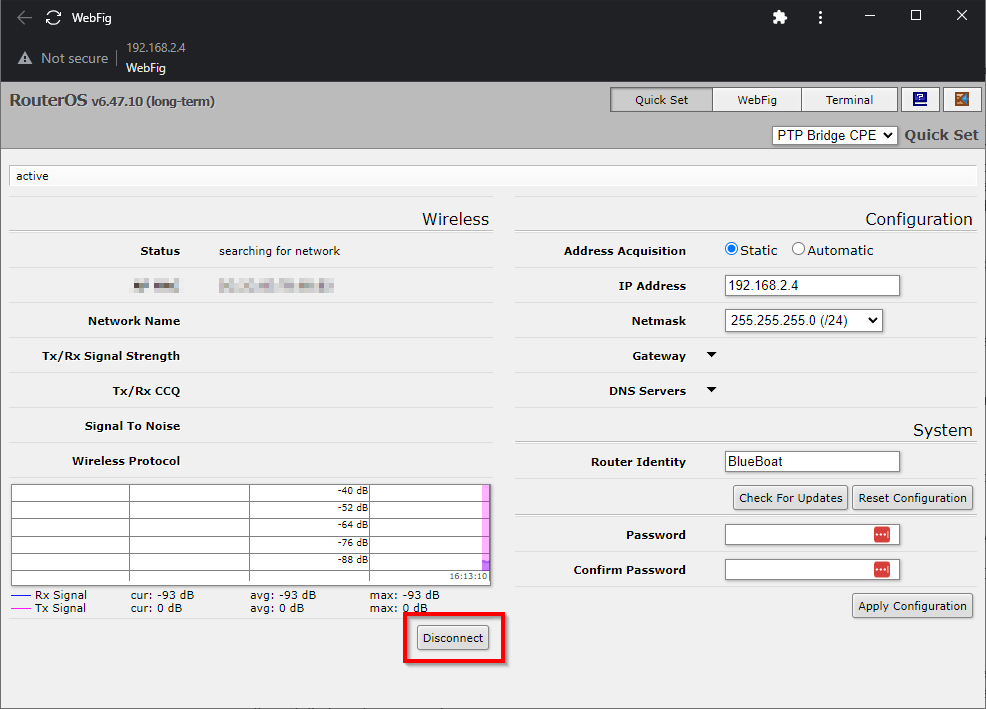
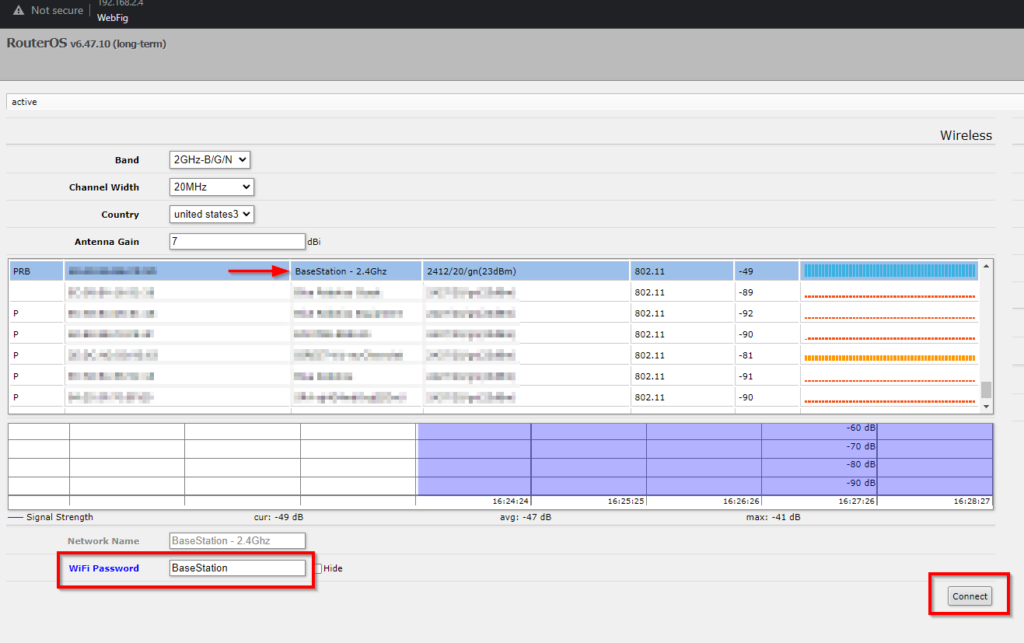
11. The interface should now display a list of networks it detects in the area. The BaseStation creates a wireless network with the SSID “BaseStation – 2.4Ghz”, select it. Enter the default password “BaseStation” and click Connect.
12. Congratulations! Your BlueBoat is now paired to your BaseStation. You can now return the starboard hatch lid assembly to the BlueBoat:
- Turn off the hatch lid assembly by turning the power switch in the “OFF” direction and disconnecting the battery.
- Disconnect the Ethernet cable from the USB Ethernet adapter and plug it back into the Raspberry Pi.
- Install the clamshell cover and thumb nut back on the hatch lid assembly.
- Install the hatch lid assembly back in the BlueBoat by reconnecting all the cables you disconnected earlier.
Calibrating the PowerSwitch
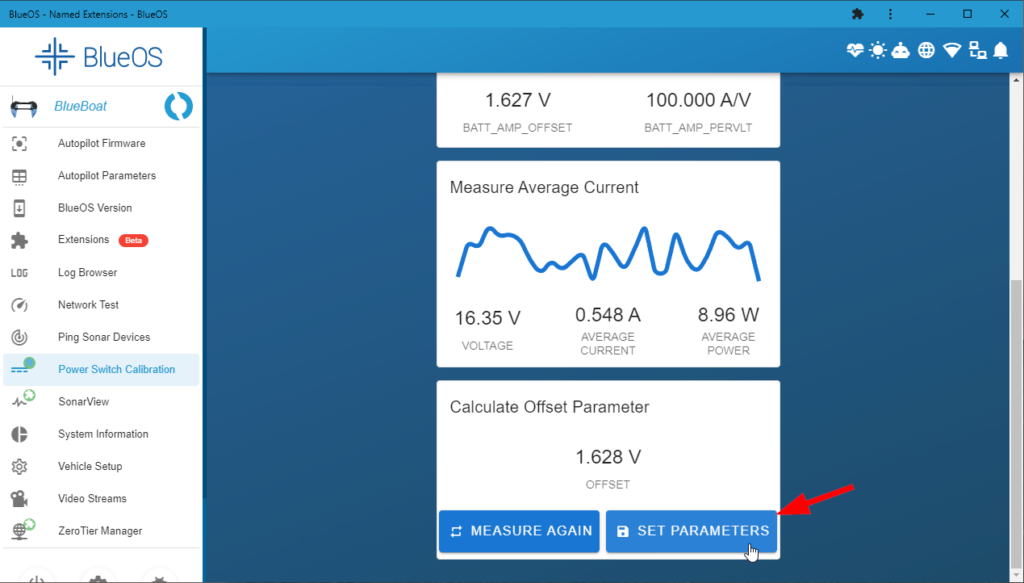
The current offset parameter for some older BlueBoats may need additional calibration. If you notice the current draw information seems inaccurate, perform this calibration procedure. The calibration should be performed while the BlueBoat is at rest, with no additional load on the power system (no accessories or payloads connected to power).
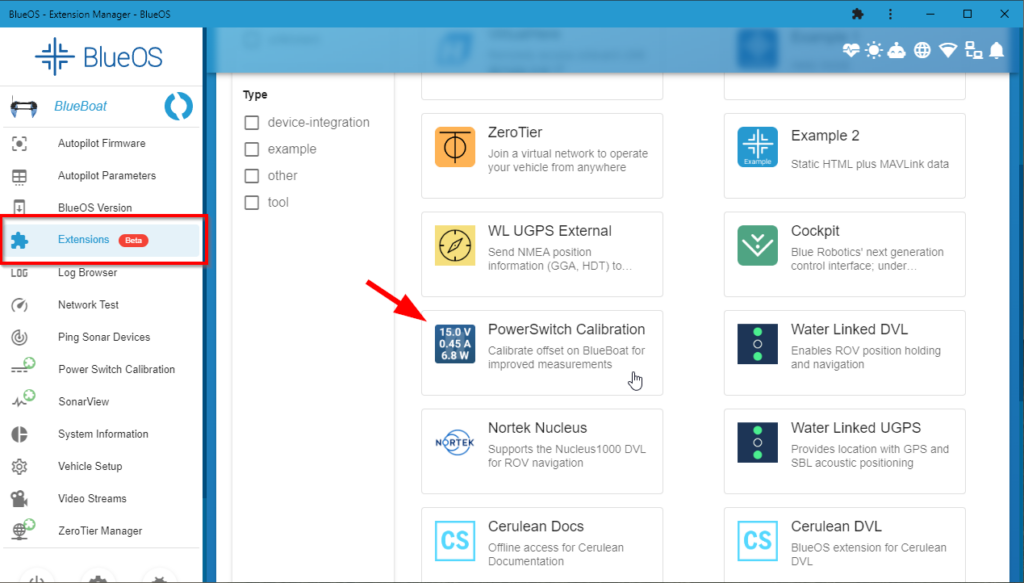
1. Access BlueOS and navigate to the Extensions menu. Install the PowerSwitch Calibration extension.
2. After the extension is installed, click on it from the left sidebar. Wait for the extension to connect then click START CALIBRATION.
3. The calibration routine will run for a few seconds. The newly calculated offset parameter will be displayed when it is done, click on SET PARAMETERS to save the parameter to your BlueBoat.