
How to Choose a WetLink Penetrator
Introduction
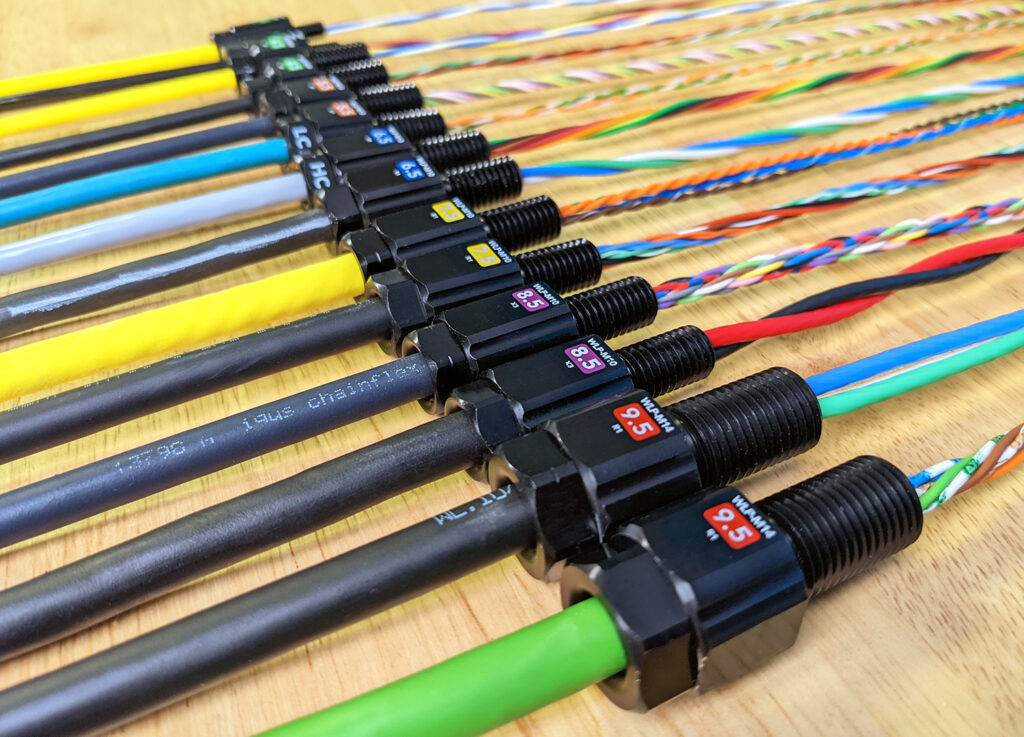
We love the WetLink Penetrator product line, and we think you will too! The WetLink Penetrator (WLP) enables us to seal the wide variety of cables that are found in our products. We’ve found it so useful that we’ve provided you with a full range of WLP sizes for your own projects, covering cable diameter sizes from 3.7 to 9.8 mm.
Throughout the development of WLP, we’ve learned a lot about what makes a reliable cable seal underwater, and we want to share with you what we’ve learned through this guide. We’ll cover how the product line works, how to choose the right WLP size for your cable, and things to check for during and after assembly to make sure your WLP will work properly.
Our testing so far has shown that on correctly assembled WetLink Penetrators, with properly sized cable, you can achieve a reliable seal that withstands hundreds of cycles to 1000 meters depth.
How WetLink Penetrator Works
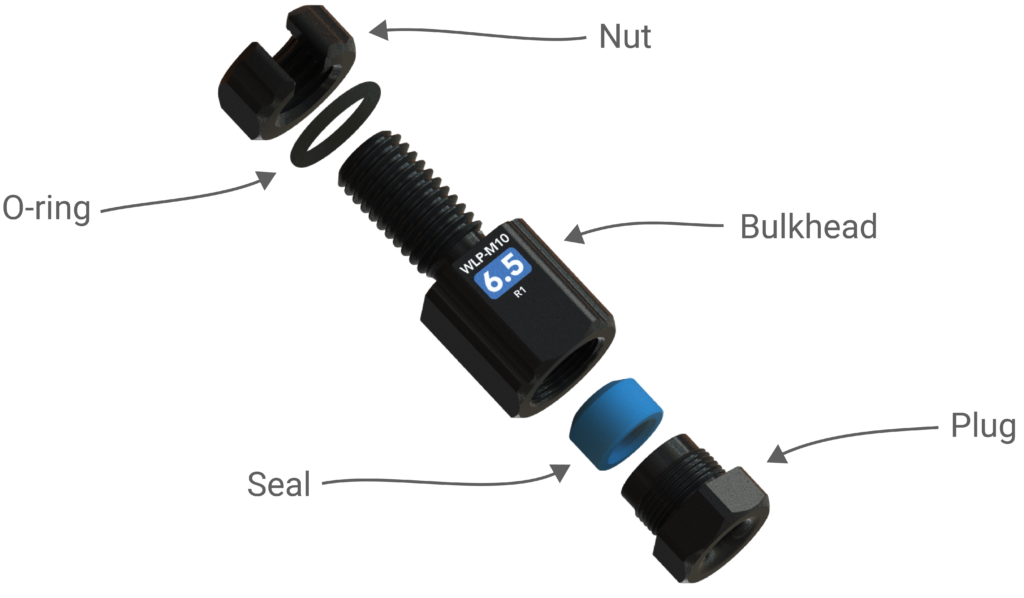
The WetLink Penetrator works by compressing a rubber seal around the cable, forming a watertight interface. It’s a simple concept, but there are a few things to know if you’re experimenting with your own cables. Let’s start by reviewing the names of different parts of a WLP assembly and cable.
Parts of the WetLink Penetrator
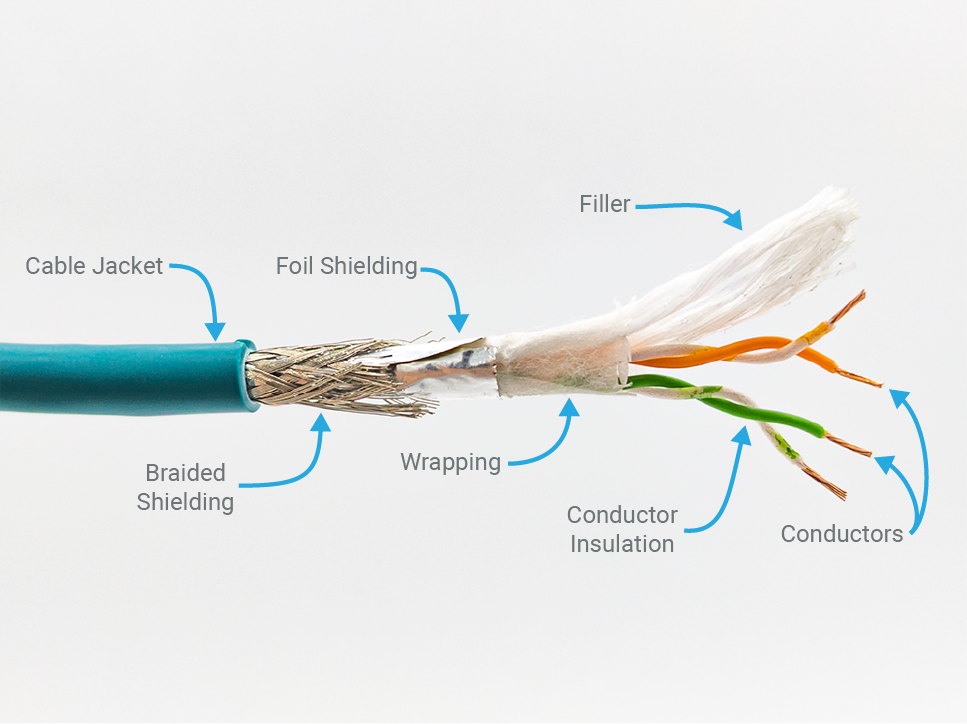
Parts of a Cable
Seal Sizes and Plug Compressions
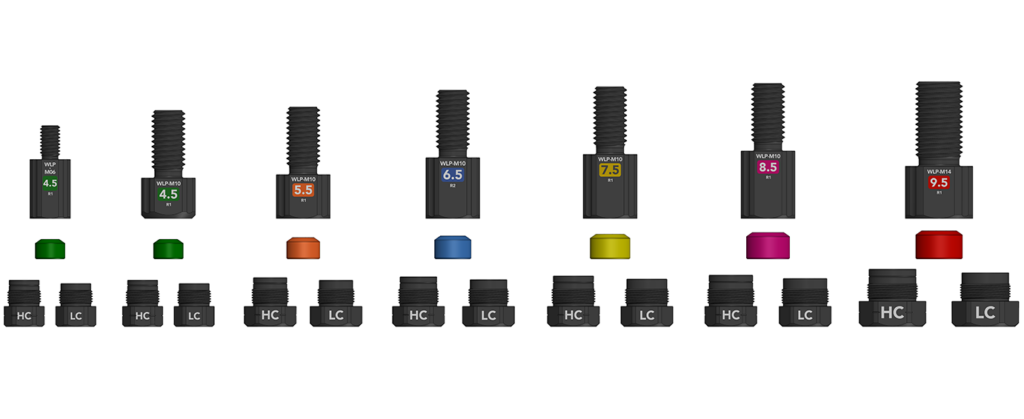
Full WLP product line with high and low compression plug options for each seal size.
There are six nominal WetLink Penetrator seal sizes: 4.5, 5.5, 6.5, 7.5, 8.5, and 9.5 millimeters.
Each seal size has two plug compression options:
- Low Compression (LC) plugs are for cable diameters ranging from the nominal seal size ±0.3 mm.
- High Compression (HC) plugs apply more pressure, making them suitable for smaller cables by shifting the compatible diameter range downward by 0.5 mm.
These two plug options allow each seal size to cover a broader range of cable diameters. The compatible range increases in 0.5 mm steps, with a ±0.3 mm tolerance on each size—so there’s always some overlap between adjacent ranges.
If you’re a visual learner, check out the graphic below to see how the size ranges overlap.

Bulkhead Sizes
There are three bulkhead sizes, each designed for different applications and cable sizes:
- M6 is the smallest and requires an M6 hole for installation. It’s typically used on the device side for compact products like the Ping Sonar and Lumen Lights.
- M10 requires an M10 hole and is the most common size used on the cable end for most Blue Robotics products. It matches the standard hole size found on many enclosure end caps and Watertight Boxes
- M14 is used for larger cables such as those on the T500 Thruster, and requires an M14 hole for installation.
Size Index
The Size Index table below lists the major specifications for each nominal seal size. We’ll explain how to use this table in the section, Choosing a WetLink Penetrator For Your Cable.
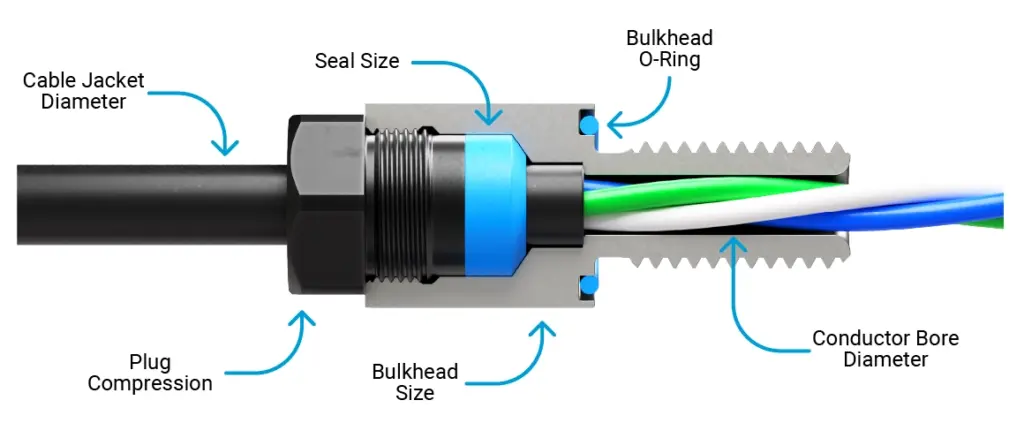
- Seal Size is the nominal WLP seal size.
- Bulkhead Sizes shows the available bulkhead sizes for the seal size.
- Conductor Bore Diameter is the diameter of the hole the cable conductors pass through.
- Plug Compression and Cable Diameter Range Shows the compatible cable diameter range for each plug compression option.
- Part Number is the part number and direct link to the WetLink Penetrator product page.
| Seal Size | Bulkhead Sizes | Conductor Bore Diameter | Plug Compression | Jacket Diameter Range | Part Number | |
|---|---|---|---|---|---|---|
| 4.5 | M06 | 3.3 mm | High (HC) | 4.0 ± 0.3 mm | BR-100870-345 |
|
| M10 | BR-100870-145 | |||||
| M06 | Low (LC) | 4.5 ± 0.3 mm | BR-100870-245 |
|||
| M10 | BR-100870-045 | |||||
| 5.5 | M10 | 4.0 mm | High (HC) | 5.0 ± 0.3 mm | BR-100870-155 | |
| Low (LC) | 5.5 ± 0.3 mm | BR-100870-055 | ||||
| 6.5 | M10 | 4.8 mm | High (HC) | 6.0 ± 0.3 mm | BR-100870-165 | |
| Low (LC) | 6.5 ± 0.3 mm | BR-100870-065 | ||||
| 7.5 | M10 | 5.7 mm | High (HC) | 7.0 ± 0.3 mm | BR-100870-175 | |
| Low (LC) | 7.5 ± 0.3 mm | BR-100870-075 | ||||
| 8.5 | M10 | 6.5 mm | High (HC) | 8.0 ± 0.3 mm | BR-100870-185 | |
| Low (LC) | 8.5 ± 0.3 mm | BR-100870-085 | ||||
| 9.5 | M14 | 7.5 mm | High (HC) | 9.0 ± 0.3 mm | BR-100870-195 | |
| Low (LC) | 9.5 ± 0.3 mm | BR-100870-095 | ||||
What makes a cable compatible with WLP?
Even though we’ve designed the WetLink Penetrator product line to be very robust, every cable is unique! There are no hard rules on what makes a cable compatible or not, but we’ve provided some guidelines below.
The amount of compression of the seal around the cable jacket is the most important factor when determining if a WetLink Penetrator will seal reliably on a cable. Your goal when selecting a WetLink Penetrator is to get just the right amount of compression of the seal around the cable jacket—not too much and not too little. Too little compression will result in a leak through the seal or the cable pulling out easily when strained. Too much compression may cause the cable or conductors to break. We will show you how to check if you have the right amount of compression later in the ‘Choosing a WetLink Penetrator For Your Cable’ section of this guide.
Along with the amount of compression, the following factors also affect compatibility:
- Jacket material: soft jackets typically require more compression than harder jackets. If the jacket is very soft, like a foam jacket, higher compressions are typically needed than are specified in the table.
- Cable construction: some cables have tighter constructions, which typically require less compression, and some have a looser construction with lots of free space, which typically need more compression.
- Jacket surface finish: slippery jackets will pull out easily when strained because the seal can’t grip them as well.
- Operating temperature: higher temperatures (usually >60°C-70°C) translates to more compression set (loss of compression over time) in both the seal and the cable jacket.
- High temperatures in combination with high compression can lead to the cable reducing in diameter to the point where either the cable breaks, or there is total loss of seal pressure and the interface leaks.
- High temperatures in combination with too low of a compression can lead to total loss of seal pressure and the interface leaks, or is unable to withstand any strain.
With this understanding of how the WetLink Penetrator works, you’re ready to experiment with your own cables!
Choosing a WetLink Penetrator For Your Cable
This section will guide you through the process of choosing a compatible WetLink Penetrator for you cable. Please note, all of the tables mentioned are also found in our WetLink Penetrator datasheet as well as the Technical Details section of the WetLink Penetrator product page.
Firstly, all cables and tether manufactured by Blue Robotics have a compatible WetLink penetrator. If you are using Blue Robotics cable or tether, or are installing a WetLink Penetrator on a Blue Robotics product, you can find the compatible WetLink Penetrator in the Tested Cables table or the technical details section of the cable, tether, or product you are using. You can then skip the rest of this guide and proceed to the WetLink Penetrator Assembly Guide.
Second, If you have a requirement for a type of cable that is not manufactured by Blue Robotics, check the Tested Cables table below to see if there is already a tested cable for your needs. Blue Robotics has tested a number of cables from other manufacturers and found the correct size WetLink Penetrator to use for each. If one of these cables suits your needs, the compatible WetLink Penetrator part number and link is provided in the “Compatible WLP Part Number” column. You can then skip the rest of this guide and proceed to the WetLink Penetrator Assembly Guide.
| Compatible WetLink Penetrator | Cable Part Name / Number | Manufacturer | Application | Jacket Diameter | Jacket Material | Conductors | Tested Current¹ | Nominal Voltage | Max Temp Recommended² |
|---|---|---|---|---|---|---|---|---|---|
| M06-4.5mm-HC M10-4.5mm-HC | Fathom Slim Tether | Blue Robotics | Tether | 4.0 mm | PUR Foam | 1x UTP 26AWG | - | - | 50°C |
| M06-4.5mm-LC M10-4.5mm-LC | Lumen/Gripper Cable | Blue Robotics | Power / PWM | 4.5 mm | PUR | 3x 22AWG | - | - | 60°C |
| Ping Cable | Blue Robotics | Power / Serial | 4.5 mm | PUR | 4x 24AWG | - | - | 60°C | |
| M10-5.5mm-LC | chainflex® control cable CF9 (CF9-02-06) | IGUS | Power / Signal | 5.4 mm | TPE | 6x 24AWG | - | 300 V | 60°C |
| Ping360 Cable | Blue Robotics | Power / Ethernet | 5.5 mm | PUR | 3x UTP 26AWG | - | - | 50°C | |
| M10-6.5mm-LC | T200 Thruster Cable | Blue Robotics | Power | 6.4 mm | PUR | 3x 16AWG | 48 A | - | 60°C |
| Etherline® (2170300) | LAPP | Cat5e | 6.3 mm | PUR | 4x S/FTP 26AWG | - | 1000 V | 60°C | |
| M10-7.5mm-HC | Fathom ROV Tether | Blue Robotics | Cat5 / Tether | 7.8 mm | PUR Foam | 4x UTP 26AWG | - | - | 50°C |
| M10-7.5mm-LC | Ethernet and Power Cable | Blue Robotics | Cat5 + Power | 7.5 mm | PUR | 4x UTP 26AWG + 2x 22AWG | - | - | 60°C |
| M10-8.5mm-HC | chainflex® control cable CF9 (CF9-02-12) | IGUS | Power / Signal | 7.7 mm | TPE | 12x 24AWG | - | 300 V | 60°C |
| M10-8.5mm-LC | High Power Cable | Blue Robotics | Power | 8.3 mm | PUR | 2x 12AWG | 60 A | - | 60°C |
| M14-9.5mm-HC | T500 Thruster Cable | Blue Robotics | Power | 9.0 mm | PUR | 3x 12AWG | 100 A | - | 60°C |
| ¹ Current ratings evaluated at ambient temperatures in water. ² Sustained high temperatures can lead to performance loss over long periods of time. |
|||||||||
For all other untested cables, follow the steps below
1. Start by measuring the jacket diameter of your cable.
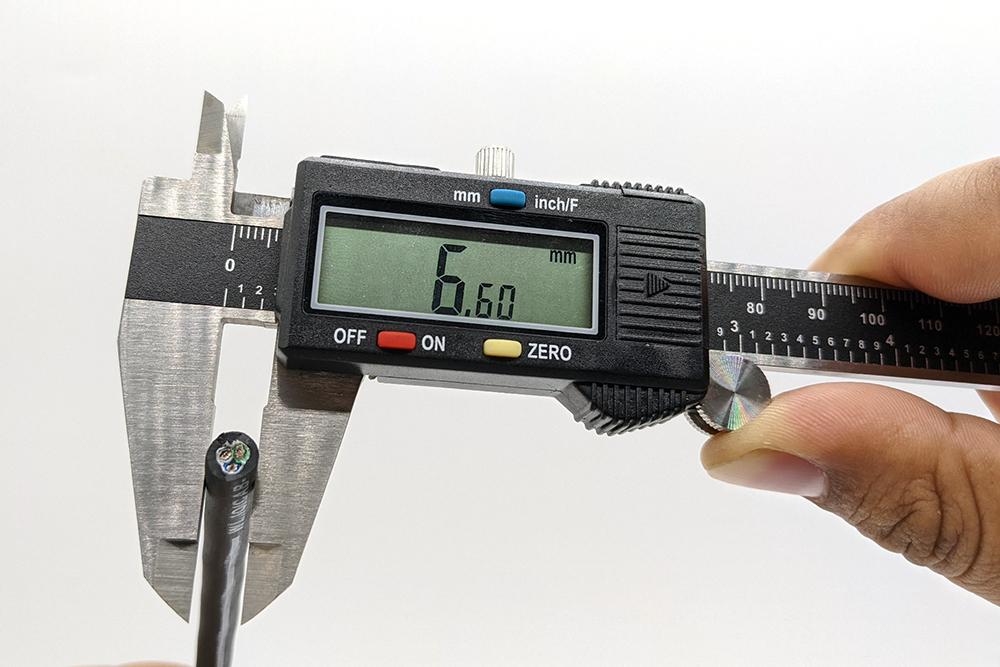
2. Take the cable jacket diameter and refer to the Size Index tables below. Find where your cable jacket diameter falls in the “Cable Diameter Range” column. The compatible seal size and plug compression will be listed in their respective columns in the same row. This will give you a good starting point, but be aware that the final fit and sealing performance depends on the specific cable, so we recommend getting one size above and one size below to test with just in case.
If your cable jacket diameter falls in the overlap between WLPs:
- If your cable is between high compression and low compression of the same seal size, it may not matter which you choose. Try testing with both and choose the size with the best looking compression as outlined in step 5.
- If your cable is between seal sizes, consider the size of the conductors. Larger seal sizes have a larger conductor bore in the bulkhead, which provides more space to pass the conductors.
- Consider jacket material and cable construction. Soft jacket material or loose cable construction may need more compression or a smaller seal. Harder jackets or tighter construction may need less compression.
Size Index
| Seal Size | Bulkhead Sizes | Conductor Bore Diameter | Plug Compression | Jacket Diameter Range | Part Number | |
|---|---|---|---|---|---|---|
| 4.5 | M06 | 3.3 mm | High (HC) | 4.0 ± 0.3 mm | BR-100870-345 |
|
| M10 | BR-100870-145 | |||||
| M06 | Low (LC) | 4.5 ± 0.3 mm | BR-100870-245 |
|||
| M10 | BR-100870-045 | |||||
| 5.5 | M10 | 4.0 mm | High (HC) | 5.0 ± 0.3 mm | BR-100870-155 | |
| Low (LC) | 5.5 ± 0.3 mm | BR-100870-055 | ||||
| 6.5 | M10 | 4.8 mm | High (HC) | 6.0 ± 0.3 mm | BR-100870-165 | |
| Low (LC) | 6.5 ± 0.3 mm | BR-100870-065 | ||||
| 7.5 | M10 | 5.7 mm | High (HC) | 7.0 ± 0.3 mm | BR-100870-175 | |
| Low (LC) | 7.5 ± 0.3 mm | BR-100870-075 | ||||
| 8.5 | M10 | 6.5 mm | High (HC) | 8.0 ± 0.3 mm | BR-100870-185 | |
| Low (LC) | 8.5 ± 0.3 mm | BR-100870-085 | ||||
| 9.5 | M14 | 7.5 mm | High (HC) | 9.0 ± 0.3 mm | BR-100870-195 | |
| Low (LC) | 9.5 ± 0.3 mm | BR-100870-095 | ||||
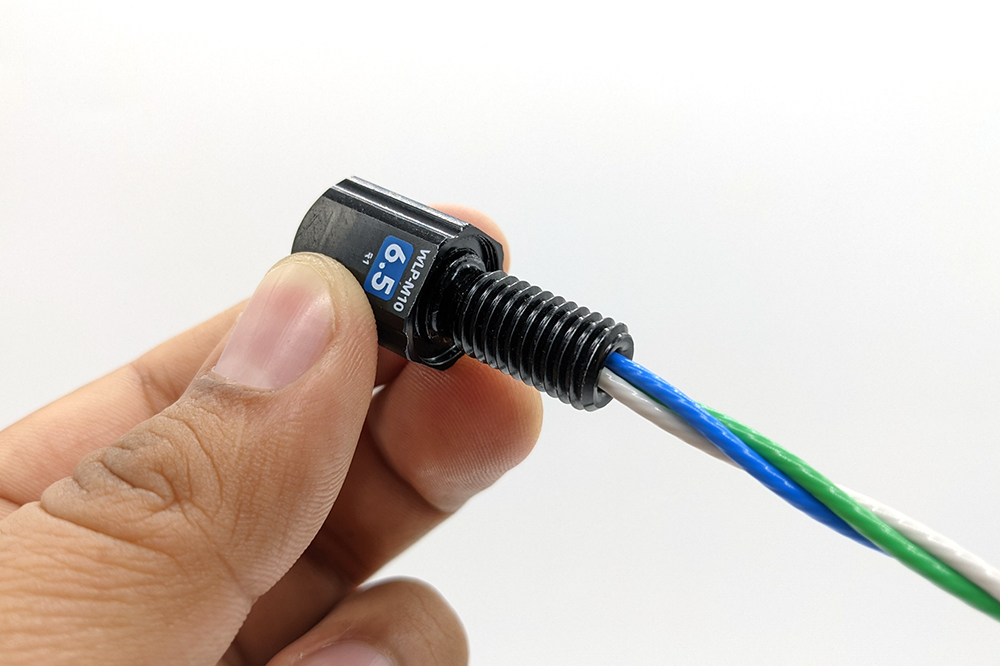
3. Assemble the penetrator onto the cable in accordance with our WetLink Penetrator Assembly Guide, but first:
- Check that the conductors will fit through the conductor bore by trying to insert them into the back of the bulkhead.
- If conductors do not fit, try moving up to the HC plug of the next seal size. Bigger bulkheads have bigger conductor bores for the conductors.
- Check that the plug and seal fits the cable, the plug should not be difficult to fit onto the cable, if it is, try moving up to the HC plug of the next seal size.
4. After assembly, lightly pull on the cable and WLP with about 5–10 lbs of force for about 5 seconds (this feels about the same as picking up an adult cat). The cable should remain firmly seated in the WLP. If the cable comes out:
- You may not have enough compression. If using an LC plug, switch to the HC plug of the same nominal seal size.
- The cable jacket may be too slippery. Try wiping the cable with acetone or alcohol and try again with a new section of cable.
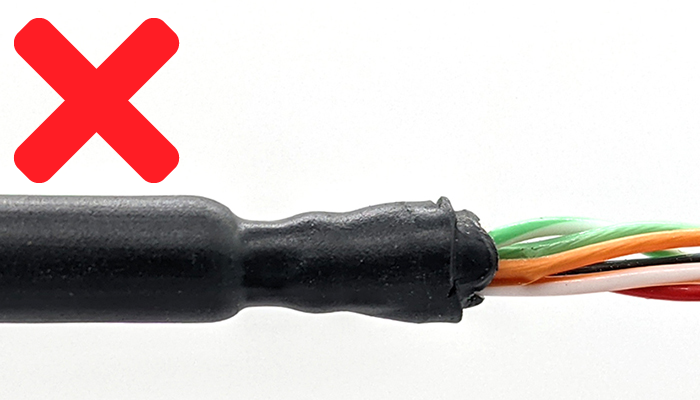
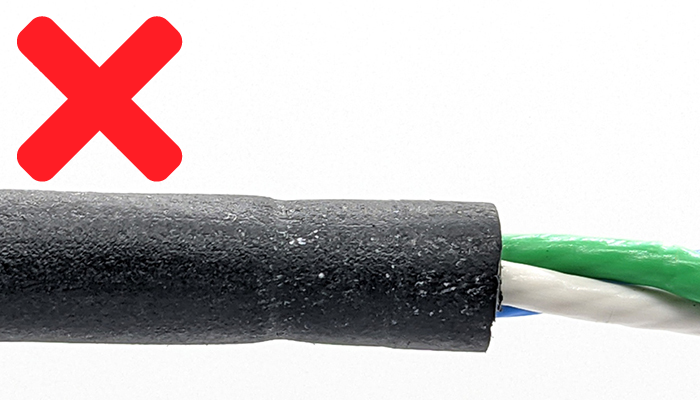
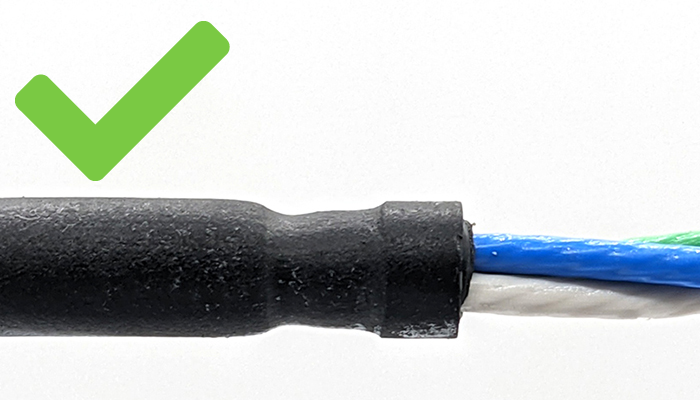
5. Let the assembled WLP and cable sit for at minimum 6 hours or overnight then disassemble the WLP and check the level of compression around the cable jacket. This is the most important factor when determining if the WLP will seal reliably. Compare the level of compression on your cable to the pictures below.
- Too much compression. The seal has compressed too tightly around the jacket and there is risk of damage to the cable or conductors. Try again with a lower compression plug and a new section of cable.
- Too little compression. The seal has not compressed around the cable jacket enough and will likely leak or pull out easily when strained. Try again with a higher compression plug and a new section of cable.
- Ideal compression. The cable jacket is showing a good amount of compression to seal reliably while not damaging the cable or conductors.
6. If the compression looks good then this WetLink Penetrator size is compatible with your cable. Make sure to always vacuum test the seal before using it in your application. Then happy diving!
Feedback
We’re always working to make our documentation, instructions, software, and user experience even better. If you have any ideas on how we can improve this guide, feel free to let us know here.