
4K Cam BlueROV2 Installation
4K Cam is a 4K camera upgrade for the BlueROV2. It replaces the USB camera that ships with the vehicle. It offers 4K resolution, improved low-light performance, one-push underwater white balance, and manual zoom and focus.
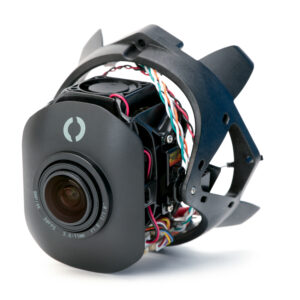
This guide will show you how to install it in your BlueROV2.
Parts and tools for installation
In addition to the 4K Cam kit and your BlueROV2, you’ll need the following parts and tools:
- 1 x 2.5 mm hex tool
- 1 x #2 Phillips head screwdriver
Remove the USB camera
4K Cam replaces the whole USB camera assembly, so you’ll remove that first. Make sure the battery is disconnected from the ROV before working on it.
1. Open up the electronics enclosure. If you don’t know how to do that, refer to these instructions in the BlueROV2 Operator’s guide.
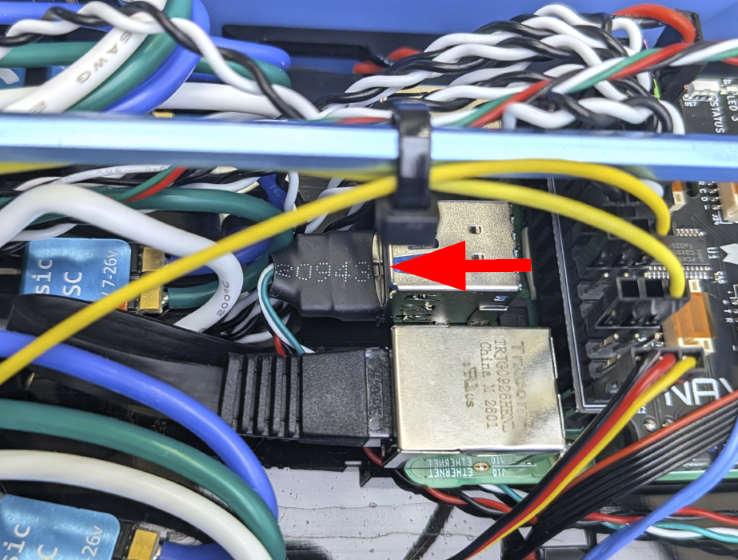
2. Locate the Raspberry Pi on the right (starboard) side of the electronics tray. Disconnect the camera’s cable from the Raspberry Pi’s USB port.
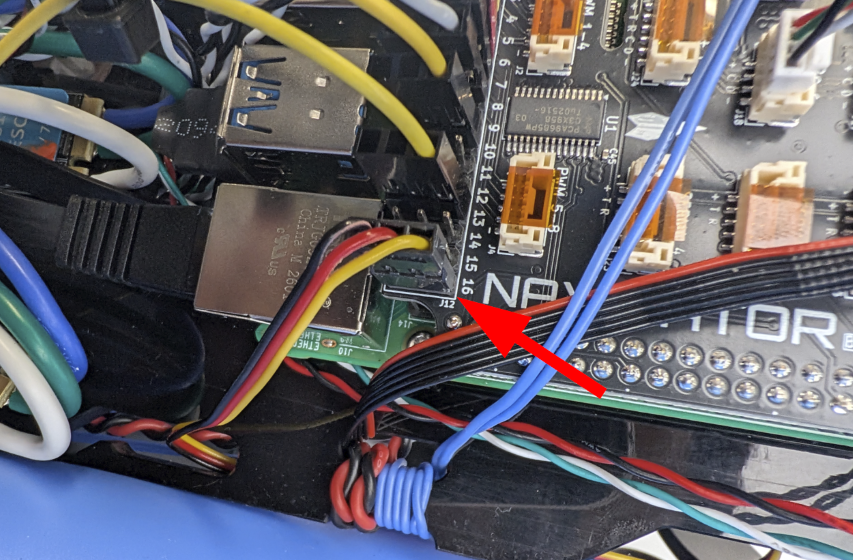
3. Just above the USB ports, disconnect the camera’s tilt servo cable (black, yellow, and red cable) from the Navigator. This is normally connected to output channel 16.
4. Carefully remove the leak sensor probe and adhesive from the circular tray. If it comes off cleanly, you can reattach it to the bottom of the electronics tray.
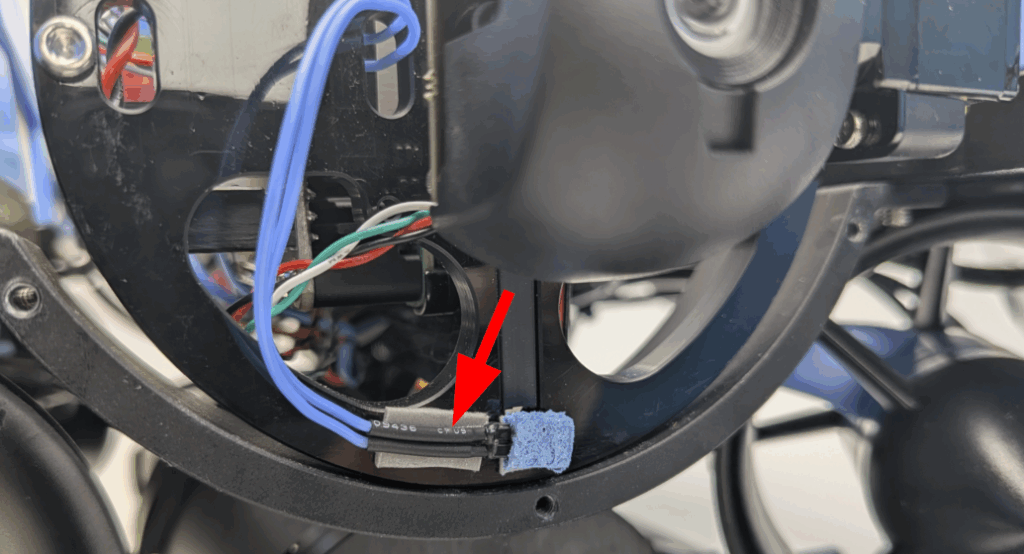
You can also instead disconnect the probe from the Navigator leak sensor port and swap in a new one. Spare probes are available here.
5. Use the 2.5 mm hex tool to remove the screws holding the circular tray the USB camera is mounted to.
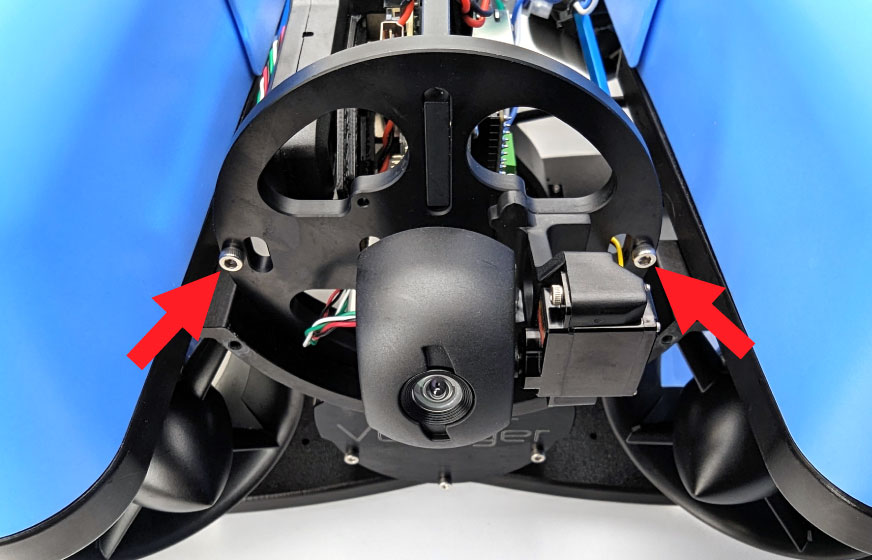
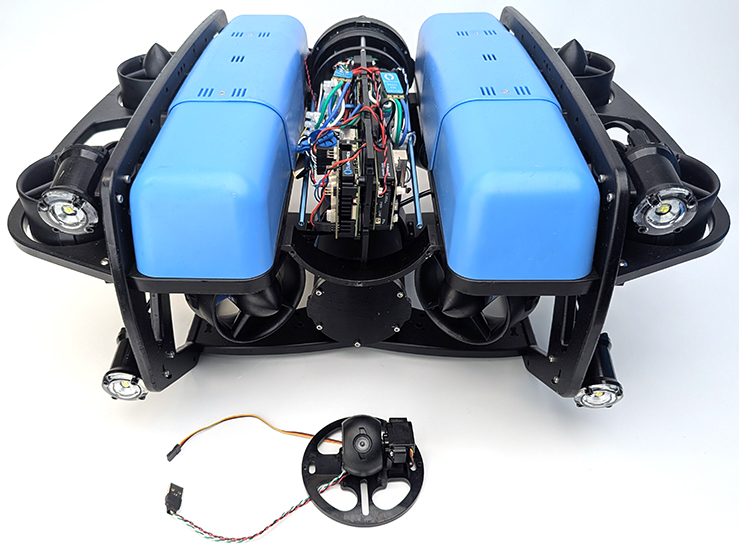
6. You can now remove the whole camera and tray assembly from the ROV.
Install 4K Cam
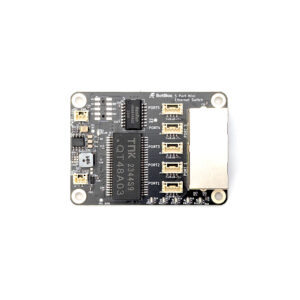
4K Cam requires the Ethernet Switch to connect to the BlueROV2. Go ahead and install it now if it isn’t already, and come back to this guide when you’re done. Ethernet Switch installation instructions are available here.
Install standoffs
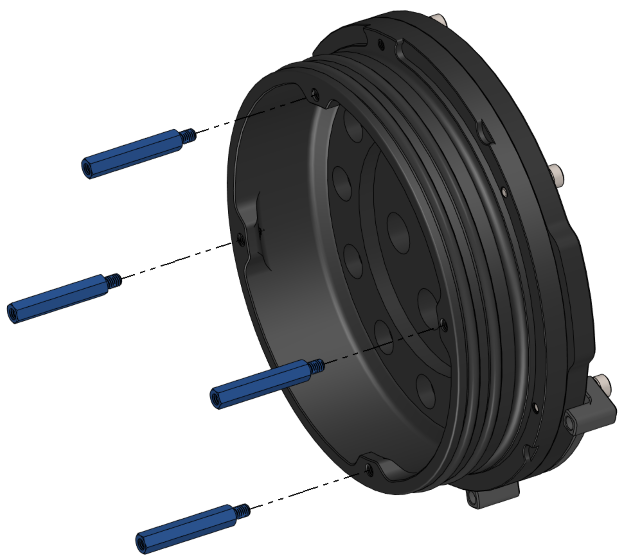
The 4K Cam kit includes four 25 mm standoffs that replace the 31 mm standoffs already installed in the ROV. All of the following steps can be done with the wire connections in place. You shouldn’t need to disconnect anything that isn’t mentioned in this guide.
1. Unscrew and remove the two long standoffs from the shorter standoffs and circular tray. Set these aside—you’ll use them again later.
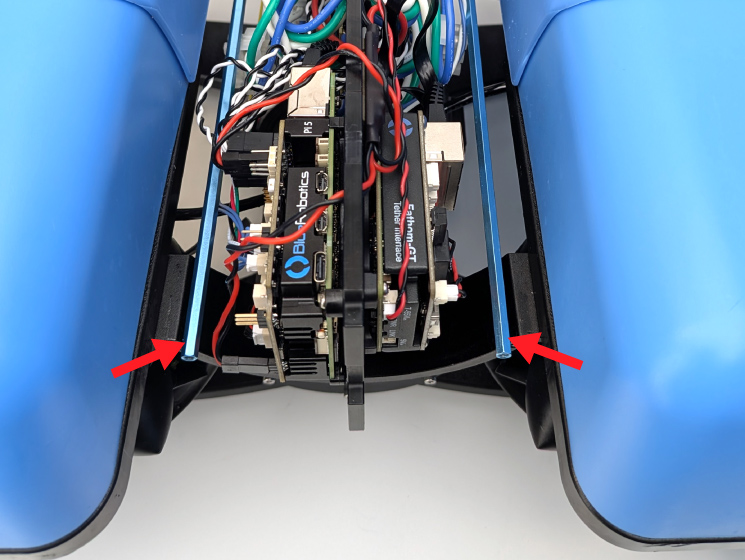
2. Use the 2.5 mm hex tool to remove the two M3 screws located at the top and bottom of the circular tray. Keep the screws.
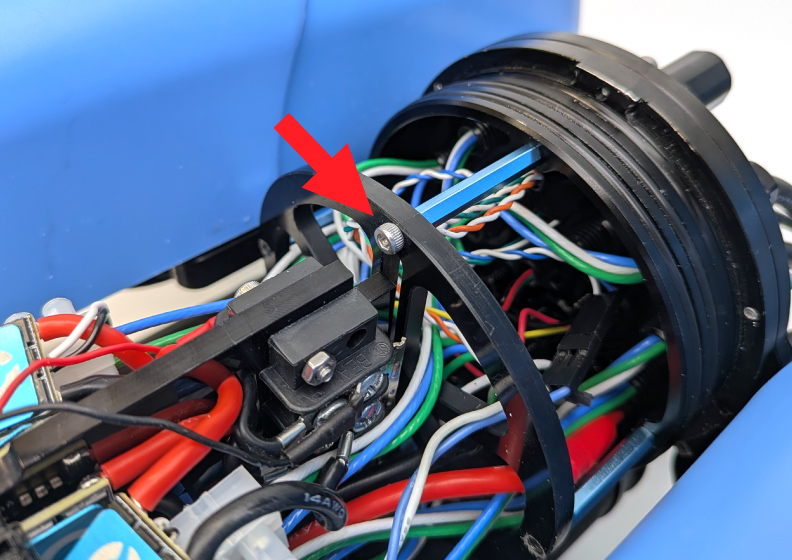
3. Unscrew and remove all four standoffs from the rear flange. You won’t reuse these.
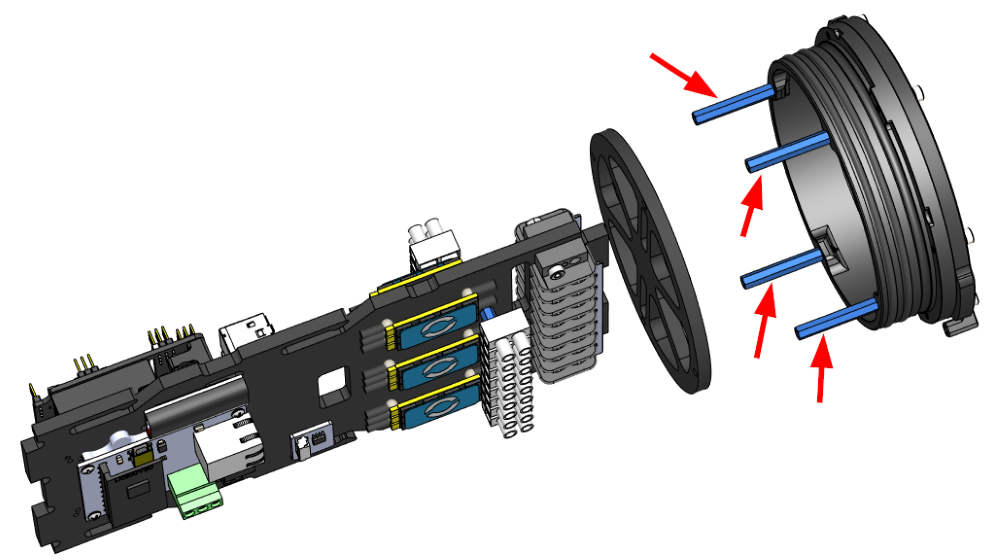
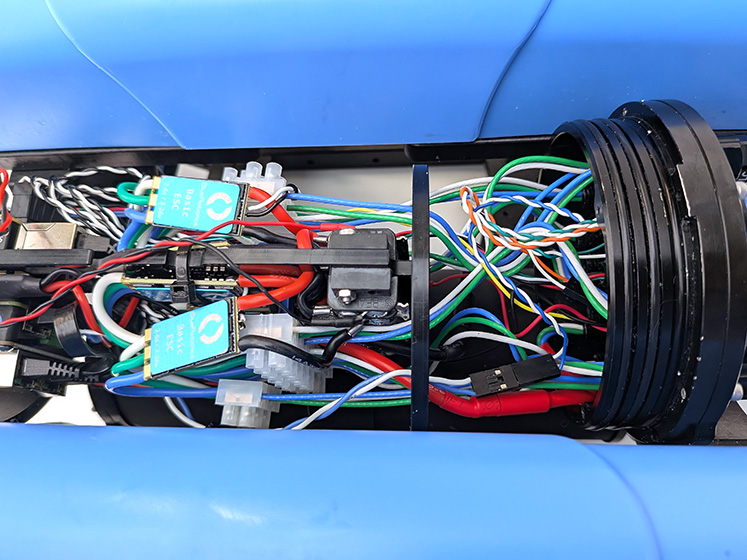
At this point your ROV will look something like this, with the electronics trays loosely held together by all the wires.
4. Install the four new 25 mm standoffs that came with the 4K Cam kit.
5. Start putting the electronics tray parts back together:
- Reattach the circular tray to the standoffs using the two M3 screws you removed earlier.
- Reattach the two long standoffs you removed earlier.
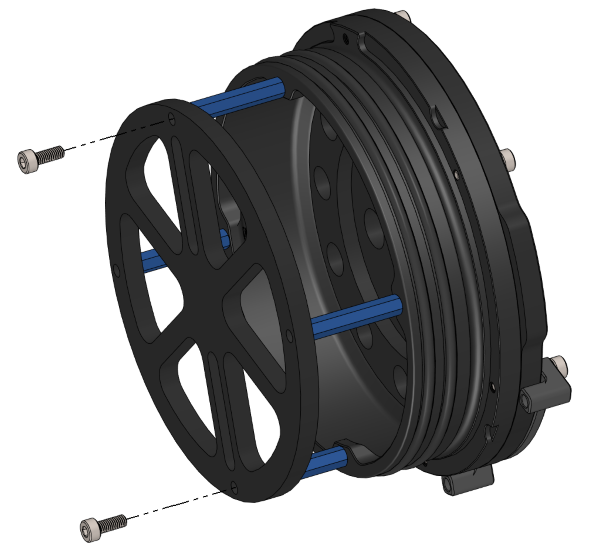
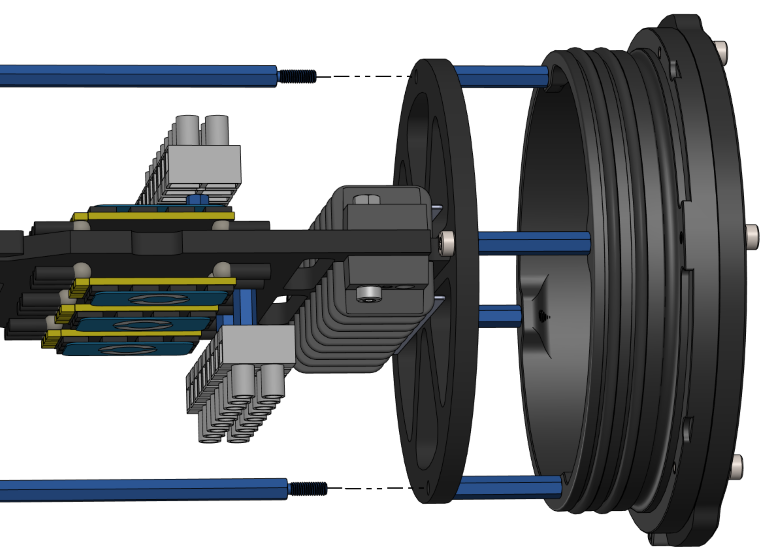
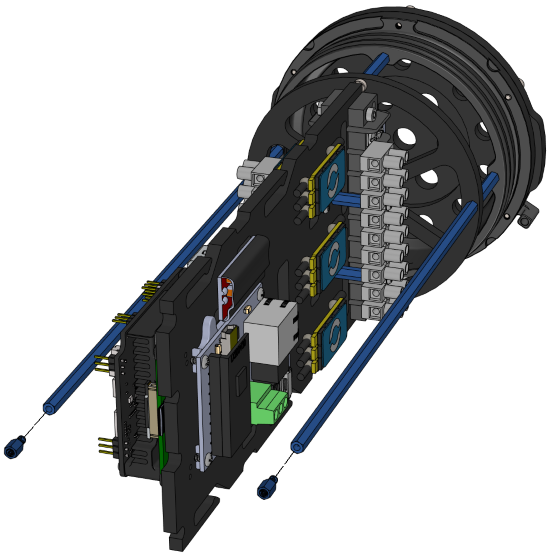
6. Attach one of the very short 6 mm standoffs included with the 4K Cam kit to the end of each long standoff.
Mount 4K Cam
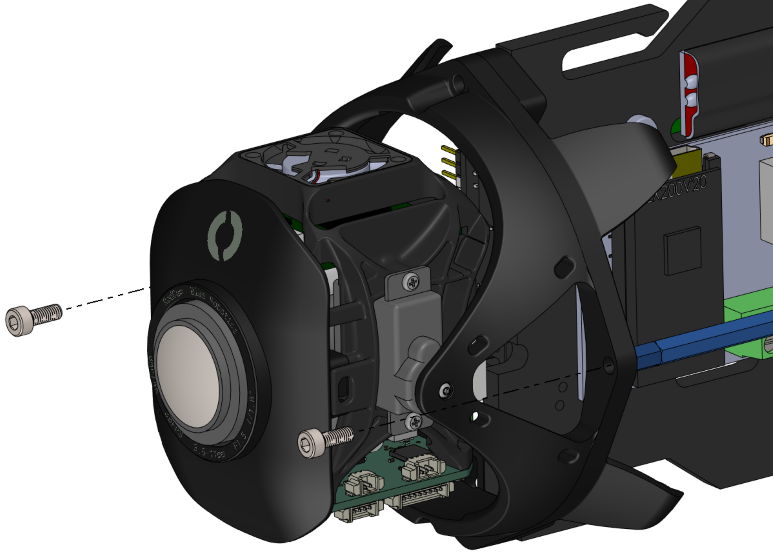
Place the 4K Cam at the front of the electronics tray, oriented so the fan and Blue Robotics logo are upright. Use the 2.5 mm hex tool and included M3x8 socket head screws to secure the 4K Cam to the long standoffs.
Connect 4K Cam wires
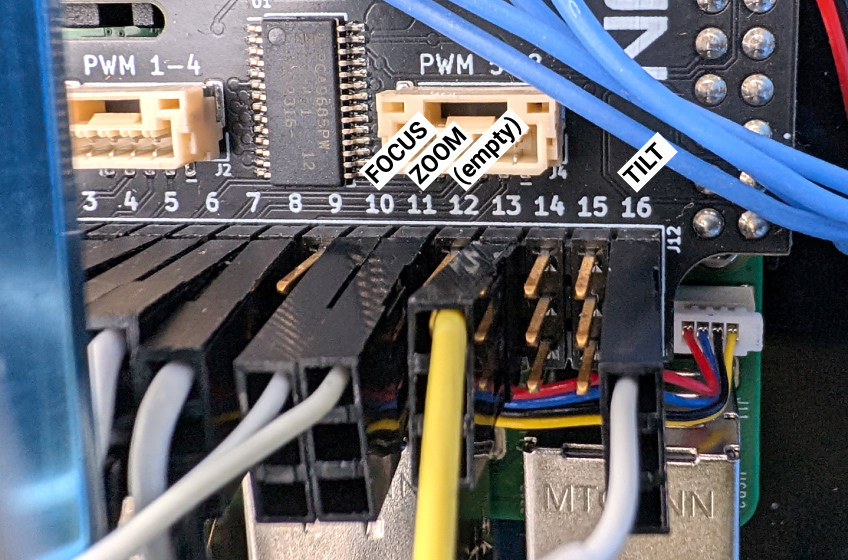
4K Cam requires four PWM output channels: three for the FOCUS, ZOOM, and TILT signal wires, plus one additional channel reserved for the zoom-focus correlation script and left empty (no wire connected).
By default, connecting the wires as described below lets the software auto-configure the channels for you. If you need to arrange the wires differently, you can connect the wires to other available channels and configure them manually instead (take note of which channels everything is connected to).
1. Connect the labeled FOCUS, ZOOM, and TILT signal wires to the Navigator’s PWM outputs as shown. Make sure the signal wire sits in the top position of its channel, inline with the white signal wires from your other connected outputs:
- Connect FOCUS to output channel 10.
- Connect ZOOM to output channel 11.
- Leave output channel 12 empty (reserved by the zoom-focus correlation script).
- Connect TILT to output channel 16.
2. Use a #2 Phillips screwdriver to connect the red and black power wires to the BlueROV2 power terminal blocks:
- Connect the black wire to any available position on the terminal block with the other black wires (right, starboard side).
- Connect the red wire to any available position on the terminal block with the other red wires (left, port side).
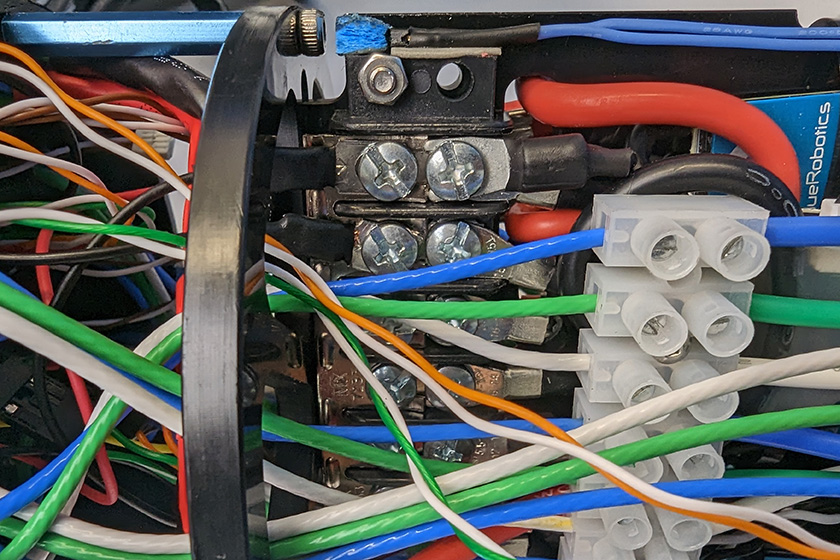
All the black power wires.
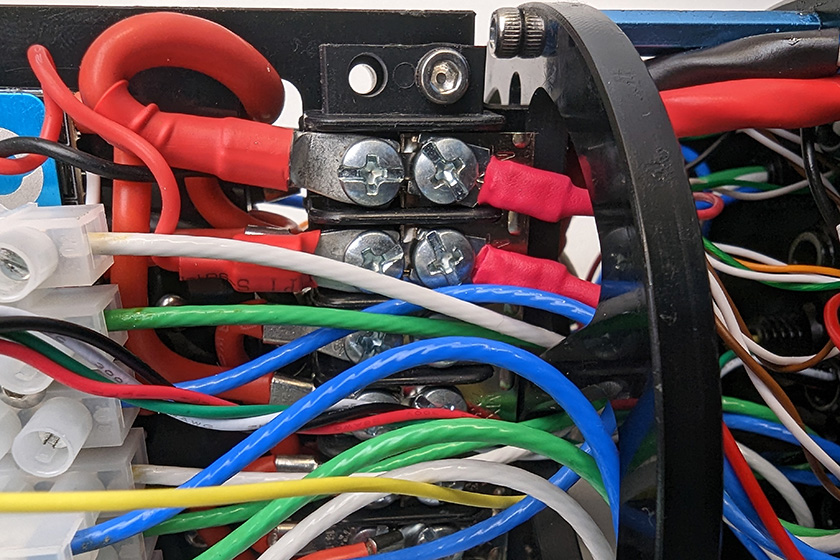
All the red power wires.
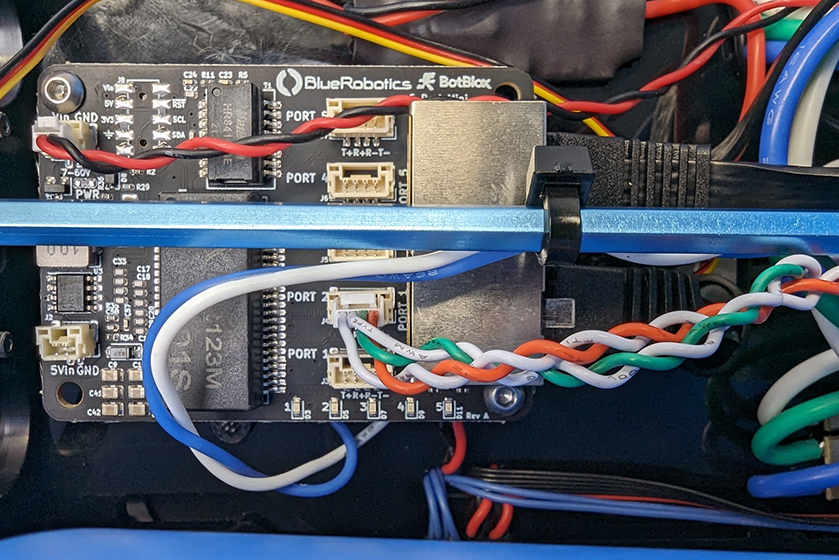
3. Connect the 4-wire Ethernet cable to an open port on the Ethernet Switch. Do not use ports 1 or 5 as these are already in use.
Reassemble ROV
After installing the 4K Cam and connecting its wires, reassemble the ROV.
1. Reinstall the electronics enclosure tube. If your ROV has a locking-style enclosure, make sure the rotation locking tab is aligned inside the slot in the tube.
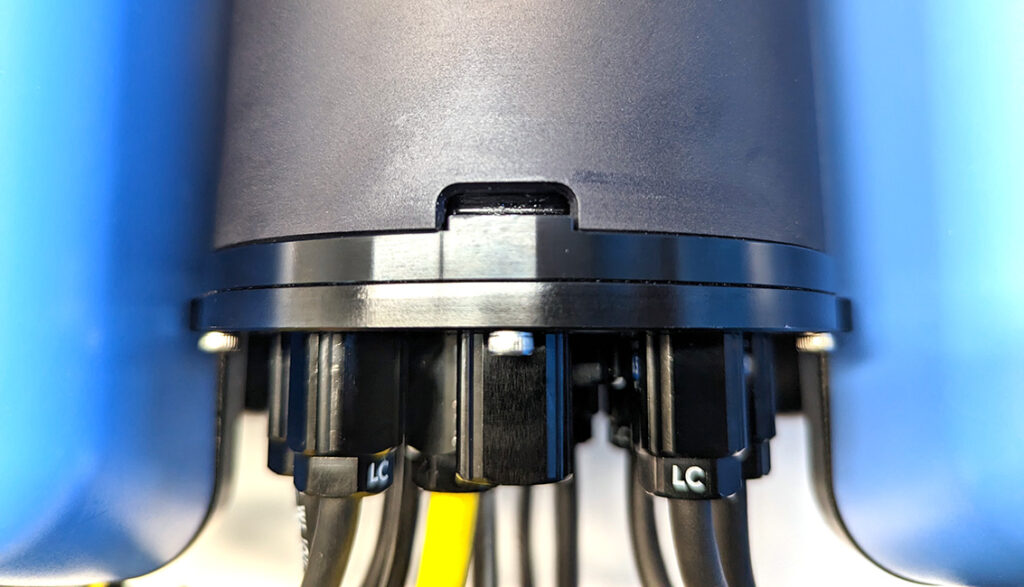
2. If your ROV has a locking cord, insert it through the slot.
3. Reinstall the Pressure Relief Valve (PRV) or vent plug in the bulkhead. Turn the plug clockwise until it stops to seal it.
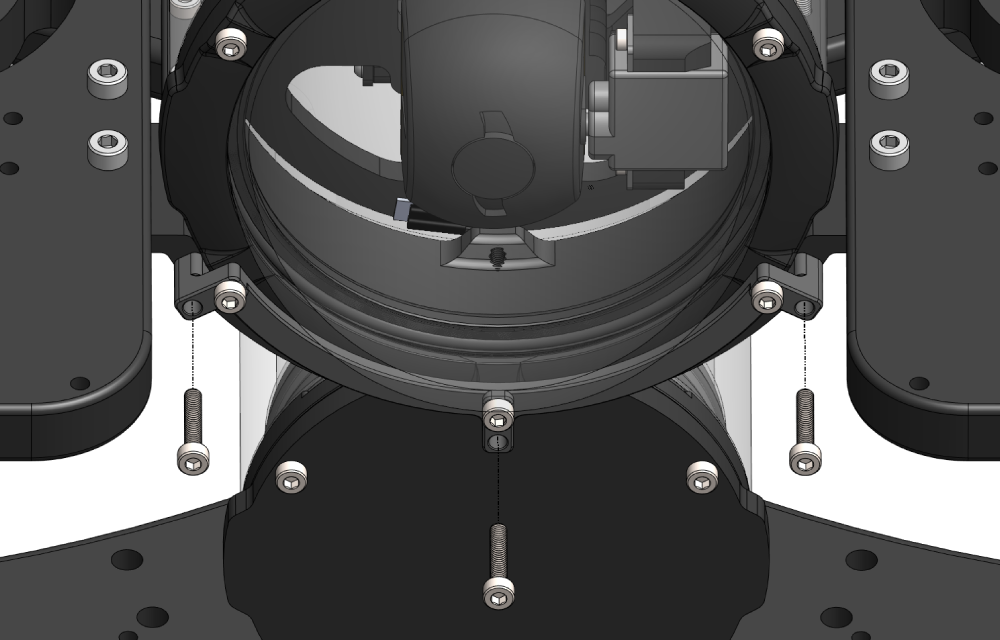
4. Place the electronics enclosure on the enclosure cradles and line up the mounting clips with the screw holes on the cradles. Use the 2.5 mm hex tool to install the screws through the mounting clips and into the front and rear enclosure cradles.
Software setup
4K Cam software setup involves updating the BlueROV2 software to the supported versions, installing the 4K Cam Manager BlueOS extension, and configuring Cockpit. Make sure a strong, reliable Wi-Fi network is available.
The required software versions for 4K Cam support are shown below for reference:
- BlueOS 1.4.5 or later
- ArduSub 4.5.7 or later
- Cockpit 1.18.3 or later
4K Cam works with QGroundControl for basic video display, but the advanced camera functions like zoom/focus correlation and one-push white balance require controller button functions that are only supported in Cockpit. Cockpit is now our recommended ground control station software. If you haven’t already installed it, see the BlueROV2 Software Setup guide for installation instructions before continuing. The rest of this guide assumes you’re using Cockpit.
Connect the ROV
1. Power up your BlueROV2 and connect it to your computer. If you don’t know how to do that, please check out the BlueROV2 Software Setup guide first.
2. Access BlueOS (the BlueROV2’s operating system) by entering 192.168.2.2 or blueos.local into a web browser address bar.
3. Connect the BlueROV2 to a Wi-Fi network by selecting an available network from the Wi-Fi menu and entering the password.
Update BlueOS
If you’re on a BlueOS version older than 1.4.5, you must update for 4K Cam support. If you’re already on a newer version, it’s still a good idea to check for updates. Your ROV must be connected to Wi-Fi to check for updates.
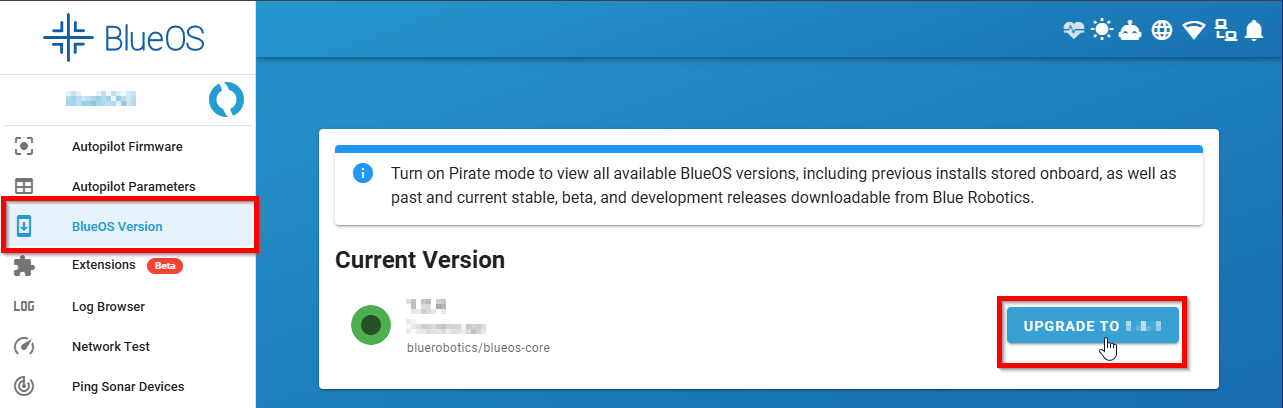
1. In BlueOS, choose BlueOS Version from the left sidebar.
2. The page will display an UPGRADE TO button if an update for BlueOS is available. Go ahead and update if one is available. The process may take a few minutes depending on your internet connection speed. Wait for the update to complete.
Update ArduSub
If you’re on an ArduSub version older than 4.5.7, you must update for 4K Cam support. Your ROV must be connected to Wi-Fi to check for updates.
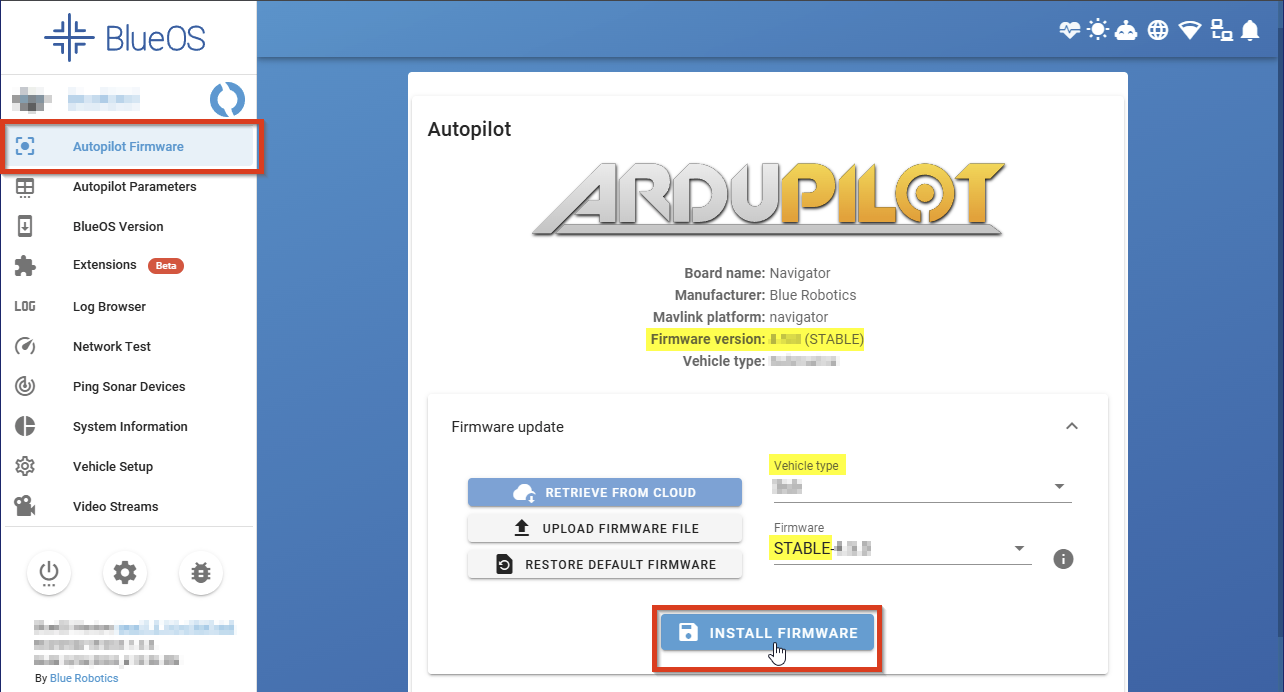
1. In BlueOS, select Autopilot Firmware from the left sidebar. The currently installed firmware version is displayed in the autopilot summary information at the top.
2. Expand the Firmware update section. Select Sub from the Vehicle type dropdown menu. From the Firmware dropdown menu, select the latest STABLE version available (a higher number means a newer version). If the latest stable matches what is currently installed, you don’t have to do anything. Otherwise, if a newer version is available, click INSTALL FIRMWARE and wait for the process to finish.
Install 4K Cam Manager extension
1. In BlueOS, select Extensions from the left sidebar and install the 4K Cam Manager extension.
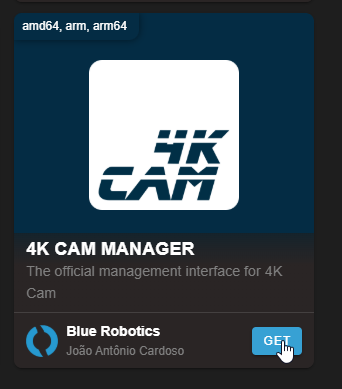
2. Open 4K Cam Manager from the left sidebar.
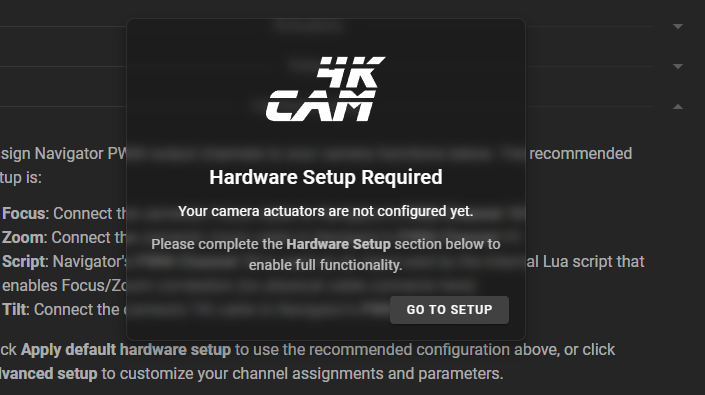
3. If this is the first time setting up the camera, 4K Cam Manager will prompt you that hardware setup is required. Select GO TO SETUP.
4. If you wired 4K Cam to the default PWM output channels, select APPLY DEFAULT HARDWARE SETUP—the extension will auto-configure using the defaults shown (these match the defaults in this guide). If you wired it differently, select ADVANCED SETUP to manually select each output channel.
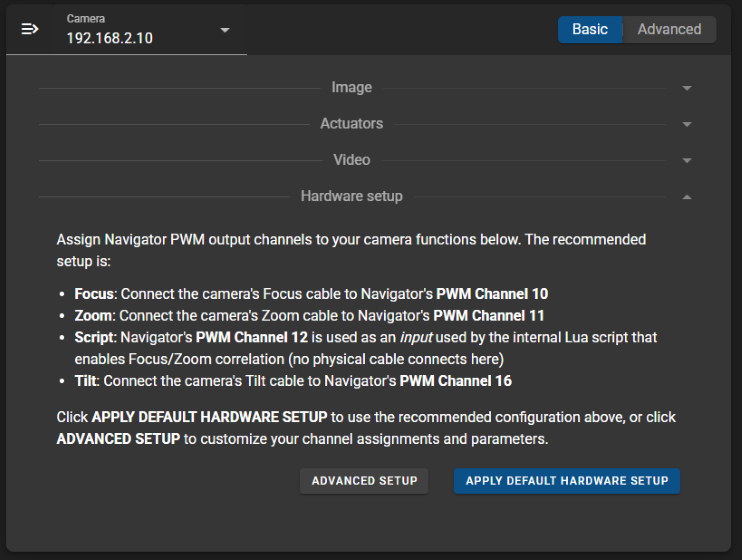
Camera settings are covered later in the 4K Cam Manager and Settings section.
Cockpit setup
After setting up the 4K Cam extension in BlueOS, Cockpit will try to auto-configure 4K Cam settings the first time you launch it. This includes switching the camera stream, importing the one-push white balance action, and setting up controller button mapping.
Configure camera stream
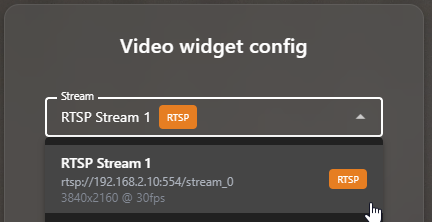
The first time you open Cockpit after switching out the USB camera, Cockpit will ask to switch your video widgets to use the new stream from 4K Cam.
There are two stream options, RTSP and WebRTC:
- The RTSP stream is preferred but only supported by the standalone version of Cockpit. If you exclusively use the standalone version (and not the Cockpit Lite extension), choose RTSP.
- Cockpit Lite extension only supports WebRTC. If you frequently use Cockpit Lite, choose WebRTC.
Make your selection and select REPLACE STREAM to have Cockpit make the switch.
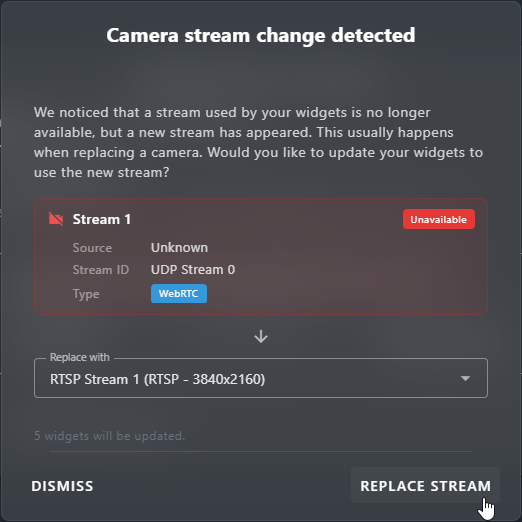
You can configure the stream manually at any time from the video widget settings.
Controller button configuration (joystick mapping)
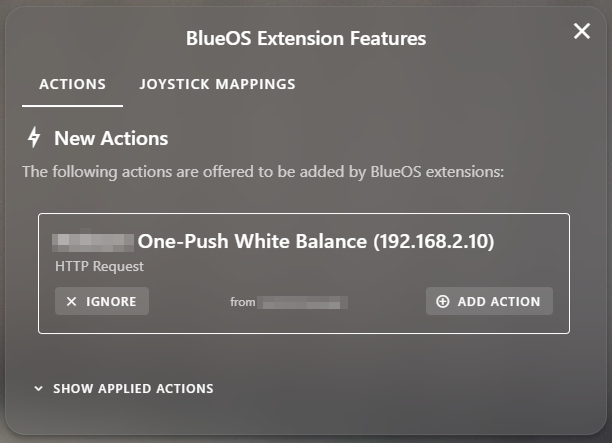
4K Cam uses new controller button functions for zoom, focus, and one-push white balance. Cockpit will try to set these automatically the first time you launch it after installing the 4K Cam extension.
1. Add the One-Push White Balance action to enable one-push white balance triggering from a button.
2. Recommended controller button (joystick) mappings are provided—one set for ROVs with Newton Grippers, and one without. You can apply any, all, or none of the recommended mappings.
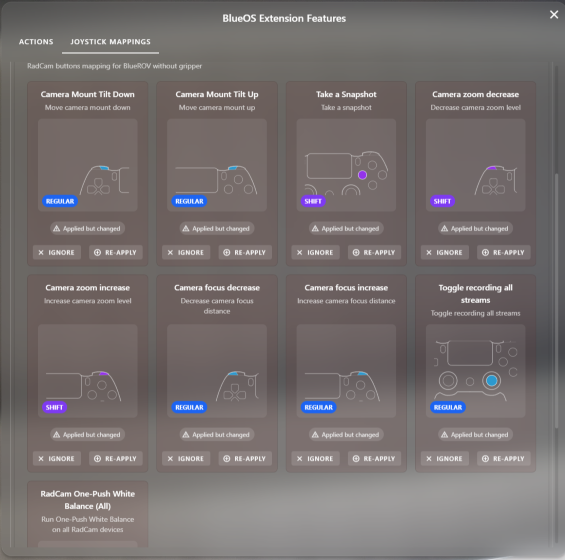
You can always configure the controller mapping yourself later using the Joystick configuration menu in Cockpit.
Add 4K Cam widget
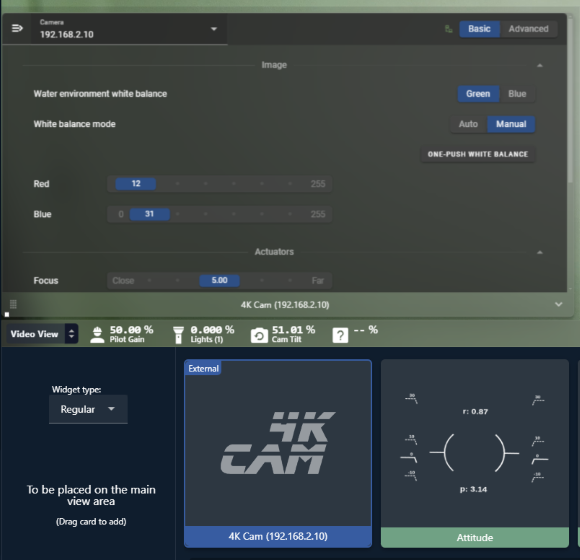
Add the 4K Cam Cockpit widget to your interface for direct access to 4K Cam controls and settings in Cockpit.
4K Cam Manager and settings
The 4K Cam BlueOS extension exposes camera settings and controls. This section covers all the features.
Top bar

1. Menu icon – use to access:
- Update Lua script
- Apply Recommended Camera Settings
- Reboot Camera
2. Camera selector – select between 4K Cams available on the network. Each 4K Cam must have a unique IP address. The default IP is 192.168.2.10.
3. Settings toggle – switch between basic and advanced settings. Most users won’t need advanced settings.
Image settings
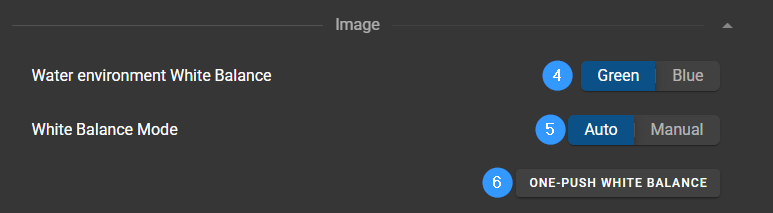
4. Water environment White Balance – choose the water color for manual white balance mode (one-push white balance). This setting does not affect auto white balance mode. The camera defaults to green at startup.
- Green – use for most conditions, including shallow water and areas near the seafloor or reef. This is also the right choice whenever the scene looks green, neutral, or only mildly blue.
- Blue – use in clear, deep, open water where the light and the entire scene takes on a strong, uniform blue cast.
5. White Balance Mode – controls how white balance is triggered. The camera defaults to auto mode at startup.
- Auto – the camera continuously attempts to correct white balance. Use only with good, consistent lighting, such as shallow water with bright sunlight or when using lights.
- Manual – white balance only occurs when one-push white balance is triggered.
6. ONE-PUSH WHITE BALANCE – initiates white balancing. The image is white balanced according to the current environment. If lighting changes—for example, moving up or down the water column—trigger white balance again to adjust. One-push white balance can also be controlled via controller button functions in Cockpit.
- Triggering one-push white balance while in Auto mode will change the white balance mode to manual.
Actuators
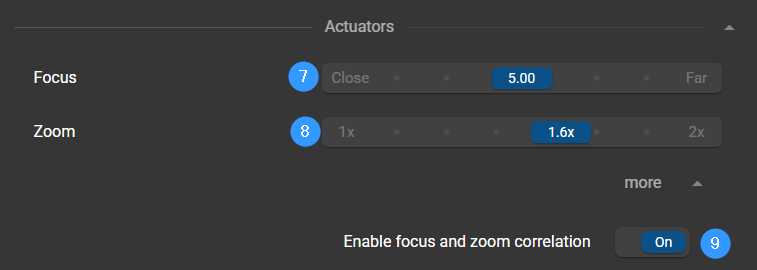
7. Focus slider – displays the current focus setting. Move the slider to adjust focus. Focus is also controlled via controller button functions in Cockpit.
8. Zoom slider – displays the current zoom setting. Move the slider to adjust zoom. Zoom is also controlled via controller button functions in Cockpit.
9. Enable focus and zoom correlation – turns focus/zoom correlation on or off.
- With correlation on: you can adjust focus and zoom independently, but the camera automatically makes a coarse focal adjustment to hold the current focal distance when zoom changes. Fine focal adjustment may still be needed to bring the image fully into focus.
- With correlation off: focus and zoom operate fully independently—the camera makes no automatic adjustment to either one. Changing zoom will throw the image out of focus, and you’ll need to refocus manually.
Video settings
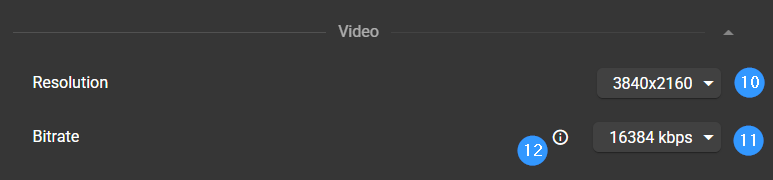
10. Resolution – choose between 4K resolution (3840×2160) or full HD (1920×1080).
11. Bitrate – choose video bitrate.
- A higher bitrate improves video quality but uses more network bandwidth and creates larger recorded video files.
- A lower bitrate reduces video quality but uses less network bandwidth and creates smaller recorded video files.
12. Bitrate options info – shows a chart comparing disk usage (in gigabytes per hour) across resolution and bitrate options.
Hardware setup
Expand this section to change the hardware configuration.
Operational tips
- At startup, the camera resets zoom and focus to a set point. You can adjust this point to your preference using the trim values in BlueOS:
- Set the camera zoom and focus to the point you want.
- In BlueOS, go to Vehicle Setup > PWM Outputs.
- For CameraFocus and CameraZoom (outputs 11 and 12 by default), set the Trim value to their current output values.
- Manual one-push white balance works best for most operating situations. Reserve Auto white balance for good, consistent lighting—for example, shallow water in bright sunlight, or when using your vehicle lights.
- Camera white balance and water color always reset to auto and green at startup, since most missions begin at the surface, where these defaults work best. From there, the typical sequence is:
- Start at the surface with the defaults: auto white balance and green water color.
- When you move into deeper water and auto stops correcting color accurately, trigger one-push white balance. The camera switches automatically to manual.
- Trigger one-push white balance again anytime the lighting changes or colors look off.
- Switch to blue water color if you’re in deep, blue water.
- Advanced camera settings are available through the camera’s self-hosted admin page:
- Default IP address: 192.168.2.10
- Password: blue