Upgrading a BlueROV2 from Companion to BlueOS

BlueOS is the latest and greatest onboard vehicle management software for the BlueROV2. It replaces the old Companion software system shipped on BlueROV2s from 2016 to 2022.
BlueOS 1.3.1 brings full compatibility with Raspberry Pi3 and Pixhawk hardware found in older BlueROV2 models, so now is a great time to upgrade your older BlueROV2 to make sure you continue to get feature updates and access to extensions. This guide will show you how to upgrade your BlueROV2 to BlueOS.
How do I know if I need to upgrade?
The R1, R2, and R3 versions of the BlueROV2 all used Companion software—these can be updated to BlueOS. If you have the R4 version of the BlueROV2, or have upgraded your ROV to the Navigator Flight Controller, you are already using BlueOS!
Preparing the SD Card
Upgrading to BlueOS is as simple as switching out the SD card in your ROV. To do that, you’ll need a microSD card with BlueOS on it. You can create the BlueOS SD card yourself, or you can purchase a pre-programmed BlueOS SD card here.
To create a BlueOS SD card:
1. Select a good quality micro SD card to use.
- Class A1 (Application Performance Class) recommended, class A2 is better.
- At least 8GB storage but 16GB to 128GB is preferable.
You can use the SD card that is already in your ROV, just keep in mind that all the data will be overwritten and you will not be able to use it to go back to Companion if you do.
You will also need an SD card reader/writer if your computer does not have one built in.
2. Download the latest stable version of BlueOS for Raspberry Pi 3B/4B from this link. BlueOS will download in a compressed folder, do not extract the contents of the folder.
3. Download and install Balena Etcher.
4. Insert the SD card into the card reader/writer and open Balena Etcher. Choose Flash from file and select the BlueOS image you downloaded.
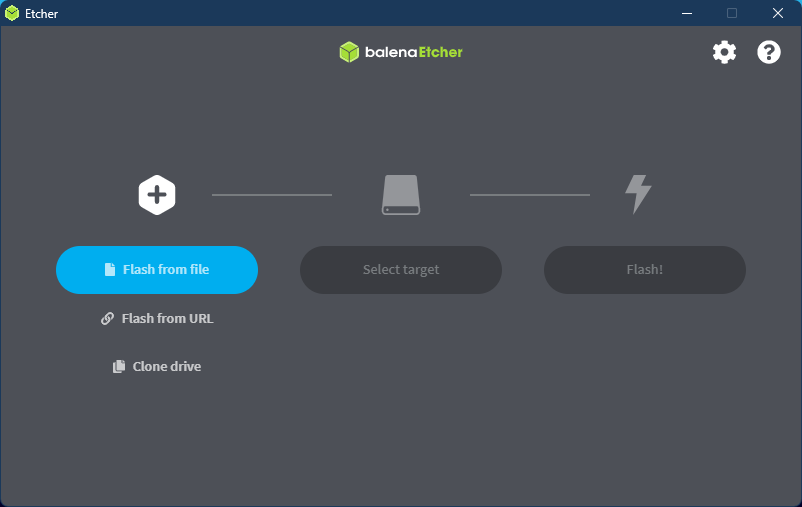
Select the SD card as the target then click Flash!
The process will take a couple of minutes. When it is finished the SD card is ready to install in your ROV.
Installing the SD Card
You’ll need to open your BlueROV2 to access the SD card. To do this you will need:
- 2.5 mm hex driver
- A set of tweezers is also very helpful
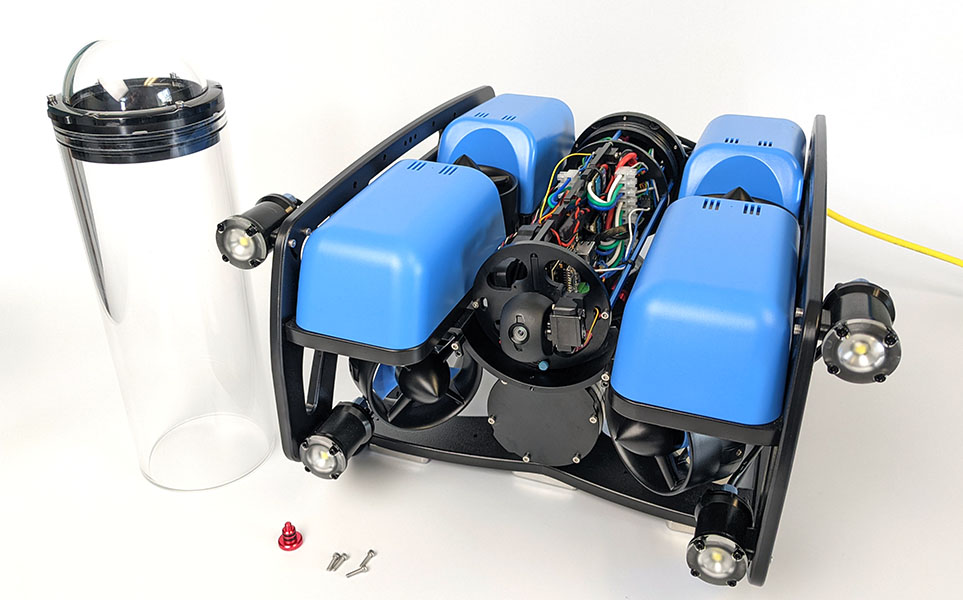
1. Use the 2.5 mm hex driver to remove the four M3x16 screws that secure the Electronics Enclosure mounting clips to the enclosure cradles and set them to the side.
2. Remove the Electronics Enclosure vent plug from the vent bulkhead and set it to the side.
3. Remove the Electronics Enclosure tube from the Electronics Enclosure assembly.
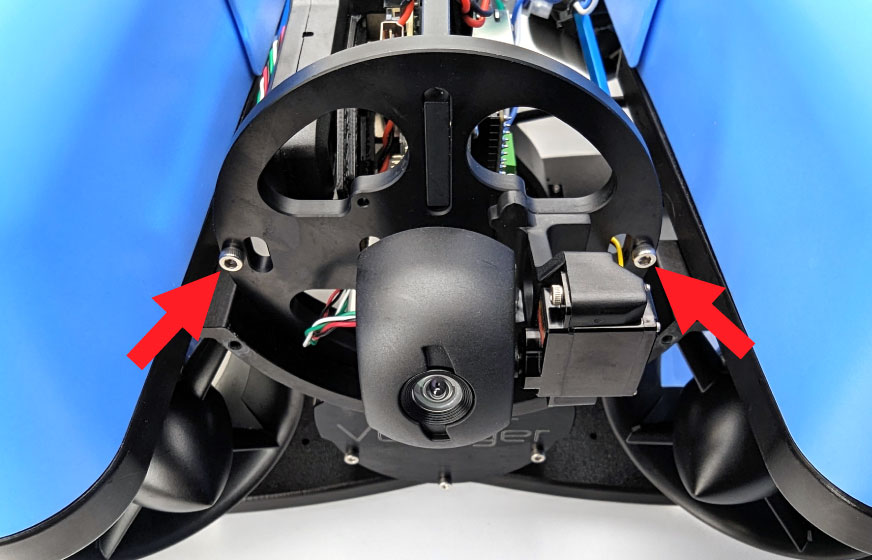
4. The SD card is located in the Raspberry Pi, behind the camera assembly tray. Use the 2.5 mm hex to remove the two screws shown below. Let the tray hang down but don’t pull on the wires too much.
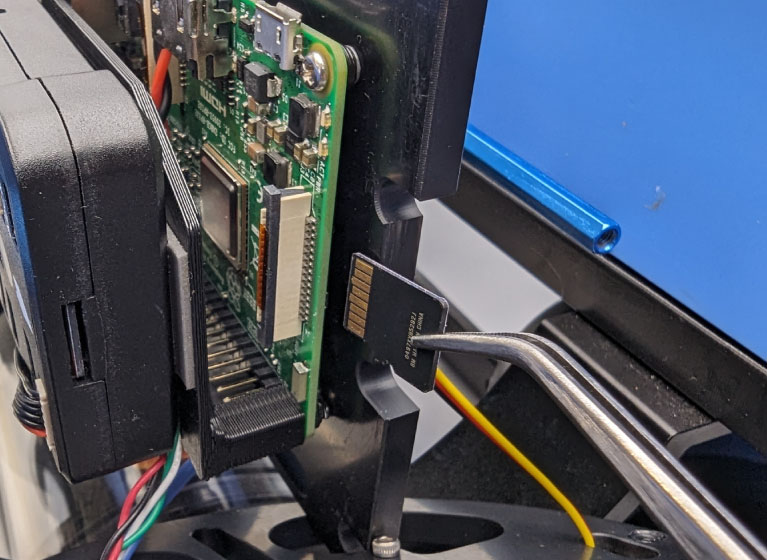
5. Use the tweezers to pull out the SD card from the bottom of the Raspberry Pi and install the BlueOS SD card. The SD card metal contacts should face up towards the Raspberry Pi.
6. That’s it! Reinstall the camera tray assembly and tube and your ROV is ready to run BlueOS.
Software Setup
BlueOS uses the same network settings to connect to the ROV, so if you haven’t changed your network then you should be able to connect right away. Otherwise, if you haven’t set up your network settings, follow the network setup instructions here then come back to this guide.
1. Power on the BlueROV2 and connect it to your computer.
2. Access BlueOS by typing the IP address 192.168.2.2 or blueos.local in a web browser address bar. The very first boot with a new SD card may take a few minutes to fully load. If the page does not load right away, give it a few minutes and try again.
3. If this is the first time booting up BlueOS, you should be welcomed by the setup wizard. Go ahead and follow the instructions to connect to the internet.
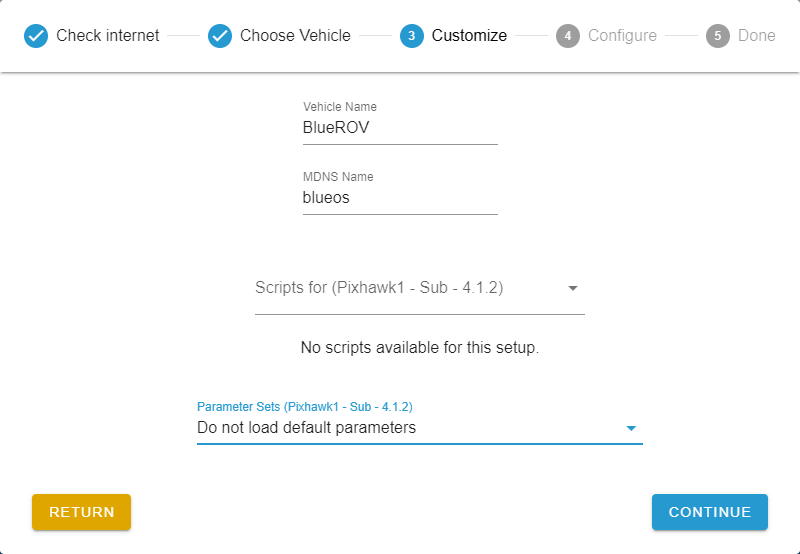
4. Choose the BlueROV2 vehicle option. On the next screen you can give your ROV a unique name and change the MDNS name.
- The MDNS name is the hostname that you can use to access BlueOS instead of the IP address. For example, if you change the MDNS to “myrov”, you would access the ROV by typing in “myrov.local” into the address bar. The default MDNS is blueos.local.
Choose Do not load default parameters to leave your current Pixhawk parameter settings intact. You should only choose to load default parameters if you know your parameters are incorrect and want to reset them.
5. The wizard will finish by updating ArduSub firmware. After this you are all set to start using your BlueOS powered ROV!
BlueOS has many new tools and features to help you along your underwater explorations, you can read more about these in the BlueOS documentation here.
