
Installing the BlueBoat Cellular Modem
The BlueBoat Cellular Modem adds 4G LTE connectivity to your BlueBoat, letting you stay connected anywhere with cellular coverage.
The typical bandwidth of a cellular connection makes it ideal for:
- Viewing telemetry
- Monitoring and updating missions
- Issuing commands
- Other low-bandwidth tasks
It’s not recommended for high-bandwidth payloads or video streaming due to slower speeds and potentially high data costs.
The modem does not replace the standard 2.4 GHz radio system used with the BaseStation. It installs separately and can be used alongside it:
- Use it as a backup connection when the BlueBoat goes beyond radio range.
- Or make it the primary connection for long-range or remote deployments.
This guide walks you through installing and configuring the BlueBoat Cellular Modem.
Choosing a Cellular Service Provider
This kit includes a Hologram SIM card for convenience. Hologram simplifies global cellular connectivity by partnering with hundreds of cellular carriers worldwide. You can activate the SIM instantly and get online anywhere Hologram provides coverage. However, you’re free to use any cellular provider you prefer. We recommend comparing data rates and coverage to choose what works best.
Kit Contents
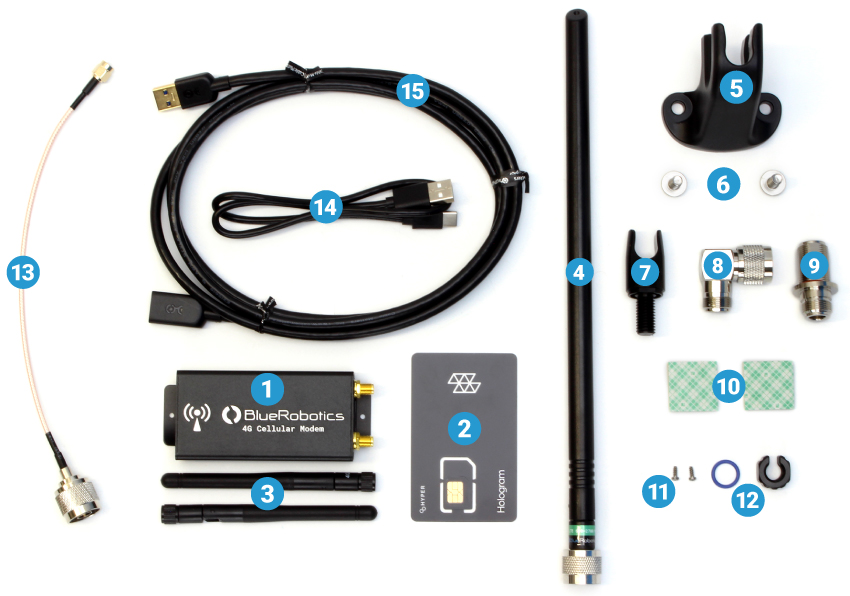
- 1 x Cellular modem
- 1 x Hologram global IoT SIM card (BR-103506)
- 2 x Internal antenna (only one used for installation)
- 1 x 4G LTE external omnidirectional antenna
- 1 x Antenna guard (BR-101311)
- 2 x M6x14 flanged button head screw (BR-101259)
- 1 x Antenna clip (BR-101346)
- 1 x N-type 90° connector (BR-101323)
- 1 x N-type antenna bulkhead (BR-101324)
- 2 x Double sided mounting tape (BR-100149)
- 2 x M2.2×6 button head thread forming screw (BR-103509)
- 1 x M10 bulkhead nut & -013 O-ring (BR-100167-010)
- 1 x N-type to SMA cable (BR-103494)
- 1 x USB-C cable
- 1 x 6′ USB extension cable (BR-103510)
- 2 x 8.5″ cable tie (not pictured, BR-102154)
Parts and Tools for Installation
In addition to the cellular modem kit you will need the following tools:
- Silicone grease (Molykote 111)
- 1 x 2.5 mm hex (included with BlueBoat)
- 1 x 4 mm hex (included with BlueBoat)
- 1 x Adjustable wrench, or the following wrench sizes if you have them available:
- 16 mm
- 19 mm, deep socket
- 20 mm
Hardware Installation
The modem is installed in the port side hatch lid. Make sure the BlueBoat power switch is in the off position before starting installation.
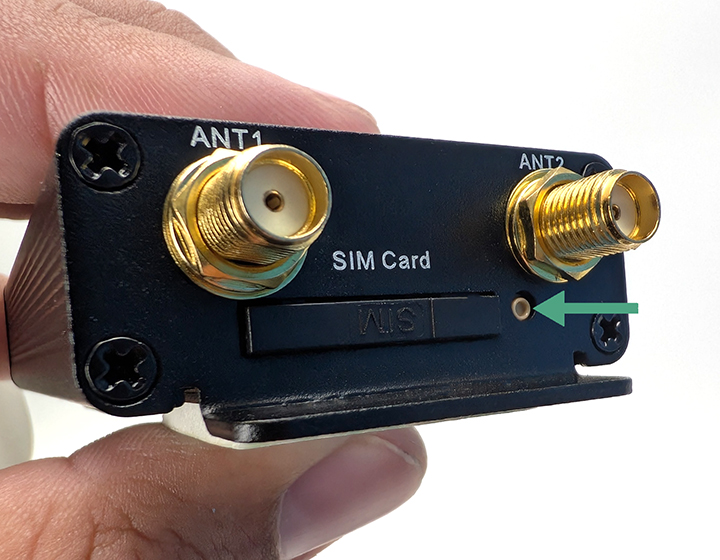
Installing the SIM Card
You’ll want to install your SIM card in the modem before installing the modem in the BlueBoat.
1. Use a paperclip or similar to push the little button to eject the SIM tray from the modem.
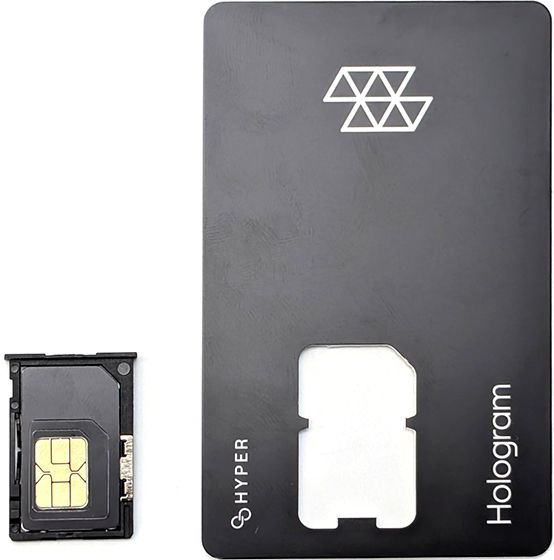
2. Remove the SIM card from its card holder. The modem uses the largest (standard) SIM card size.
- Use the included Hologram SIM card or a different SIM card if you’re using your own provider.
- Place the SIM in the tray with the metal contacts facing up.
3. Insert the tray back in the modem and set it to the side, we’ll come back to it in a bit.
Installing the Cellular Modem
For this section you’ll need:
- 1 x Cell modem with SIM card installed
- 1 x USB-C cable
- 1 x Internal antenna
- 2 x double sided mounting tape
- 2 x Cable tie
- 1 x 2.5 mm hex
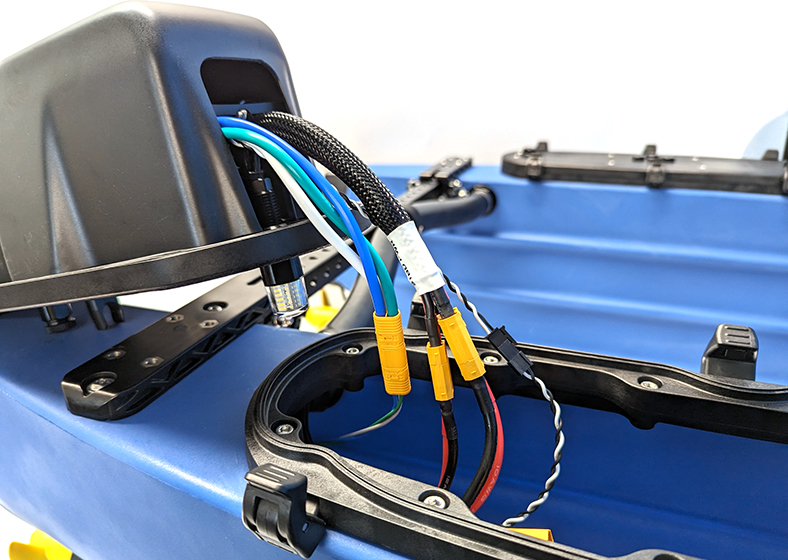
1. Remove the port side hatch lid assembly from the BlueBoat by disconnecting all the cables.
2. Remove the cover from the port hatch lid assembly by unscrewing the thumb nut.
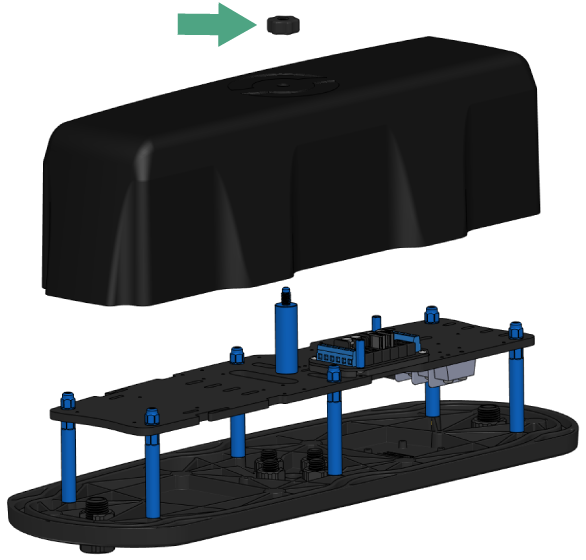
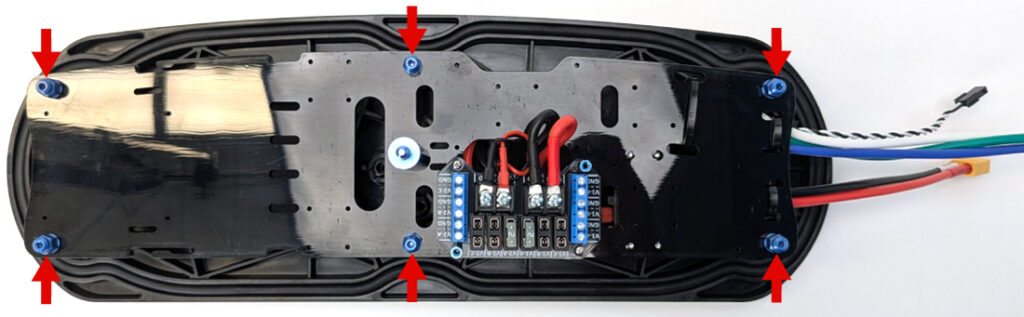
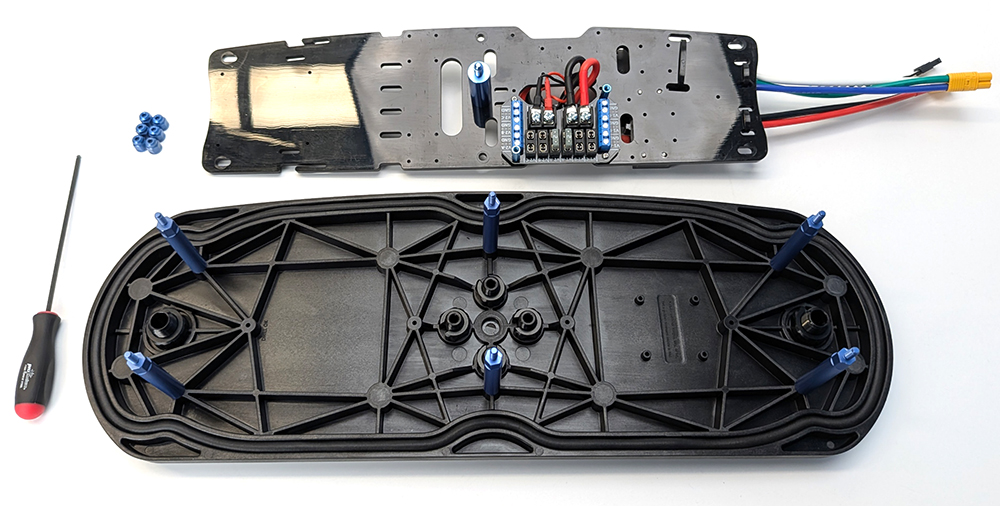
3. Use the 2.5 mm hex driver to remove the six hex nuts from the electronics tray (on older boats these will be flange head screws). You can now separate the electronics tray from the lid to work on it separately.
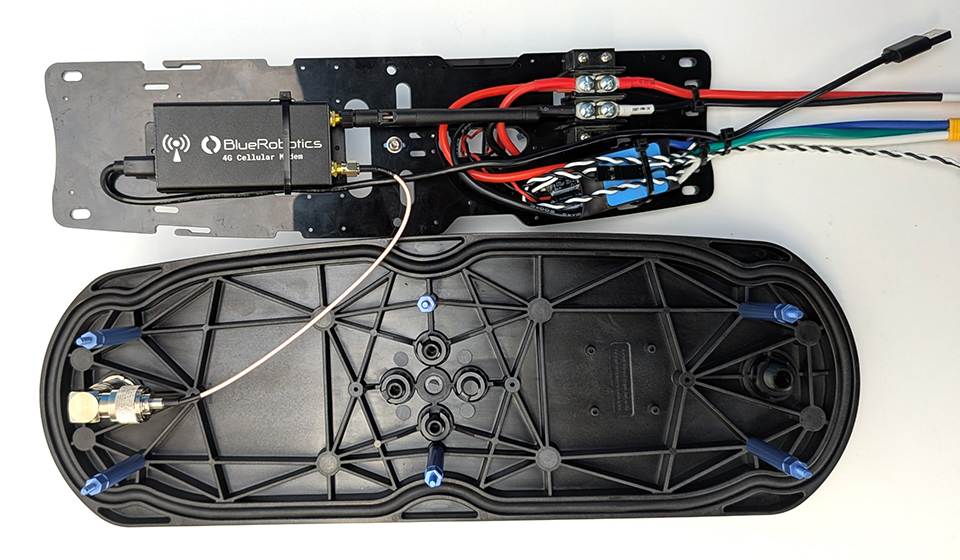
4. Take the cell modem and stick two pieces of mounting tape to the bottom of it.
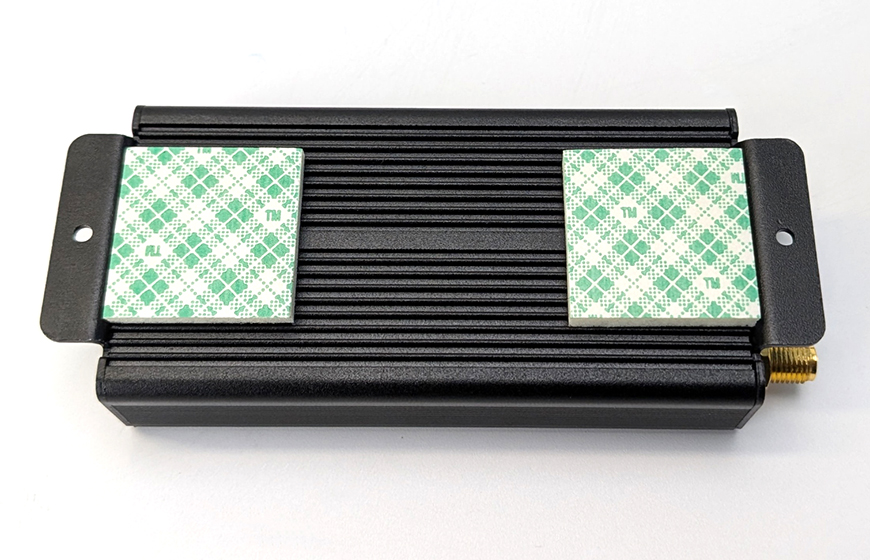
5. Stick the modem to the electronics tray on the same side as the ESC. Use the cut out as a reference point to line up the bottom edge of the modem.
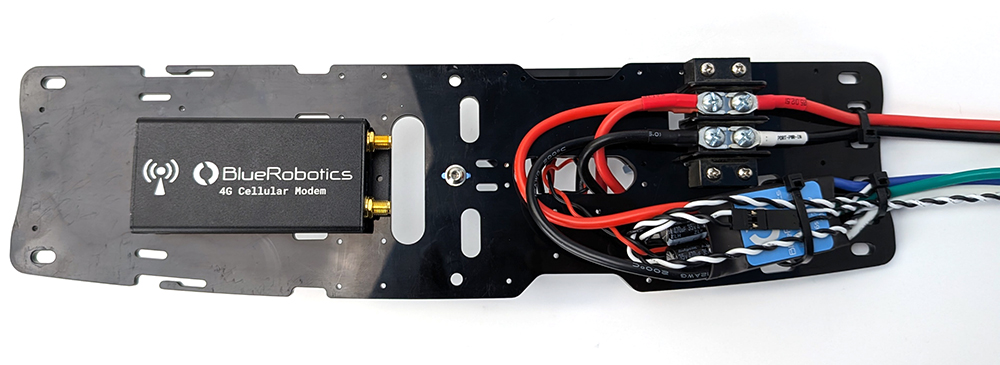
6. Take the USB-C cable from the box the modem was in and connect it to the modem. Route the other end so it runs next to the other cables. Use one cable tie to secure the modem and USB cable to the electronics tray and use the other cable tie to secure the loose end of the USB cable to the other cables.
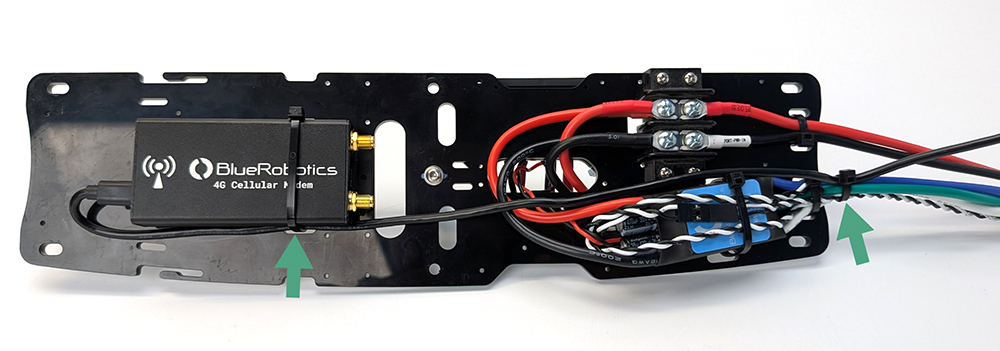
7. Take one of the small internal antennas included with the modem box and connect it to the ANT2 connector. The other small antenna is not used.
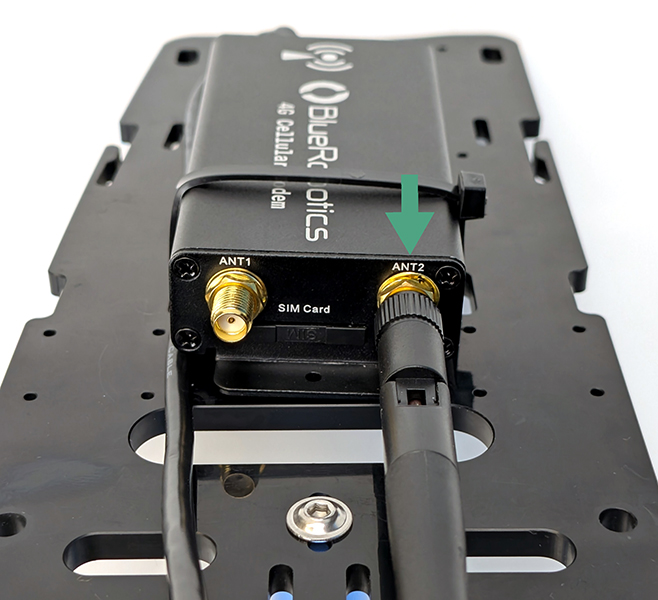
Set the electronics tray to the side while we work on the hatch lid.
Installing the External Antenna
For this section you will need:
- 1 x 4G LTE external omnidirectional antenna
- 1 x Antenna guard
- 2 x M6x14 flanged button head screw
- 1 x Antenna clip
- 1 x M10 bulkhead nut & -013 O-ring
- 1 x N-type 90° connector
- 1 x N-type antenna bulkhead
- 1 x N-type to SMA cable
- Silicone grease
- 1 x 4 mm hex
- 1 x Adjustable wrench, or the following wrench sizes if you have them available:
- 16 mm
- 19 mm, deep socket
- 20 mm
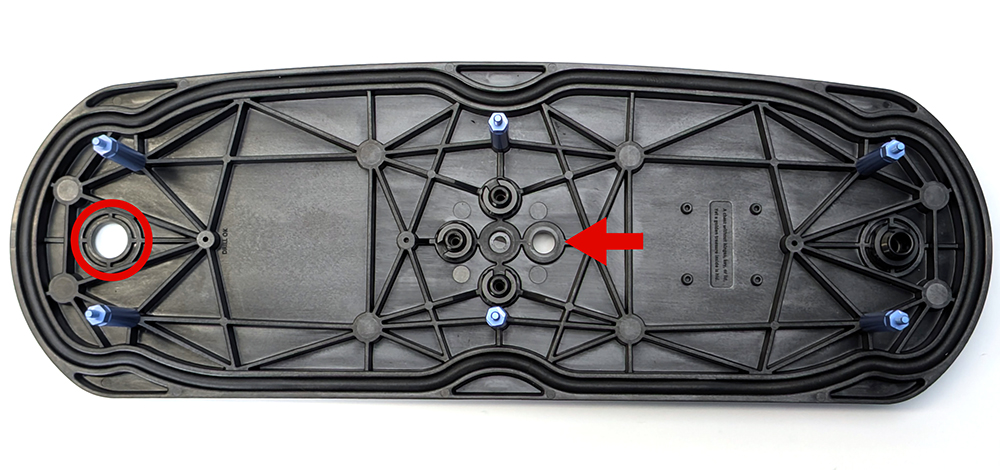
The 4G antenna is installed on the port side hatch lid. Where you mount the external antenna on the hatch lid depends on which version of the BlueBoat you have:
- Newer BlueBoats: The antenna can be installed in either the front or back lid hole (right side in the photo).
- Older BlueBoats: The antenna can only be installed in the larger lid hole closest to the back of the lid (left side in the photo).
To tell which version you have, check the area around the blank bulkhead penetrators in the middle of the lid:
- Newer lids have a diamond-shaped area with no texture around the penetrators.
- Older lids do not have this diamond shape.

1. Use the information above to determine the correct antenna mounting location, then use an adjustable wrench or 20 mm wrench to remove the blank bulkhead penetrator from that hole.
2. Use an adjustable wrench or 16 mm wrench to remove the blank penetrator in the center of the lid that is farthest from the hole you just opened.
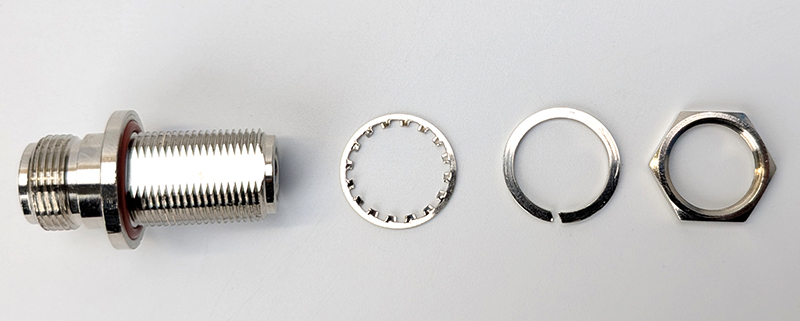
3. Remove the plastic caps from the N-type antenna bulkhead, then remove the two washers and the nut.
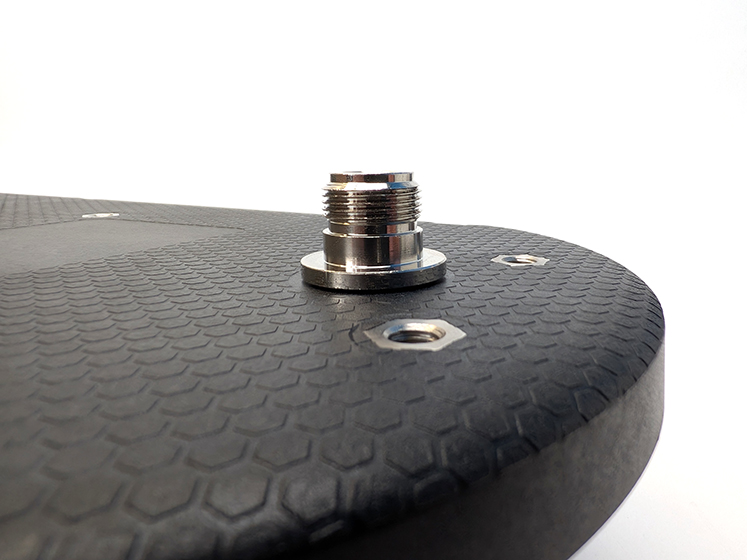
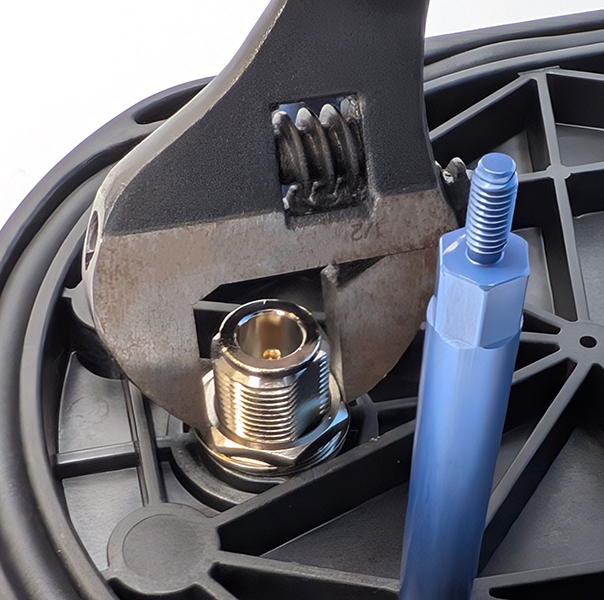
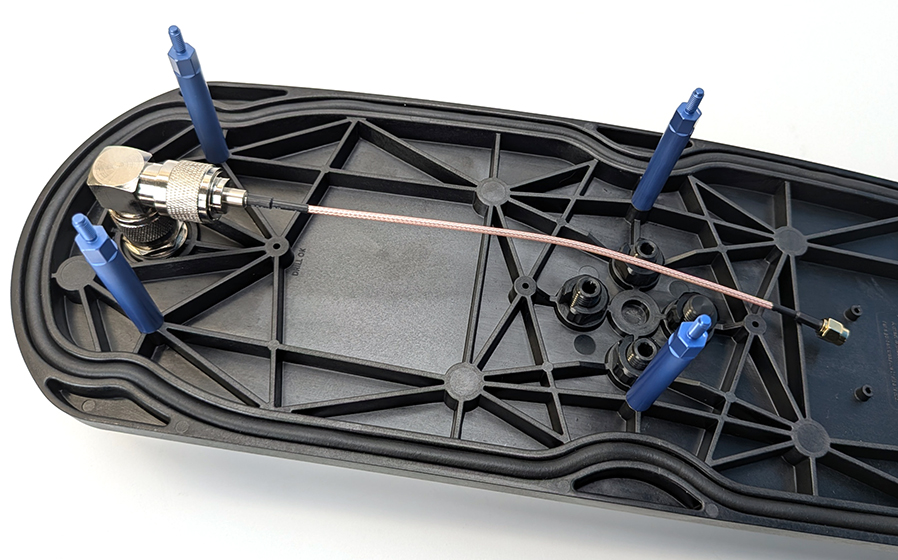
4. Apply a thin layer of silicone grease to the O-ring on the underside of the antenna bulkhead, then install the bulkhead in the larger hole. Insert it so the O-ring sits against the top of the lid. On the underside, install the tooth washer, split lock washer, and nut (in that order), then use an adjustable wrench (or a 19 mm socket, if you have one) to fully tighten it. The bulkhead should be snug and should not rotate by hand when properly installed.
5. Apply silicone grease to the -013 O-ring and install it in the underside of the antenna clip. Insert the antenna clip into the smaller hole, fasten it from the underside using the bulkhead nut, and tighten with an adjustable wrench or 16 mm wrench. You can connect and clip in the antenna during this step to ensure it’s aligned correctly while you secure it.
6. Install the 90° connector and N-type to SMA cable to the antenna bulkhead.
7. Connect the SMA cable cable to ANT1 connector on the modem.
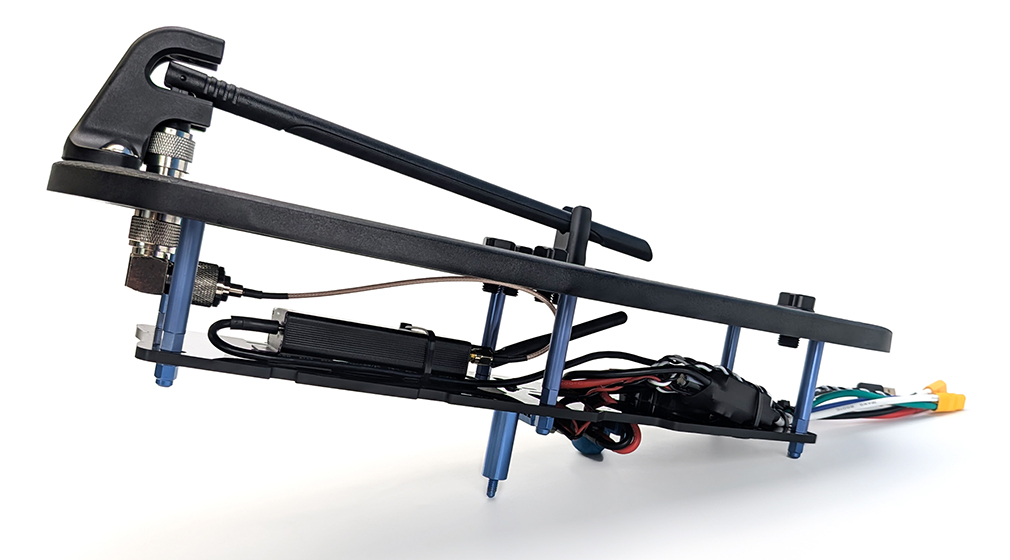
8. With all the connections complete, Install the electronics tray back on the lid standoffs.
9. Install the cellular antenna to the connector if you haven’t connected it already and clip it into the antenna clip.
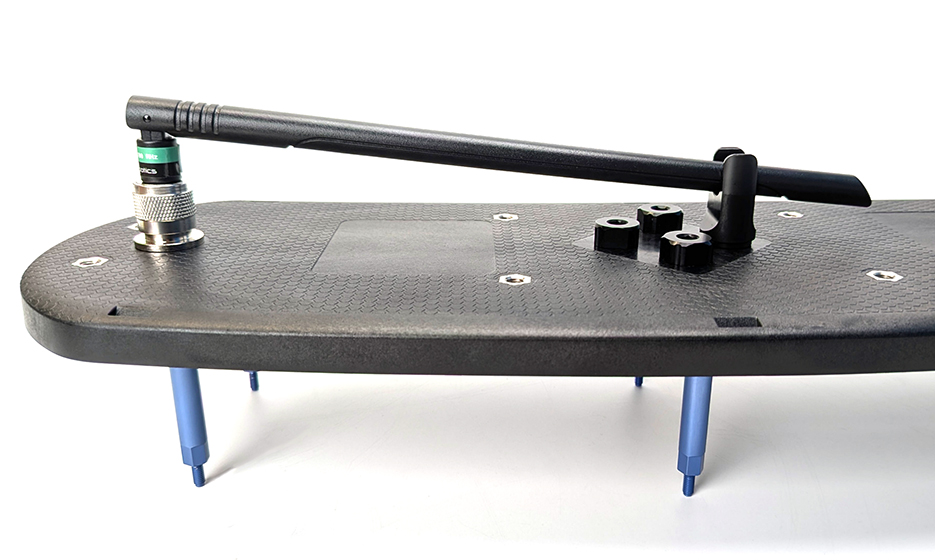
10. From the front of the antenna, push the antenna guard onto the antenna—it’s a tight fit. Once in place, use a 4 mm hex driver and two M6x14 screws to secure it.
The assembly should now look similar to this. If you have the older lid type, the antenna will be on the other end of the lid. You can now put the cover back on.
Routing the USB Cable and Final Connections
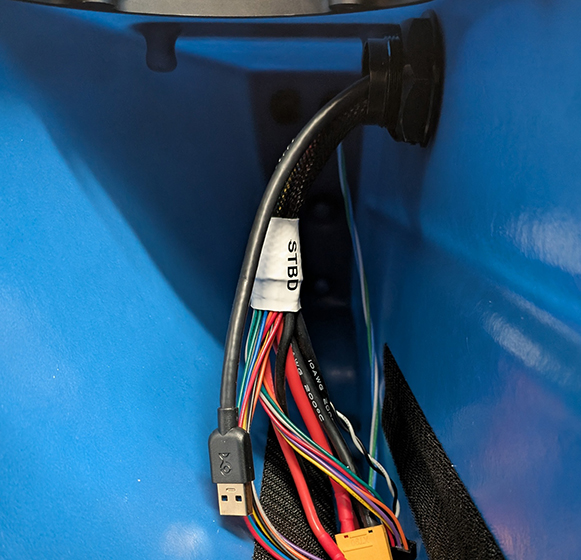
1. Route the 6-foot USB extension cable through the cross tube to connect the modem to the Raspberry Pi in the starboard hatch.
- The male end of the USB cable should be on the starboard side.
- Leave about 1 foot (~30 cm) of extra cable length on the starboard side compared to the port side.
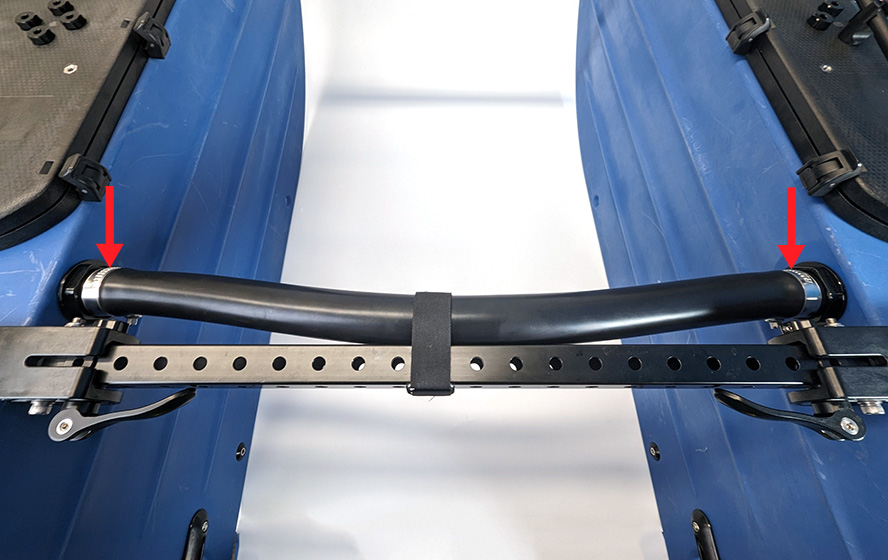
If routing the cable is difficult, you can loosen the hose clamps to temporarily remove the cross tube. Using a wire clothes hanger or electrician’s fish tape can also help guide the cable through the tube more easily.
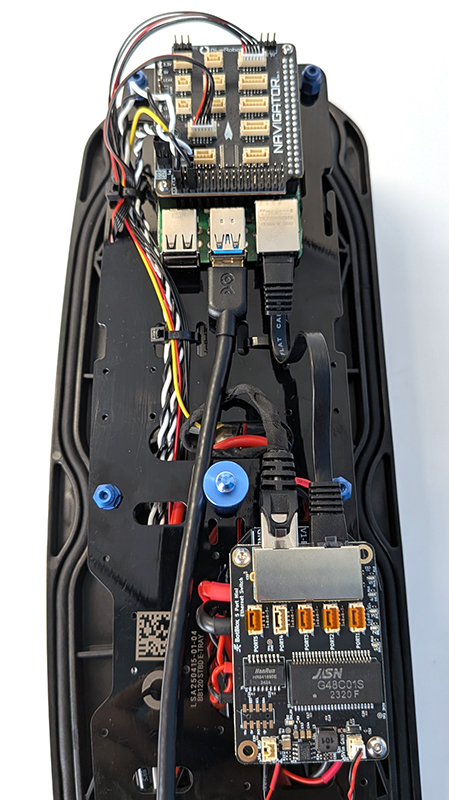
2. Take the cover off of the starboard hatch lid assembly and connect the USB cable to a USB port on the Raspberry Pi.
3. Finish the assembly by connecting the USB cable on the port side and reinstalling both hatch lids onto the BlueBoat.
Software Setup
This section will walk you through setting up all the necessary software components on your computer and the BlueBoat. Before you begin, complete the steps below:
1. Connect a battery, power on your BlueBoat and BaseStation, and connect the system to your computer. If you’re not sure how to do this, check out the BlueBoat Software Setup guide first.
2. Access BlueOS (the BlueBoat’s operating system) by typing 192.168.2.2 or blueos.local into a web browser’s address bar.
3. Connect the BlueBoat to a Wi-Fi network.
4. Make sure you’re running BlueOS version 1.1.0 or later. Installing extensions requires at least version 1.1.0. If your system is out of date, follow these instructions to update BlueOS then come back to this guide.
Setting up Hologram
The Cellular Modem kit includes a Hologram SIM card to help you get started quickly. If you plan to use Hologram, this is a good time to create an account and activate your SIM. Hologram’s help center covers both:
If you are using a different cellular provider, you can activate that SIM now instead.
Setting up Zerotier
ZeroTier is required to connect to the BlueBoat over a cellular connection. It creates a secure, private network over the internet, allowing devices to communicate as if they were on the same local network. It’s free for personal use and simple to set up.
1. Create a ZeroTier account and install the ZeroTier client on your computer. ZeroTier must be installed on a computer in order to connect to it with the cellular modem.
2. In a web browser, log into your ZeroTier account, you should be taken to your account dashboard.
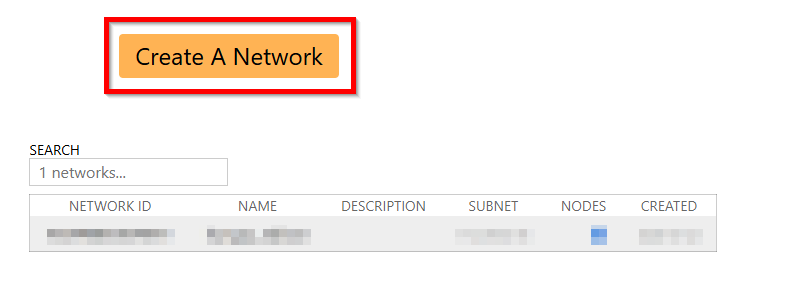
- Click on the Create A Network button, you’ll see a new network added to the networks list.
- Click on the network to go to the network details page.
- The most important piece of information here is the Network ID, which we’ll need later.
- The network name is randomly generated, you can change it if you want to personalize it.
- Leave all the other settings at their defaults.
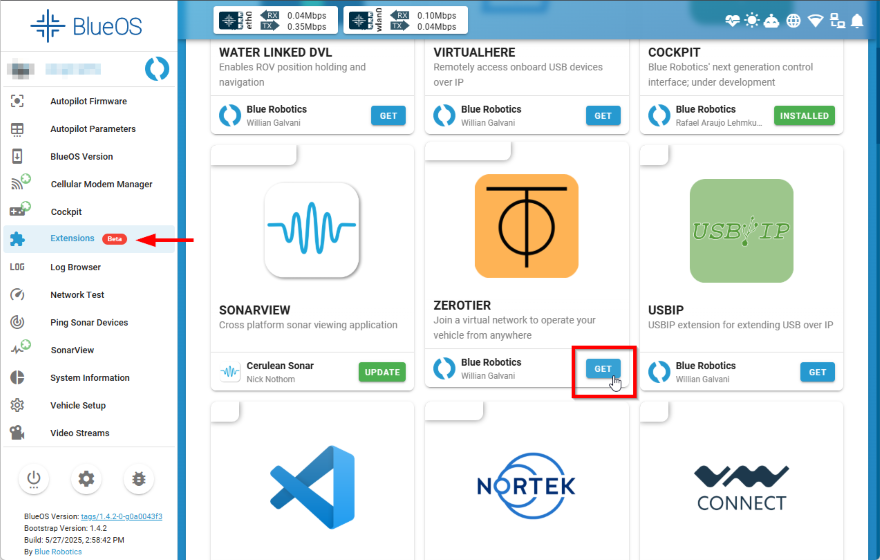
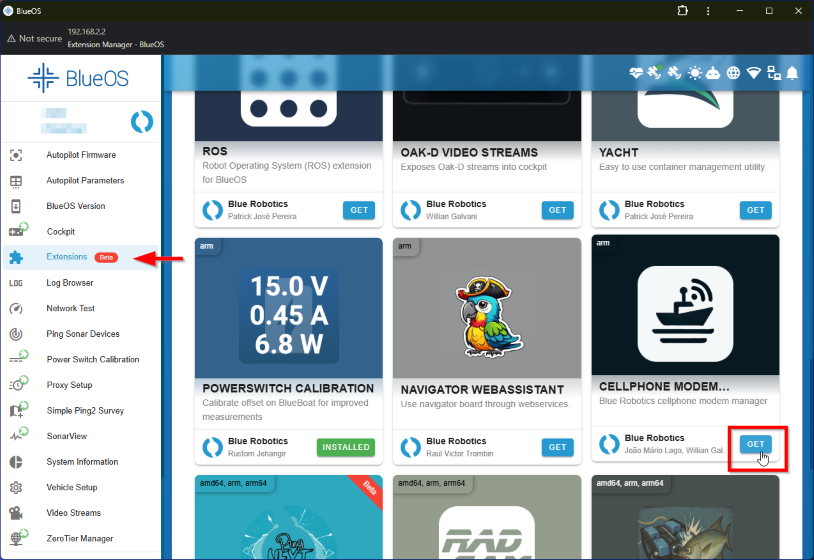
3. In BlueOS, go to the Extensions menu and install the ZEROTIER extension. After the extension is installed, ZeroTier Manager will appear in the left sidebar. Click it to launch it.
4. Copy your Network ID from ZeroTier and paste it in the Network ID section in the ZeroTier manager extension, then click Join.
- You should see a confirmation that you have joined.
- The status may show ACCESS_DENIED; we’ll fix this in the next step.

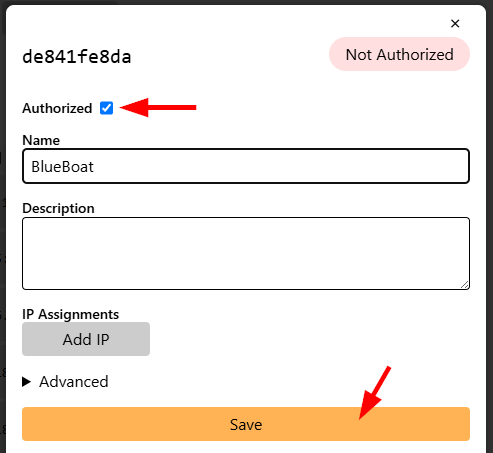
5. Go back to your ZeroTier dashboard and open the network details page. You should see a new “member” added to the list—this is the BlueBoat.
- Click on the edit icon. On the next screen give it a name so you can tell what it is and enable the Authorized checkbox.
- Click on Save to confirm.
6. Open the ZeroTier client on your computer (it runs in the system tray on Windows/macOS). Select Join New Network from the menu and paste the same network ID to join the network.

7. Go back to the account dashboard and repeat the same process to give your computer a name and authorize the connection.
8. Once all devices are authorized, they’ll each be assigned a Managed IP address. This is the IP address you will use to access each member/device on the ZeroTier network.
If you need more information about setting up ZeroTier, refer to the getting started guide.
Creating a MAVLink Endpoint
To enable communication with the BlueBoat over ZeroTier, you’ll need to create a new MAVLink endpoint that points to your computer’s ZeroTier-managed IP address. It’s best to do this from the same computer you’re connecting to.
1. Copy the BlueBoat’s ZeroTier-managed IP address and paste it into the web browser address bar, this will open up BlueOS.
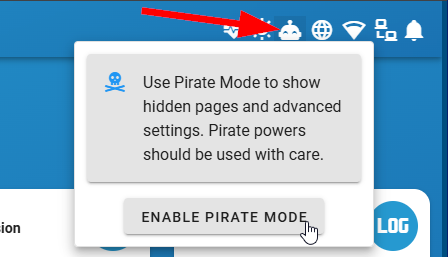
2. Enable Pirate Mode by clicking on the happy robot icon in the top right corner.
3. Click on MAVLink Endpoints from the left sidebar, then click on the plus icon in the bottom right corner to create a new endpoint.
4. Give this new endpoint a name, if you like, and set the Type to UDP Client.
- If you’re accessing BlueOS from the same computer you’re targeting and you’re using the BlueBoat’s ZeroTier-managed IP to connect, the IP/Device field will autofill with the correct address.
- Otherwise, in the IP/Device field, enter your computer’s ZeroTier-managed IP address. Note: your address will be different than what is shown in the picture.
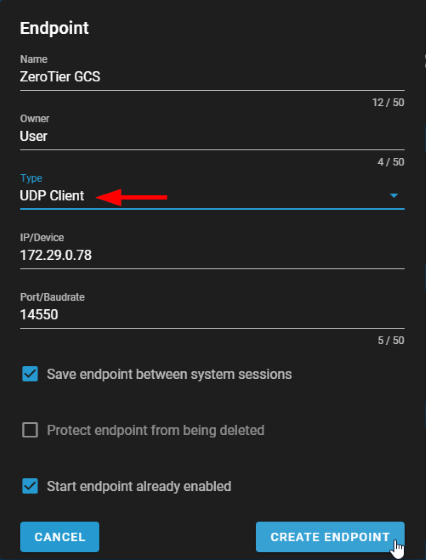
Click on CREATE ENDPOINT to save.
Configuring the Modem
1. In BlueOS, go to the Extension menu and install the Cellular Modem Manager extension. After the extension is installed, it will appear in the left sidebar—click it to launch.
2. On the next screen, the modem will show up as Quectel / EG25-G. Click it.
3. Toggle Enable Modem on, then switch to the INTERNET tab and click the edit icon.
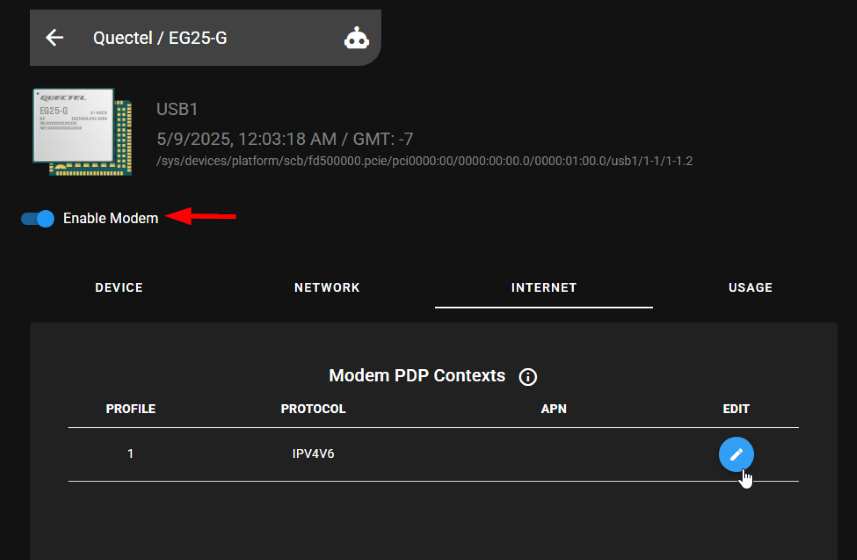
4. Here you will enter the APN (Access Point Name) for your cellular provider. Enter it and click CONFIRM.
- If you are using the included Hologram SIM, use: hologram
- If you are using a different cellular provider, enter that provider’s APN. If you don’t know it, follow the tips below to help find it.
Where to find your APN:
- Check your cellular provider’s website or support page – Search for “APN settings” + your provider’s name.
- Look in your cellular account portal – Some carriers list APN details under device, SIM, or network settings.
- Contact customer support – If it’s not listed online, support can usually provide it quickly.
- APN is the standard term, but some providers may refer to it as part of “cellular data settings”, “mobile network settings”, or “SIM network configuration.”
- If you’re using a data-only or IoT-specific SIM, make sure you’re using the APN specific to that service—it’s sometimes different from their consumer/mobile APN.
5. Switch to the NETWORK tab to view the connection status. Once the modem is connected, you’re ready to test.
Testing the Network Connection
1. Check all of the following:
- In the Cellular Modem Manager extension, confirm the modem is enabled and the cellular network is connected.
- In the ZeroTier extension, check that the status is OK.
- On your computer, open the ZeroTier client and confirm it’s connected to the network.
- Make sure your computer has internet access.
2. Disconnect BlueOS from any Wi-Fi networks.
3. Turn off the BaseStation.
4. In a web browser, enter the BlueBoat’s ZeroTier-managed IP address. If the cellular connection is working, BlueOS should load.
5. Launch QGroundControl. The BlueBoat should automatically connect over the cellular network.